Migrating to Ansible Collections Webinar

Migrating to Ansible Collections (Webinar Q&A)

Sean Cavanaugh, Anshul Behl and I recently hosted a webinar entitled "Migrating to Ansible Collections". Here is a link to the on-demand webinar replay. This webinar was focused on enabling the Ansible Playbook writers, looking to move to the wonderful world of Ansible Collections in existing Ansible 2.9 environments and beyond.

The webinar was much more popular than we expected, so much so we didn't have enough time to answer all the questions, so we took all the questions and put them in this blog to make them available to everyone.

I would like to use Ansible to automate an application using a REST API (for example creating a new bitbucket project). Should I be writing a role or a custom module? And should I then publish that as a Collection?

It depends on how much investment you'd like to make into the module or role that you develop. For example, creating a role that references the built-in Ansible URI module can be evaluated versus creating an Ansible module written in Python. If you were to create a module, it can be utilized via a role developed by you or the playbook author. Sometimes a standalone role may be preferred, depending on the exact functionality or requirements for interfacing with the REST API endpoint. Overall it is important to keep a clean resource/module mapping, and avoid as much as an operation/module. There is no right or wrong answer here unfortunately ("it is in the eyes of the Ansible beholder"), regardless an Ansible module and/or an Ansible role can be developed and then included into a Collection for use in Ansible playbooks.  Collections are the standard way for distributing Ansible Content, which includes both roles and modules.

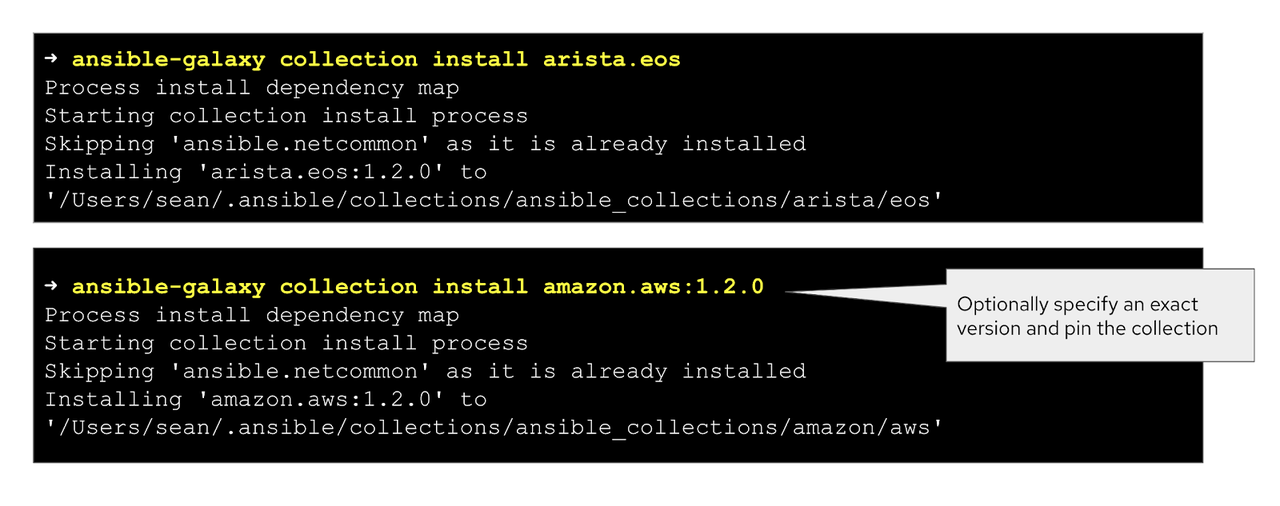
When will we be able to install Collections using a requirements.yml file in an offline environment? Roles seem to work with Git repositories as upstream, but for Collections, it does not seem to work yet and I always want to look online to galaxy.ansible.com. That is, can I use a GitHub URL (like in roles)?

You can point the ansible-galaxy CLI client to pull Collections from different sources, please check out the following documentation page. Please note that pulling Collections from GitHub (or other sources) would not be officially supported as part of the Ansible Automation Platform. It would be best, even with using Community Collections, to install from Ansible Galaxy.

Certain modules require additional Python packages, for example pyvmomi for VMware modules. Will Collections at some point be able to include this Python code to make it work?

In the future we will have a containered technology called Ansible Execution Environments, which is an abstraction layer above Collections, allowing for operating system-level components to be installed. There were some talks about this at AnsibleFest, and a blog talking about Ansible Builder, but the current answer is venv's but Soon(tm) will be Execution Environments.

When will ansible-doc be able to show docs for a Collection? Using ansible-doc with a FQCN does not work yet.

ansible-doc works FQCN currently; check the verbose logs to see if there are some issues discovering the Collection by ansible-doc. For example, the following command does function properly:

$ ansible-doc infoblox.nios_modules.nios_a_record

How will Ansible Execution Environments work together?

This topic is in a very active development stage at the moment and will be covered in upcoming blogs, webinars, and docs. Coming soon, but watch this space for more information.

Any particular resources for network automation? I have been struggling to create playbooks on non-standard network devices. I just feel that the online documentation is lacking from the network side.

Check out our Network Getting Started guide. The current Ansible connection plug-ins (like network_cli, netconf and httpapi) have enabled over 75 networking platforms to date. Also, using the cli_command and cli_config, generic modules could be of help. Take a look at github.com/ansible/workshops and see if that helps your searching. Also, reaching out to the network device vendor directly may help, as they may have private Ansible content available.

When will Ansible 2.10 be available for Red Hat Linux via yum?    

Ansible 2.10 will not be made available in RPM format downstream, please refer to the following link for more details: https://access.redhat.com/articles/5392421.

When would Collections be a hard requirement and deprecating the old way (2.9 or earlier)?

2.10 and newer require Collections, but if there was existing content in 2.9 migrated out, the current playbooks should just work as they are utilizing the global runtime.yml file as part of the 2.10 distribution. Hence why we are focusing on 2.9 + Collections to elongate the transition process.

To future proof can I implement this to 2.9 and use FQCN?

Yes, that should be fine, assuming the Collections were either migrated from Ansible 2.9 or tested against it if net-new.

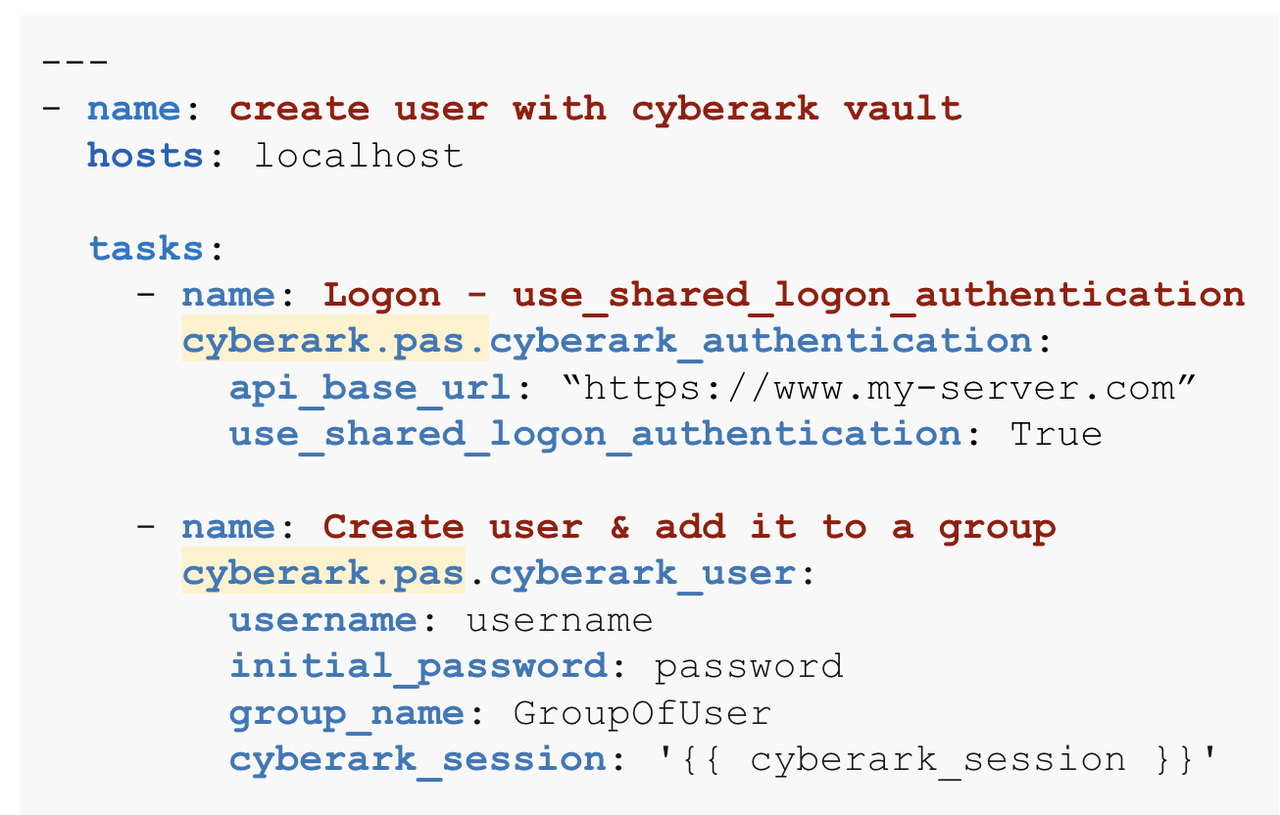
You can also just put collections: cyberark at the top of the playbook, right? Can you show what that looks like?

You would need to specify the specific Cyberark namespace.collection and not just the Cyberark namespace as you have stated. We also recommend against using the collections keyword and instead use the fully qualified collections name (FQCN) instead per task (see notes in the slides).

Using the collections keyword:

webinar Q&A blog 1

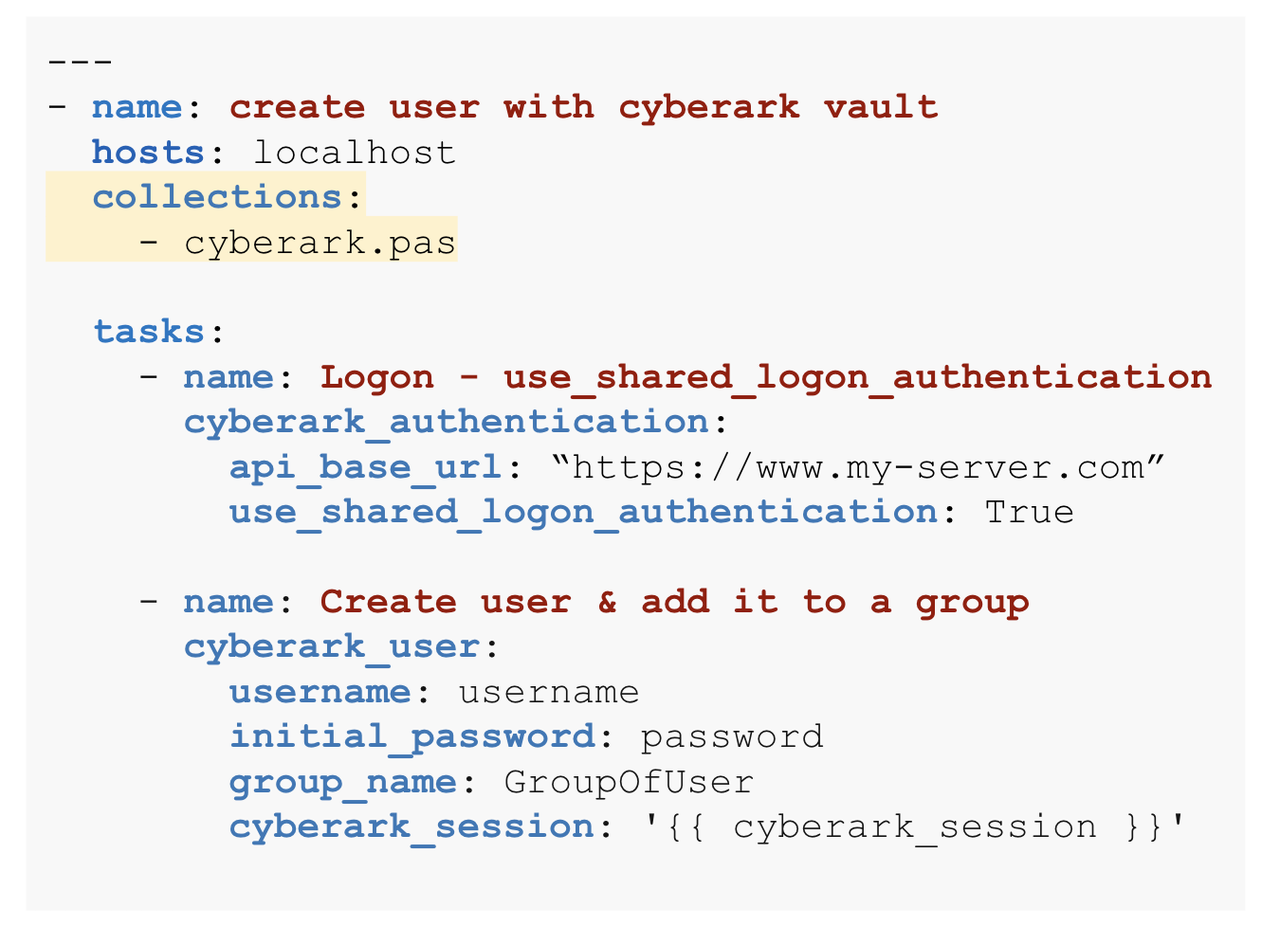
Using the recommended way FQCN (fully qualified Collection name):

Webinar Q&A blog 2

In our environment, we have customers that rely on cli's as the cli's get developed faster, example aws-cli. Do we anticipate vendors like AWS to contribute faster to the Collections side?

The Ansible Engineering team actually maintains all AWS Ansible content, and typically have a "CLI First" or "API First" mentality, but in general, participating vendors have been great about updating their Collections for new features!  One of the goals of Ansible Collections was for partners and certified content to move faster and asynchronously from Ansible Automation Platform releases, which means both the community and customers will get new content faster.

What site licenses are needed for access to Automation Hub?  

Any Red Hat Ansible Automation Platform subscription will provide access to the Automation Hub, and the ability to run a private Automation Hub in your environment.

When is the Ansible Execution Environment scheduled to be released?   

Tentatively the middle of next year (2021) as part of the product, but the pieces will start becoming available in an ongoing fashion upstream.

If all the modules are being moved out into Collections [ansible.builtin] etc., what is still part of the Base/Core?   

Well a few modules will still be in there, hence "builtin," but those still might move async. But there is a lot of code running the actual Ansible executable including how we do parallelism, constructs like conditionals, loops, blocks, etc, and much moren. Many of which are things that a lot of Ansible users don't really interact with (think of it like an engine in your car).

Is it possible to use multiple versions of a Collection within the same codebase? (ie list the version on the playbook level)

That is not an option currently, you cannot pin the Collection version in the playbook, this will most likely be ideal when using a venv or future execution environments.

Can the private Automation Hub be a repo in a binary repo like artifactory or nexus?

No, private Automation Hub leverages the same content types in cloud.redhat.com. Ansible Collection tarballs built and published to Automation Hub are decompressed and contents are shown.

Could I use Ansible Collections on CentOS8?

If Ansible 2.9 is installable on CentOS8 (or any other Linux distribution), then Collections can be utilized there.

Would Galaxy be deprecated or still working in the future? 

Galaxy is still the current place to publish and download Community Ansible Collections!

Ansible 2.9 doesn't support using private repos as placeholders for Collections, correct?

You can use private Automation Hub to point to a self hosted instance for your Collections and curate and control what your group has access to.

Is the private Automation Hub standalone or can it be clustered?

It's currently only available as standalone, but may be cluster-enabled in the future.

How does the FQCN use the Collection and not the regular mapped module (in 2.9)?

FQCN stands for fully qualified collection name and it will always point to a Collection and not a module inside the standard Ansible 2.9 installation, as they reside in different locations on the Ansible control node.

What's the difference between Execution Environments and the Container Isolated Groups which are in tech preview in Red Hat Ansible Tower?

Container Isolated Groups use the same execution principles. The easiest way to think about this is that you can consider container groups as being built on "Execution Environments v0.1." When Execution Environments are released, this will become far superior than container groups.

Is there a means to download the :latest Collection version? Or is that what you get automatically?

Latest version is pulled automatically, but you can specify the exact version as well. You don't need to use :latest - that's what you get automatically, assuming it doesn't have something like "-beta" or prerelease versions (using hyphens) as part of it, which are not considered GA releases (and skipped).

[webinar Q&A blog 3

For roles we write ourselves, is there or will there be a way to organize related roles as a Collection?

Multiple roles can be organized inside a Collection today as part of the /roles directory.

Everything I've seen about Collections has been how to use ones (from Galaxy or other sources). Is there any documentation/reference about how to write our own Collection?

Yes! Check out the Developer Guide

Will Automation Hub contain the official/prominent vendor modules. An example is a NetApp or Dell module.

Yes, it already contains that today, we have a certification program and we have certified content from a lot of vendors like Dell and Netapp. Automation Hub contains all supported and Certified Collections, there is a public KBASE that lists them, please check https://access.redhat.com/articles/3642632[.

If I choose to take a trial of Ansible Automation Platform, will it allow access to the Automation Hub?

Yes it will as part of the subscription; an Ansible Automation Platform subscription includes everything to trial, including all components and connectivity to services on cloud.redhat.com, and the Red Hat Customer Portal.

Is deleting a Collection from ansible-galaxy CLI coming soon, or do we still have to go into the Collections directory to manually delete it?

Right now, that is the only way to delete a collection.  You can overwrite a collection using the force flag.

Can we install the Collection somewhere besides the default ~/.ansible/collections?

Yes, you can put them anywhere, but make sure the control node knows where they are in the path. For example: ansible-galaxy install -p /path/to/collections namespace.collection and associated documentation.

Can I check the version of an existing Collection on my server?

The ansible-galaxy collection list command provides a list of Collections and versions for Ansible 2.10 and newer.

For adding a new host in RHV, I had to downgrade the last ansible version to 2.9.13 otherwise it did not work (a known bug by Red Hat). In which 2.9 version will the bug be solved?

Do you have a GitHub issue we can see? We can make sure to follow up. Bugs are usually tracked on GitHub Ansible project and the conversations there should help you understand a timeline.

What's the future path for users that have absolutely zero interest in things changing? I have been working toward changing department culture toward an automation friendly way of thinking for a year or two, and this will effectively put me back to square one, if not further back. Change resistant businesses don't like big changes just as they get ready to implement.

We think we have created a win/win scenario where customers and community members can now use Collections and get new content faster, while maintaining backwards compatibility with existing Ansible Automation.  While we encourage folks to start using Collections and writing Ansible playbooks with FQCNs, there will be a long period of time before customers are required to use them.  Red Hat does offer long term support options/offerings, so you are not forced to change for considerable time. Ansible 2.9 will be supported much longer than originally planned, for subscribing customers.

Is there a set of paths that Ansible will check for runtime.yml defined in base ansible?

Redirection rules currently follow a precedence, waterfall between the following two files:

  1. The built-in runtime.yml file as part of the Ansible distribution. In this example, the Ansible 2.10 built-in runtime.yml. This file is consulted first.
  2. The runtime.yml file as part of the actual Collection as the /meta/runtime.yml. This file is consulted next.


Introduction to Ansible Builder

Introduction to Ansible Builder

Hello and welcome to another introductory Ansible blog post, where we'll be covering a new command-line interface (CLI) tool, Ansible Builder. Please note that this article will cover some intermediate-level topics such as containers (Ansible Builder uses Podman by default), virtual environments, and Ansible Content Collections. If you have some familiarity with those topics, then read on to find out what Ansible Builder is, why it was developed, and how to use it. 

This project is currently in development upstream on GitHub and is not yet part of the Red Hat Ansible Automation Platform product.  As with all Red Hat software, our code is open and we have an open source development model for our enterprise software.  The goal of this blog post is to show the current status of this initiative, and start getting the community and customers comfortable with our methodologies, thought process, and concept of Execution Environments.  Feedback on this upstream project can be provided on GitHub via comments and issues, or provided via the various methods listed on our website.

What is Ansible Builder?

In a nutshell, Ansible Builder is a tool that aids in the creation of Ansible Execution Environments. To fully understand this, let's step back and discuss what exactly execution environments are.  

A Primer on Execution Environments

Before the concept of Execution Environments came about, the Ansible Automation Platform execution system was limited to executing jobs under bubblewrap in order to isolate processes. There were several problems related to this, including the fact that in the cases of Red Hat OpenShift and Kubernetes-based deployments, any container running jobs had to run in privileged mode. In addition to this issue, consuming Ansible Content Collections was very labor-intensive and users faced a lot of challenges managing custom Python virtual environments and Ansible module dependencies. The concept of Execution Environments is the solution to these problems; simply put, they are container images that can be utilized as Ansible control nodes. These container images enable the simplification and automation of outdated processes.

As an example of how useful Execution Environments can be, let's say a developer writes content for Ansible locally by using container technology so that they can create portable automation runtimes; these container images will allow that developer to share pre-packaged Execution Environment, which can be tested and promoted to production. This eliminates a lot of manual steps (e.g. creating a Dockerfile from scratch) and accelerates operations by streamlining development and deployment.  

Ansible Builder is a Tool for Building Execution Environments

To enable developers, contributors, and users to take advantage of this new concept, Ansible Builder was developed to automate the process of building Execution Environments.  It does this by using the dependency information defined in various Ansible Content Collections, as well as by the user. Ansible Builder will produce a directory that acts as the build context for the container image build, which will contain the Containerfile, along with any other files that need to be added to the image.

Getting Started

Installing

You can install Ansible Builder from the Python Package Index (PyPI) or from the main ansible-builder development branch of the codebase hosted on GitHub. In your terminal, simply run:

$ pip install ansible-builder

Note: Podman is used by default to build images. To use Docker, use ansible-builder build --container-runtime docker.

Writing a Definition

In the world of Ansible Builder, the "definition" is a YAML file that outlines the Execution Environment's Collection-level dependencies, base image source, and overrides for specific items within the Execution Environment. The ansible-builder build command, which we will discuss in further detail later, takes the definition file as an input and then outputs the build context necessary for creating an Execution Environment image, which it then uses to actually build that image. That same build context can consistently rebuild the Execution Environment image elsewhere, which enables users to create distributable working environments for any Collections. 

Below is an example of the content that would be in a definition file:

---
version: 1
dependencies:
  galaxy: requirements.yml
  python: requirements.txt
  system: bindep.txt

additional_build_steps:
  prepend: |
    RUN pip3 install --upgrade pip setuptools
  append:
    - RUN ls -la /etc

Note: The build command will default to using a definition file named execution-environment.yml. If you want to use a different file, you will need to specify the file name with the -f (or --file) flag. This file must be a .yml formatted file.

In the dependencies section of the definition file above, the entries that would be listed there may be a relative path from the directory of the Execution Environment definition's folder, or an absolute path. Below is an example of what might be contained in a requirements.yml file, which points to a valid requirements file for the ansible-galaxy collection install -r... command:

NOTE: The following collection example is sourced from Automation Hub on cloud.redhat.com and requires a valid Ansible Automation Platform subscription and an upcoming feature to ansible-builder to access.

  • For more information on using Automation Hub, refer to the user guide
  • For instructions on how to use an ansible.cfg file with Ansible Builder, see the documentation here
---
collections:
  - redhat.openshift

The python entry points to a Python requirements file for pip install -r. For example, the requirements.txt file might contain the following:

awxkit>=13.0.0
boto>=2.49.0
botocore>=1.12.249
boto3>=1.9.249
openshift>=0.6.2
requests-oauthlib

The bindep requirements file specifies cross-platform requirements, if there are any.  These get processed by bindep and then passed to dnf (other platforms are not yet supported as of the publication of this blog post). An example of the content of a bindep.txt file is below:

subversion [platform:rpm]
subversion [platform:dpkg]

Additional commands may be specified in the additional_build_steps section, to be executed before the main build steps (prepend) or after (append). The syntax needs to be either a multi-line string (as shown in the prepend section of the example definition file) or a list (as shown via the example's append section).

Customizable Options

Before we run the build command, let's discuss the customizable options you can use alongside it.  

'-f', '--file'

This flag points to the specific definition file of the Execution Environment; it will default to execution-environment.yml if a different file name is not specified.

'-b', '--base-image'

The parent image for the Execution Environment; when not mentioned, it defaults to quay.io/ansible/ansible-runner:devel.

'-c', '--context'

The directory to use for the build context, if it should be generated in a specific place. The default location is $PWD/context.

'--container-runtime'

Specifies which container runtime to use; the choices are podman (default option) or docker.

'--tag'

The name for the container image being built; when nothing is specified with this flag, the image will be named ansible-execution-env.

As with most CLIs, adding --help at the end of any Ansible Builder command will provide output in the form of help text that will display and explain the options available under any particular command. Below is an example of a command for looking up help text, along with its corresponding output:

$ ansible-builder --help
usage: ansible-builder [-h] [--version] {build,introspect} ...

Tooling to help build container images for running Ansible content. Get
started by looking at the help for one of the subcommands.

positional arguments:
  {build,introspect}  The command to invoke.
    build             Builds a container image.
    introspect        Introspects collections in folder.

optional arguments:
  -h, --help          show this help message and exit
  --version           Print ansible-builder version and exit.

Start the Build

Let's see what happens when we run the build command! The build definition will be gathered from the default execution-environment.yml file as shown below:

---
version: 1
dependencies:
  galaxy: requirements.yml

additional_build_steps:
  prepend: |
    RUN pip3 install --upgrade pip setuptools
  append:
    - RUN ls -la /etc

We will be building an image named my_first_ee_image using Docker by running the command below:

$ ansible-builder build --tag my_first_ee_image --container-runtime docker
Using python3 (3.7.7)
File context/introspect.py is already up-to-date.
Writing partial Containerfile without collection requirements
Running command:
  docker build -f context/Dockerfile -t my_first_ee_image context
Sending build context to Docker daemon  14.34kB
Step 1/3 : FROM quay.io/ansible/ansible-runner:devel
devel: Pulling from ansible/ansible-runner
85a0beca2b15: Pulling fs layer
...
e21f0ff5ad71: Pull complete
Digest: sha256:e2b84...
Status: Downloaded newer image for quay.io/ansible/ansible-runner:devel
 ---> 6b886a75333f
Step 2/3 : RUN echo this is a command
 ---> Running in e9cea402bd67
this is a command
Removing intermediate container e9cea402bd67
 ---> 5d253a1fbd54
Step 3/3 : RUN cat /etc/os-release
 ---> Running in 788173de3929
NAME=Fedora
VERSION="32 (Container Image)"
...
VARIANT="Container Image"
VARIANT_ID=container
Removing intermediate container 788173de3929
 ---> df802929c259
Successfully built df802929c259
Successfully tagged my_first_ee_image:latest
Running command:
  docker run --rm -v /Users/bhenderson/Documents/GitHub/ansible-builder/context:/context:Z my_first_ee_image /bin/bash -c python3 /context/introspect.py
python: {}
system: {}

Rewriting Containerfile to capture collection requirements
Running command:
  docker build -f context/Dockerfile -t my_first_ee_image context
Sending build context to Docker daemon  14.34kB
Step 1/4 : FROM quay.io/ansible/ansible-runner:devel
 ---> 6b886a75333f
Step 2/4 : RUN echo this is a command
 ---> Using cache
 ---> 5d253a1fbd54
Step 3/4 : RUN cat /etc/os-release
 ---> Using cache
 ---> df802929c259
Removing intermediate container 6bd2a824fe4f
 ---> ba254aa08b88
Step 4/4 : RUN ls -la /etc
 ---> Running in aa3d855d3ae7
total 1072
drwxr-xr-x 1 root root   4096 Sep 28 13:25 .
...
drwxr-xr-x 2 root root   4096 Jul  9 06:48 yum.repos.d
Removing intermediate container aa3d855d3ae7
 ---> 0b386b132825
Successfully built 0b386b132825
Successfully tagged my_first_ee_image:latest
Complete! The build context can be found at: context

As you can see from the output above, the definition file points to the specific Collection(s) listed, then builds a container image with all of the dependencies specified in the metadata.  Output such as:

Step 2/3 : RUN echo this is a command
 ---> Running in e9cea402bd67
this is a command

and

Step 4/4 : RUN ls -la /etc
 ---> Running in aa3d855d3ae7
total 1072
drwxr-xr-x 1 root root   4096 Sep 28 13:25 .

shows that the prepend and append steps are also being run correctly. The following output shows that we indeed did not list any Python or system requirements:

python: {}
system: {}

Validating with Ansible Runner

Due to this new tool still being in development, we are taking a shortcut with our current available set of tools to help us validate against this. That being said, as of now, ansible-runner is a command-line utility that has the ability to interact with playbooks.  Also, since it is a key part of Execution Environments, our validation for now will be that the content runs as expected.  This will change in the future; we'll definitely come up with something bigger and better! So stay tuned. 

Now without further ado, let's dive into this...

If you do not have Ansible Runner already installed, you can refer to its documentation for guidance. Below is an example playbook (we'll call it test.yml) that can be run via Ansible Runner to ensure that the Execution Environment is working:

---
- hosts: localhost
  connection: local

  tasks:
    - name: Ensure the myapp Namespace exists.
      redhat.openshift.k8s:
        api_version: v1
        kind: Namespace
        name: myapp
        state: present

To confirm that the my_first_ee_image Execution Environment image did indeed get built correctly and will work with the redhat.openshift Collection, run the command below to execute our test.yml playbook:

$ ansible-runner playbook --container-image=my_first_ee_image test.yml
PLAY [localhost] *************************************************************

TASK [Gathering Facts] *******************************************************
ok: [localhost]

TASK [Ensure the myapp Namespace exists.] ************************************
changed: [localhost]

PLAY RECAP *******************************************************************
Localhost: ok=2 changed=1 unreachable=0 failed=0 skipped=0 rescued=0  ignored=0

Running the command ansible-runner playbook will indicate to Ansible Runner that we want it to execute a playbook that's similar to running the command ansible-playbook itself. However, Ansible Runner has additional advantages over a traditional ansible-playbook command, one of which is to let us take advantage of the Execution Environment image and its dependencies, which ultimately allows the playbook to run. For this specific example, note that we also inherited the kubeconfig set per the redhat.openshift.k8s module; this kubeconfig is automatically detected and mounted into the Execution Environment container runtime (just as many other cloud provider modules and SSH credentials are) without any additional input needed from the user.

Distributing

Execution Environment build contexts (as well as the containers built from them) can be easily shared via public or private registries.  This new workflow process allows users to automate tasks that were once more manual (e.g. container images can be scanned and rebuilt automatically when vulnerabilities are discovered inside).  The build context, generated when we ran the ansible-builder command, can be committed to source control and utilized later without the need for Ansible Builder, either locally or on another system.

Push to GitHub

After an Execution Environment image has been built using Ansible Builder, all of the build context files can be pushed to GitHub (or any other version control system) for distribution.  See below for an example of a repository that hosts everything necessary for re-building a specific image:

Ansible Builder Blog one

Red Hat Quay is a container image registry that provides storage and enables the building, distribution, and deployment of containers. Set up an account in quay.io and select "Create New Repository". A series of choices will be displayed, starting with what's shown below:

Ansible Builder blog two

From here, you can select your specific GitHub repository (or wherever you are hosting your image files), then navigate through other settings such as configuring the build triggers, as well as the specific Containerfile/Dockerfile and context, amongst other things:

Ansible builder blog three

There are other ways you can also share your Execution Environment images; the above is just a single example of a streamlined and easy-to-integrate method.

Conclusion

We hope you enjoyed learning about Execution Environments and how to build them using the new Ansible Builder CLI tool!  In a future version of Red Hat Ansible Automation Platform, Execution Environments will be able to be used to run jobs in Ansible Automation Platform, so keep an eye out for details regarding the next release. For further reading, please refer to the Ansible Builder documentation, Ansible Runner documentation, and be sure to take a look at the Ansible Builder repo on GitHub.


Using NetBox for Ansible Source of Truth

Using NetBox for Ansible Source of Truth

Here you will learn about NetBox at a high level, how it works to become a Source of Truth (SoT), and look into the use of the Ansible Content Collection, which is available on Ansible Galaxy. The goal is to show some of the capabilities that make NetBox a terrific tool and why you will want to use NetBox as your network Source of Truth for automation!

Source of Truth

Why a Source of Truth? The Source of Truth is where you go to get the intended state of the device. There does not need to be a single Source of Truth, but you should have a single Source of Truth per data domain, often referred to as the System of Record (SoR). For example, if you have a database that maintains your physical sites that is used by teams outside of the IT domain, that should be the Source of Truth on physical sites. You can aggregate the data from the physical site Source of Truth into other data sources for automation. Just be aware that when it comes time to collect data, then it should come from that other tool.

The first step in creating a network automation framework is to identify the Source of Truth for the data, which will be used in future automations. Oftentimes for a traditional network, the device itself has been considered the SoT. Reading the configuration off of the device each time you need a configuration data point for automation is inefficient, and presumes that the device configuration is as intended, not simply left there in troubleshooting or otherwise inadvertently left. When it comes to providing data to teams outside of the network organization, exposing an API  can help to speed up gathering data without having to check in with the device first.

NetBox

For a Source of Truth, one popular open source choice is NetBox. From the primary documentation site netbox.readthedocs.io:

"NetBox is an open source web application designed to help manage and document computer networks".

NetBox is currently designed to help manage your:

  • DCIM (Data Center Infrastructure Management)
  • IPAM (IP Address Management)
  • Data Circuits
  • Connections (Network, console, and power)
  • Equipment racks
  • Virtualization
  • Secrets

Since NetBox is an IPAM tool, there are misconceptions at times about what NetBox is able to do. To be clear, NetBox is not:

  • Network monitoring
  • DNS server
  • RADIUS server
  • Configuration management
  • Facilities management

Why NetBox?

NetBox is a tool that is built on many common Python based open source tools, using Postgres for the backend database and Python Django for the back-end API and front-end UI. The API is extremely friendly as it supports CRUD (Create, Read, Update, Delete) operations and is fully documented with Swagger documentation. The NetBox Collection helps with several aspects of NetBox including an inventory plugin, lookup plugin, and several modules for updating data in NetBox.

NetBox gives a modern UI from the point of view of a network organization to help document IP addressing, while keeping the primary emphasis on network devices, system infrastructure,  and virtual machines. This makes it ideal to use as your Source of Truth for automating.

NetBox itself does not do any scanning of network resources. It is intended to have humans maintain the data as this is going to be the Source of Truth. It represents what the environment should look like. 

Ansible Content Collection for NetBox

You will find the Collection within the netbox-community GitHub organization (github.com/netbox-community/). Here you find a Docker container image, device-type library, community generated NetBox reports, and source code for NetBox itself.

If you are unfamiliar with what an Ansible Content Collection is, please watch this brief YouTube video.

The Galaxy link for the Collection is at galaxy.ansible.com/netbox/netbox

The NetBox Collection allows you to get started quickly in adding information into a NetBox instance. The only requirements are  to supply an API key and a URL to get started. With this Collection, a base inventory, and a NetBox environment you are able to get a Source of Truth populated very quickly. 

Let's walk through the base setup to get to a place where you are starting to use the NetBox Inventory Plugin as your Ansible inventory. First is the example group_vars/all.yml file that will have the list of items to be used with the tasks.

---
site_list:
  - name: “NYC”
    time_zone: America/New_York
    status: Active
  - name: “CHI”
    time_zone: America/Chicago
    status: Active
  - name: “RTP”
    time_zone: America/New_York
    status: Active
manufacturers:  # In alphabetical order
  - Arista
  - Cisco
  - Juniper
device_types:
  - model: “ASAv”
    manufacturer: “Cisco”
    slug: “asav”
    part_number: “asav”
    Full_depth: False
  - model: “CSR1000v”
    manufacturer: “Cisco”
    slug: “csr1000v”
    part_number: “csr1000v”
    Full_depth: False
  - model: “vEOS”
    manufacturer: “Arista”
    slug: “veos”
    part_number: “veos”
    Full_depth: False
  - model: “vSRX”
    manufacturer: “Juniper”
    slug: “vsrx”
    part_number: “vsrx”
    Full_depth: False
platforms:
  - name: “ASA”
    slug: “asa”
  - name: “EOS”
    slug: “eos”
  - name: “IOS”
    slug: “ios”
  - name: “JUNOS”
    slug: “junos”

Example group_vars/all.yml

The first step is to create a site. Since NetBox models physical gear, you install equipment at a physical location. Whether that is in your own facilities or inside of a cloud, this is a site. The module for this is the netbox.netbox.netbox_site module.

A task in the playbook may be:

- name: "TASK 10: SETUP SITES"
  netbox.netbox.netbox_site:
    netbox_url: "{{ lookup('ENV', 'NETBOX_URL') }}"
    netbox_token: "{{ lookup('ENV', 'NETBOX_API_KEY') }}"
    data: "{{ item }}"
  loop: "{{ site_list }}"

Example: Sites Task

The next two pieces are the base to add devices to NetBox. In order to create a specific device, you also need to have the device type and manufacturer in your NetBox instance. To do this there are specific modules available to create them. Platforms will help to identify what OS the device is. I recommend that you use what your automation platform is using---something like IOS, NXOS, and EOS are good choices and should match up to your ansible_network_os choices. These tasks look like the following:

- name: "TASK 20: SETUP MANUFACTURERS"
      netbox.netbox.netbox_manufacturer:
        netbox_url: "{{ lookup('ENV', 'NETBOX_URL') }}"
        netbox_token: "{{ lookup('ENV', 'NETBOX_API_KEY') }}"
        data:
          name: "{{ manufacturer }}"
      loop: "{{ manufacturers }}"
      loop_control:
        loop_var: manufacturer

   - name: "TASK 30: SETUP DEVICE TYPES"
      netbox.netbox.netbox_device_type:
        netbox_url: "{{ lookup('ENV', 'NETBOX_URL') }}"
        netbox_token: "{{ lookup('ENV', 'NETBOX_API_KEY') }}"
        data:
          model: "{{ device_type.model }}"
          manufacturer: "{{ device_type.manufacturer }}"
          slug: "{{ device_type.slug }}"
          part_number: "{{ device_type.part_number }}"
          is_full_depth: "{{ device_type.full_depth }}"
      loop: "{{ device_types }}"
      loop_control:
        loop_var: device_type
        label: "{{ device_type['model'] }}"

    - name: "TASK 40: SETUP PLATFORMS"
      netbox.netbox.netbox_platform:
        netbox_url: "{{ lookup('ENV', 'NETBOX_URL') }}"
        netbox_token: "{{ lookup('ENV', 'NETBOX_API_KEY') }}"
        data:
          name: "{{ platform.name }}"
          slug: "{{ platform.slug }}"
      loop: "{{ platforms }}"
      loop_control:
        loop_var: platform
        label: "{{ platform['name'] }}"

Example: Manufacturers, Device Types, and Platforms

At this stage you are set to add devices and device information to NetBox. The following tasks leverage the ansible_facts that Ansible automatically gathers. So for these particular device types, no additional parsing/data gathering is required outside of using Ansible to gather facts. In this example for adding a device, you will notice custom_fields. A nice extension of NetBox is that if there is not a field already defined, you can set your own fields and use them within the tool.

- name: "TASK 100: NETBOX >> ADD DEVICE TO NETBOX"
      netbox.netbox.netbox_device:
        netbox_url: "{{ lookup('ENV', 'NETBOX_URL') }}"
        netbox_token: "{{ lookup('ENV', 'NETBOX_API_KEY') }}"
        data:
          name: "{{ inventory_hostname }}"
          device_type: "{{ ansible_facts['net_model'] }}"
          platform: IOS  # May be able to use a filter to define in future
          serial: "{{ ansible_facts['net_serialnum'] }}"
          status: Active
          device_role: "{{ inventory_hostname | get_role_from_hostname }}"
          site: “ANSIBLE_DEMO_SITE"
          custom_fields:
            code_version: "{{ ansible_facts['net_version'] }}"

    - name: "TASK 110: NETBOX >> ADD INTERFACES TO NETBOX"
      netbox.netbox.netbox_device_interface:
        netbox_url: "{{ lookup('ENV', 'NETBOX_URL') }}"
        netbox_token: "{{ lookup('ENV', 'NETBOX_API_KEY') }}"
        data:
          device: "{{ inventory_hostname }}"
          name: "{{ item.key }}"
          form_factor: "{{ item.key | get_interface_type }}"  # Define types
          mac_address: "{{ item.value.macaddress | ansible.netcommon.hwaddr }}"
        state: present
      with_dict:
        - "{{ ansible_facts['net_interfaces'] }}"

Example: Add Devices and Interfaces

Once you have the interfaces you can add in IP address information that is included in the ansible_facts data, I show three steps. First is to add a temporary interface (TASK 200), then add the IP address (TASK 210), and finally associate the IP address to the device (TASK 220).

- name: "TASK 200: NETBOX >> Add temporary interface"
      netbox.netbox.netbox_device_interface:
        netbox_url: "{{ lookup('ENV', 'NETBOX_URL') }}"
        netbox_token: "{{ lookup('ENV', 'NETBOX_API_KEY') }}"
        data:
          device: "{{ inventory_hostname }}"
          name: Temporary_Interface
          form_factor: Virtual
        state: present

    - name: "TASK 210: NETBOX >> ADD IP ADDRESS OF ANSIBLE HOST"
      netbox.netbox.netbox_ip_address:
        netbox_url: "{{ lookup('ENV', 'NETBOX_URL') }}"
        netbox_token: "{{ lookup('ENV', 'NETBOX_API_KEY') }}"
        data:
          family: 4
          address: "{{ ansible_host }}/24"
          status: active
          interface:
            name: Temporary_Interface
            device: "{{ inventory_hostname }}"

    - name: "TASK 220: NETBOX >> ASSOCIATE IP ADDRESS TO DEVICE"
      netbox.netbox.netbox_device:
        netbox_url: "{{ lookup('ENV', 'NETBOX_URL') }}"
        netbox_token: "{{ lookup('ENV', 'NETBOX_API_KEY') }}"
        data:
          name: "{{ inventory_hostname }}"
          device_type: "{{ ansible_facts['net_model'] }}"
          platform: IOS
          serial: "{{ ansible_facts['net_serialnum'] }}"
          status: Active
          primary_ip4: "{{ ansible_host }}/24"

Example: Add temp interface, add IP address, re-add device with the IP address associated

Ansible Inventory Source

At this point you have NetBox populated with all of your devices that were in your static inventory. It is now time to make the move to using NetBox as the Source of Truth for your Ansible dynamic inventory plugin. This way you don't have to keep finding all of the projects that need to get updated when you make a change to the environment. You just need to change your Source of Truth database - NetBox.

You define which inventory plugin to use with a YAML file that defines the characteristics of how to configure your intended use of the plugin. Below is an example, showing you are able to query many components of NetBox for use within your Ansible inventory. You may wish to only make an update to your access switches? Use the query_filters key to define what NetBox API searches should be executed. Take a look at the plugin documentation for updated supported parameters on GitHub or ReadTheDocs. The compose key allows you to pass in additional variables to be used by Ansible, as such the platform from above would be used with the ansible_network_os key. This is where you see the definition and what would get passed from the inventory source.

This definition also has groups created based on the device_roles that are defined in NetBox and the platforms. So you would be able to access all platforms_ios devices or platforms_eos as an example, based on the information in the Source of Truth.

---
plugin: netbox.netbox.nb_inventory
api_endpoint: http://netbox03
validate_certs: false
config_context: false
group_by:
 - device_roles
 - platforms
compose:
 ansible_network_os: platform.slug
query_filters:
 - site: "minnesota01"
 - has_primary_ip: True

Example: netbox_inventory.yml

Extending NetBox with Plugins

One of the more recent feature additions to NetBox itself is the ability to extend it via your own or community driven plugins. From the wiki:

"Plugins are packaged Django apps that can be installed alongside NetBox to provide custom functionality not present in the core application"

https://github.com/netbox-community/netbox/wiki/Plugins

You can find some of the featured plugins in the community at that link. Some include:

There are many plugins available to the community for you to choose from---or you can write your own add ons!

Search https://github.com/topics/netbox-plugi for the topic NetBox Plugin.

Summary

NetBox and Ansible together are a great combination for your network automation needs!

NetBox is an excellent open source tool that helps make it easy to create, update, and consume as a Source of Truth. The APIs are easy to use and make updates to the DB with, even if you did not want to use the NetBox Collection available for Ansible. Having a tool that is flexible, capable, and accurate is a must for delivering automation via a Source of Truth. NetBox delivers on each of these. 

This post was inspired by a presentation done in March 2020 at the Minneapolis Ansible Meetup. For additional material on this, I have many of these tasks available as a working example on ansible_netbox_demo. The YouTube recording of the presentation from the Ansible Meetup is available.