Getting started with Ansible and Check Point
Getting started with Ansible and Check Point
The scale and complexity of modern infrastructures require not only that you be able to define a security policy for your systems, but also be able to apply that security policy programmatically or make changes as a response to external events. As such, the proper automation tooling is a necessary building block to allow you to apply the appropriate actions in a fast, simple and consistent manner.
Check Point has a certified Ansible Content Collection of modules to help enable organizations to automate their response and remediation practices, and to embrace the DevOps model to accelerate application deployment with operational efficiency. The modules, based on Check Point security management APIs are also available on Ansible Galaxy, in the upstream version of Check Point Collection for the Management Server.
The operational flow is exactly the same for the API as it is for the Check Point security management GUI SmartConsole, i.e. Login > Get Session > Do changes > Publish > Logout.
Security professionals can leverage these modules to automate various tasks for the identification, search, and response to security events. Additionally, in combination with other modules that are part of Ansible security automation, existing Check Point infrastructures can be integrated in orchestrated processes involving multiple security technologies.
DevOps professionals can consume the same modules in automated workflows to support the deployment and maintenance of both physical and virtualized next-generation firewalls.
To better understand how these new modules can be consumed, I'll provide a series of examples based on the code in the security automation community project, under the Ansible security automation Sample Plays GH repo. The pre-requisite for the integrations to work and function as expected is that Check Point R80 versions are supported by this integration given this hotfix is applied.
Ansible Check Point Modules
cp_mgmt_* modules have been released with Ansible 2.9. They can be
currently found in the 'latest' branch of the
documentation.
There are quite a few modules available to manage the Check Point appliance, in the Check Point Mgmt Collection they are structured in two categories:
-
cp_mgmt_*: All these modules use the aforementioned API to post API objects on the Check Point appliance. -
cp_mgmt_*_facts: All the facts modules use the same API to get facts from the Check Point appliance.
As an example, if we look at the modules dedicated to host objects this is reflected in the following way:
- cp_mgmt_host - Manages host objects on Check Point devices including creating, updating and removing objects.
- cp_mgmt_host_facts - Gets host objects facts on Check Point devices.
There are also a total of nine
checkpoint_*
modules which were introduced with
Ansible 2.8, but these
modules are deprecated and it's encouraged and advisable to use the
latest cp_mgmt_* modules
that were introduced in
Ansible 2.9 unless required.
cp_mgmt_* modules example: How to perform host configuration
Here is an example of how to use the cp_mgmt_host module to configure a host:
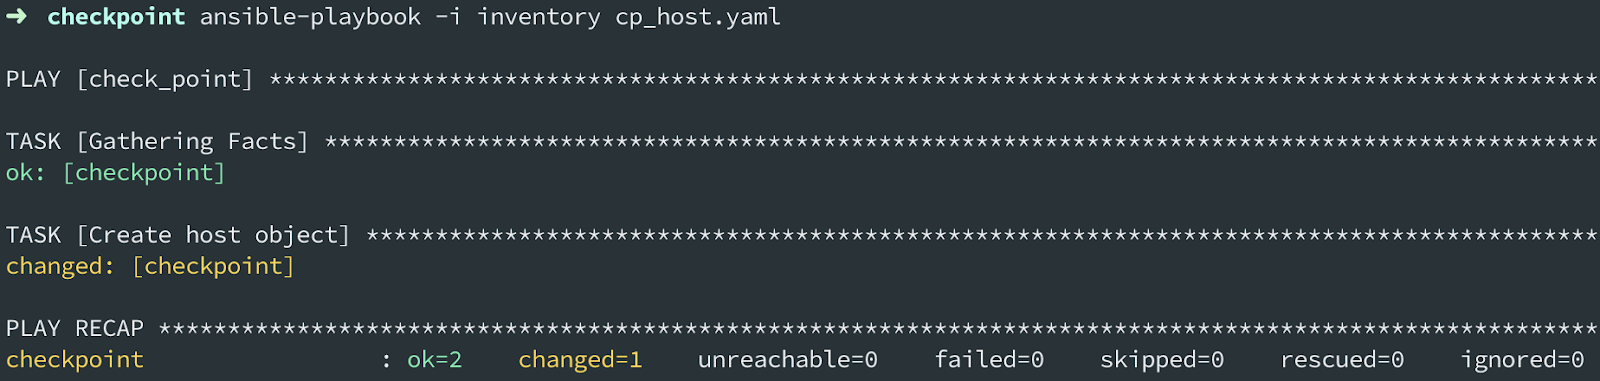
---
- hosts: check_point
  connection: httpapi
  tasks:
    - name: Create host object
      cp_mgmt_host:
        color: dark green
        ipv4_address: 192.0.2.2
        name: New CP_MGMT Host 1
        state: present
        auto_publish_session: true
When the module argument auto_publish_session is set to True, you will make Ansible run to take effect on your Check Point appliance immediately. You'll then have to publish the changes, and that's what auto_publish_session achieves. Note that by default, the value of auto_publish_session is False. This module argument is available if the user wants to publish the changes at task level.
However, if we want to publish the changes at the very end of the play run, after running "n" number of tasks, we can just run the available cp_mgmt_publish module at the end of the play, and all changes done will take effect on your Check Point appliance.
To run the playbook use the ansible-playbook command:
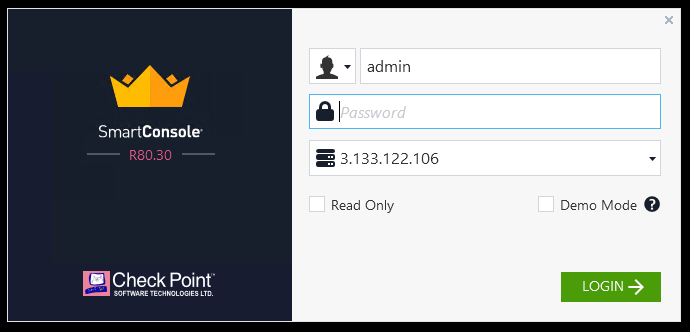
To check if this has effectively changed the Check Point configuration as expected, login to the Check Point SmartConsole and look under Network objects -> Hosts where we will see the new host listed:
The modules can keep state (where applicable) so when we re-run the playbook instead of \"changed\" it will just say OK without performing any changes to the Check Point appliance. This is also referred to as idempotency (also see the Ansible Docs).
Example: How to collect hosts facts
Check Point facts modules allow us to query different Check Point objects, such as network, address, dns domain, host records, and more.
Let's look at an Ansible Playbook snippet focused on grabbing information about an host configured via the previous example playbook:
---
- hosts: check_point
  connection: httpapi
  tasks:
    - name: collect-host facts
      cp_mgmt_host_facts:
        name: New CP_MGMT Host 1
      register: cp_host
    - name: display host facts
      debug:
        msg: "{{ cp_host }}"
Run the playbook with the ansible-playbook command as:
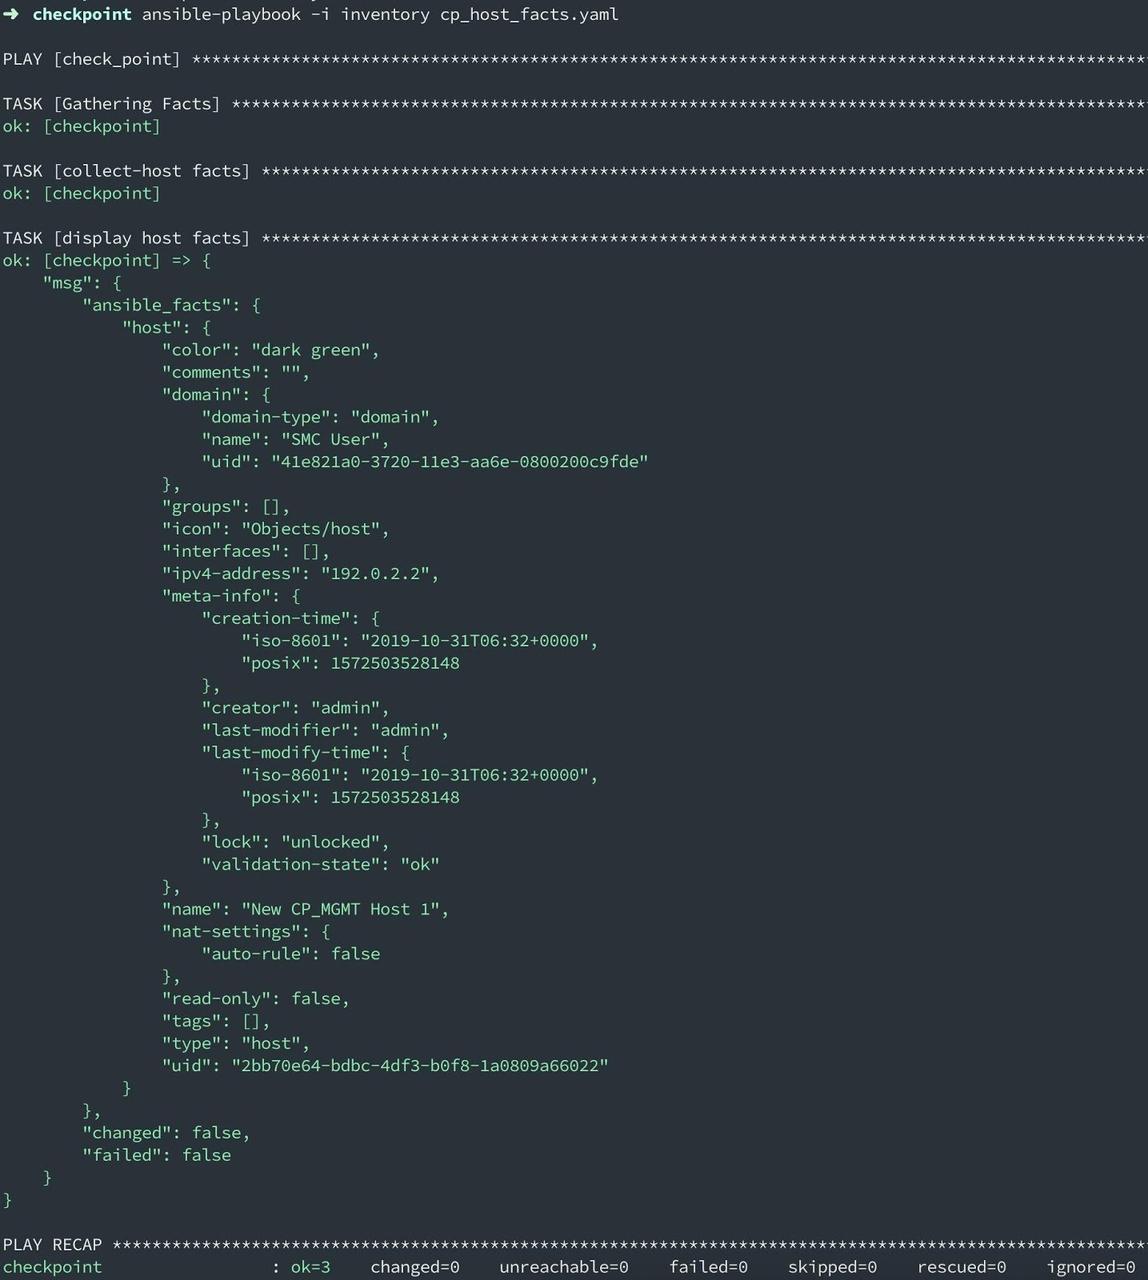
Play output: All of the host facts related to queried host name i.e. "New CP_MGMT Host 1"
The above playbook shows how we can query Check Point to collect specific information about objects (in this case, hosts). These facts can be then used through an Ansible play and allow an appliance, or a group of appliances, to act as a single source of truth for information that may be changing. To read more about Ansible variables, facts and the set_fact module, refer to the Ansible variables documentation.
How to use Check Point modules in response and remediation scenarios
Ansible security automation supports interoperability between the many security technologies used by SOCs or security teams as part of their response and remediation activities.
To help security professionals adopt Ansible as the common automation language for security, we have written a number of roles that can be immediately consumed to accelerate productivity in these scenarios.
An example of these roles is acl_manager, which can be used to automate tasks such as blocking and unblocking IP and URLs on supported technologies, like Check Point NGFW.
How to Block an IP in Check Point using the acl_manager role
---
- hosts: checkpoint
  connection: httpapi
  tasks:
   - include_role:
       name: acl_manager
       tasks_from: blacklist_ip
     vars:
       source_ip: 192.0.2.2
       destination_ip: 192.0.2.12
       ansible_network_os: checkpoint
Roles can be used to abstract common security tasks to seamlessly support specific use cases without getting into underlying module functionalities.
The Check Point management API and other Check Point APIs are defined in the Check Point API Reference.