Bullhorn #7

Ansible Bullhorn banner

The Bullhorn

A Newsletter for the Ansible Developer Community

Welcome to The Bullhorn, our newsletter for the Ansible developer community. If you have any questions or content you’d like to share, please reach out to us at the-bullhorn@redhat.com.
 

ANSIBLE 2.10.0 ALPHA 6 NOW AVAILABLE

The Ansible Community team announced the availability of Ansible 2.10.0 Alpha 6 on July 28th. This new Ansible package should be a drop-in replacement for Ansible 2.9; the roles and playbooks that you currently use should work out of the box with ansible-2.10.0 alpha6. For more information on how to download, test, and report issues, read Toshio Kuratomi’s announcement to the ansible-devel mailing list.
 

ANSIBLE-BASE 2.10.0 RELEASE CANDIDATE 3 NOW AVAILABLE

The Ansible Base team announced the pre-release availability of Ansible 2.10.0 RC 3 on July 24th. This ansible-base package consists of only the Ansible execution engine, related tools (e.g. ansible-galaxy, ansible-test), and a very small set of built-in plugins, and is also bundled with the larger Ansible distribution. For more information on how to download, test, and report issues, read Rick Elrod’s announcement to the ansible-devel mailing list.
 

COLLECTION MODULE DOCUMENTATION AVAILABLE NOW

After significant months of effort, we have now restored the module-level documentation on docs.ansible.com! This effort required coordination between the Ansible docs team and the community team and developers to pull the module documentation from the collections on Galaxy and publish them on our docsite again. For more information, read Sandra McCann’s announcement to the ansible-devel mailing list.
 

ANSIBLE STATS UPDATE

As promised in his recent tweet, Greg Sutcliffe has gone into more detail on what the bubble plot from the last issue represents, answering many questions about the details of the plot, and examining the possible uses of such graphics.
 

CONTENT FROM THE ANSIBLE COMMUNITY


ANSIBLE VIRTUAL MEETUPS

The following virtual meetups are being held in the Ansible community over the next month:

Ansible NOVA August Session
Wed, Aug 12 · 4:00 PM EDT
https://www.meetup.com/Ansible-NOVA/events/271964842/

Ansible New Zealand: building stateless self configuring Ansible Clusters
Thu, Aug 13 · 12:00 PM GMT+12
https://www.meetup.com/Ansible-New-Zealand/events/271707416/
 

FEEDBACK

Have any questions you’d like to ask, or issues you’d like to see covered? Please send us an email at the-bullhorn@redhat.com.


Securing Tower Installer Passwords

Securing Tower Installer Passwords

One of the crucial pieces of the Red Hat Ansible Automation Platform is Ansible Tower. Ansible Tower helps scaling IT automation, managing complex deployments and speeding up productivity. A strength of Ansible Tower is its simplicity that also extends to the installation routine: when installed as a non-container version, a simple script is used to read in variables from an initial configuration to deploy Ansible Tower. The same script and initial configuration can even be re-used to extend the setup and add, for example, more cluster nodes.

However, part of this initial configuration are passwords for the database, Ansible Tower itself and so on. In many online examples, these passwords are often stored in plain text. One question I frequently get as a Red Hat Consultant is how to protect this information. A common solution is to simply remove the file after you complete the installation of Ansible Tower. But, there are reasons you may want to keep the file around. In this article, I will present another way to protect the passwords in your installation files.

Ansible Tower's setup.sh

For some quick background, setup.sh is the script used to install Ansible Tower and is provided in both the regular and bundled installer. The setup.sh script only performs a couple of tasks, such as validating that Ansible is installed on the local system and setting up the installer logs; but most importantly, it launches Ansible to handle the installation of Ansible Tower. An inventory file can be specified to the installer using the -i parameter or, if unspecified, the default provided inventory file (which sits alongside setup.sh) is used. In the first section of the inventory file, we have groups to specify the servers that Ansible Tower and the database will be installed on:

[tower]
localhost ansible_connection=local

[database]

And, after those group specifications, there are variables that can be used to set the connections and passwords, and is where you would normally enter your plain text passwords, such as:

[all:vars]
admin_password='T0w3r123!'

pg_host=''
pg_port=''

pg_database='awx'
pg_username='awx'
pg_password='DB_Pa55w0rd!'

In the example above, these passwords are displayed as plain text. Many clients I have worked with are not comfortable with leaving their passwords in plain text within the inventory file for security reasons. Once Ansible Tower is installed, this file can be safely removed, but if you ever need to modify your installation to add a node to a cluster or add/remove inventory groups, this file will need to be regenerated. Likewise, if you want to use the backup and restore functions of setup.sh, you will also need the inventory file with all of the passwords as it was originally installed.

Vault to the Rescue

Since the installer is using Ansible to install Ansible Tower, we can leverage some Ansible concepts to secure our passwords. Specifically, we will use Ansible vault to have an encrypted password instead of a plain text password. If you are not familiar with Ansible vault, it is a program shipped with Red Hat Ansible Automation Platform itself and is a mechanism to encrypt and decrypt data. It can be used against individual strings or it can encrypt an entire file. In our example, we will encrypt individual strings as passwords. This will be beneficial if you end up committing your inventory file into a source control management tool. The SCM will be able to show you individual passwords that were changed in a commit versus just being able to say an encrypted file changed (but not being able to show which password within the encrypted file changed).

To start, we are going to encrypt our admin password with the following command (fields in <> indicate input to ansible-vault):

$ ansible-vault encrypt_string --stdin-name admin_password
New Vault password:
Confirm New Vault password:
Reading plaintext input from stdin. (ctrl-d to end input)
<t0w3r123!>admin_password: !vault |
          $ANSIBLE_VAULT;1.1;AES256
          66663534356430343166356461373464336332343439393731363365303063353032373564623537
          3466663861633936366463346135656130306538376637320a303738653264333737343463613366
          31396336633730323639303436653330386536363838646161653562373631323766346431663461
          6536646264633563660a343163303334336164376339363161373662613137633436393263376631
          3539
Encryption successful
</t0w3r123!>

In this example, we are running ansible-vault and asking it to encrypt a string. We've told ansible-vault that this variable will be called admin_password and it will have a value of T0w3r123! (what we would have entered into our inventory file). In the example, we used a password of 'password' to encrypt these values. In a production environment, a much stronger password should be used to perform your vault encryption. In the output of the command, after the two ctrl-d inputs, our encrypted variable is displayed on the screen. We will take this output and put it into a file called passwords.yml next to our inventory file. After encrypting the second pg_password our password.yml file looks like this:

---
admin_password: !vault |
          $ANSIBLE_VAULT;1.1;AES256
          66663534356430343166356461373464336332343439393731363365303063353032373564623537
          3466663861633936366463346135656130306538376637320a303738653264333737343463613366
          31396336633730323639303436653330386536363838646161653562373631323766346431663461
          6536646264633563660a343163303334336164376339363161373662613137633436393263376631
          3539
pg_password: !vault |
          $ANSIBLE_VAULT;1.1;AES256
          65633239383761336539313437643733323235366337653164383934303563643464626562633865
          3130313231666531613131633736386134343664373039620a336237393631333532373066343135
          65316431626630633965623134623133353635376236306538653230363038333661623236376330
          3664346237396139610a376536373132313237653239353832623433663230393464343331356561
          3435

Now that we have our completed passwords.yml file, we have to tell the installer to load the passwords from this file and also to prompt us for the vault password to decrypt the value. To do this we will add three parameters to our setup.sh command. The first option is -e@passwords.yml, which is a standard syntax to tell Ansible to load variables from a specified file name (in this case passwords.yml). The second option will be --, which will tell the setup.sh script that any following options should be passed on to Ansible instead of being processed by setup.sh. The final option will be --ask-vault-pass, which tells Ansible to prompt us for the password to be able to decrypt the vault secrets. All together our setup command will become:

$ ./setup.sh -e@passwords.yml -- --ask-vault-pass

If you normally add arguments to setup.sh, they will need to be merged into this command structure. Arguments to setup.sh will need to go before the -- and any arguments you passed to Ansible would go after the --

When running setup.sh with these options you will now be prompted to enter the vault password before the Ansible installer begins:

$ ./setup.sh -e@passwords.yml -- --ask-vault-pass
Using /etc/ansible/ansible.cfg as config file
Vault <password>:

PLAY [tower:database:instance_group_*:isolated_group_*] ******************************************************************************************

Here I have to enter my weak vault password of 'password' for the decryption process to work. 

This technique will work even if you leave the blank password variables in the inventory file because of the variable precedence from Ansible. The highest precedence any variable can take comes from extra_vars (which is the -e option we added to the installer), so values in our vault file will override any values specified in the inventory file.

Using this method allows you to keep the inventory file and password files on disk or in an SCM and not have plain text passwords contained within them.

Another Solution

Another option you could take if you only wanted a single inventory file would be to convert the existing ini inventory file into a yaml based inventory. This would allow you to embed the variables as vault encrypted values directly. While the scope of doing that is beyond this article, an example inventory.yml file might look similar to this:

all:
  children:
    database: {}
    tower:
      hosts:
        localhost:
  vars:
    admin_password: !vault |
        $ANSIBLE_VAULT;1.1;AES256
        66663534356430343166356461373464336332343439393731363365303063353032373564623537
        3466663861633936366463346135656130306538376637320a303738653264333737343463613366
        31396336633730323639303436653330386536363838646161653562373631323766346431663461
        6536646264633563660a343163303334336164376339363161373662613137633436393263376631
        3539
    ansible_connection: local
    pg_database: awx
    pg_host: ''
    pg_password: !vault |
        $ANSIBLE_VAULT;1.1;AES256
        65633239383761336539313437643733323235366337653164383934303563643464626562633865
        3130313231666531613131633736386134343664373039620a336237393631333532373066343135
        65316431626630633965623134623133353635376236306538653230363038333661623236376330
        3664346237396139610a376536373132313237653239353832623433663230393464343331356561
        3435
    pg_port: ''
    pg_sslmode: prefer
    pg_username: awx
    rabbitmq_cookie: cookiemonster
    rabbitmq_password: ''
    rabbitmq_username: tower
    tower_package_name: ansible-tower
    tower_package_release: '1'
    tower_package_version: 3.6.3

Using a file like this, setup.sh could then be called as:

$ ./setup.sh -i inventory.yml -- --ask-vault-pass

Using this method will require more work when upgrading Ansible Tower, as any field changes in the provided inventory file will need to be reflected in your yaml inventory, whereas the previous method only requires new password fields added to the inventory file to be added into the password.yml file.


Bullhorn #6

Ansible Bullhorn banner

The Bullhorn

A Newsletter for the Ansible Developer Community

Welcome to The Bullhorn, our newsletter for the Ansible developer community. If you have any questions or content you’d like to share, please reach out to us at the-bullhorn@redhat.com.
 

ANSIBLE 2.8.13 AND 2.9.10 RELEASED

The Ansible Core team announced the availability of Ansible 2.9.10 on June 19th, and Ansible 2.8.13 on July 15th, both of which are maintenance releases. Follow the links for Rick Elrod’s emails to the ansible-devel mailing list, to obtain details on what’s new, installation instructions, and links to the full changelogs.
 

VIRTUAL ANSIBLE CONTRIBUTOR SUMMIT RECAP

The second fully virtual Ansible Contributor Summit was held on July 6th. Almost 70 contributors - new and existing - joined us over the course of the day, around 20 more than the previous event. You can check out the videos from the summit, as well as the summary and full log from the IRC session.

On July 7-8, we held the virtual Ansible Hackathon, in which we followed up on the issues that were discussed during the contributor summit. Both a summary and full log are available for the hackathon as well.

These new collections were created during the event: community.digitalocean, community.proxysql, and community.mysql. Thanks to our community contributors!

We would appreciate your feedback to help us improve the Contributor Experience, whether or not you were able to attend the event. Here is the Contributor Survey; please take a couple of minutes to fill this in (if you haven't already).

The next Contributor Summit will be on October 12, 2020. It will once again be a virtual experience, along with AnsibleFest in the same week. When we have more details, we will share them in future issues of The Bullhorn!
 

UPDATES FROM THE WORKING GROUPS


Diversity (NEW!)
  • The Ansible community has launched a new working group focused on improving diversity and inclusion in the project. Community members looking to get involved with this initiative can join #ansible-diversity on Freenode IRC. You can also check out the announcement made at the Virtual Ansible Contributor Summit last week.
 

STATS UPDATE

Greg 'Gwmngilfen' Sutcliffe, our team stats person, has been hard at work on some of the suggestions that came out of the Contributor Summit. One such idea, from Jeff Geerling, was some kind of heatmap of contributors, so that we can see where there is activity, and also potentially some "bus-factor". Here's a first cut of that map:

The colour ranges from "1 contributor" in red to "lots" in pool, with white centred at 5 unique contributors.

Community.General has such a large number of contributors that it overshadows the others - but note how many collections are <5 contributors for any single file, but largely healthy at the directory level, which is good to see! You can see a bigger version on the Ansible Stats pages if you want to zoom in.
 

COMMUNITY CONTENT

Every month we notice the community posting great content. Although not all strictly developer focussed, maybe there’s an article or two here that piques your interest? Let us know if you’d like to see more of this.

Evgeni Golov details how they mass-migrated modules inside an Ansible Collection for the Foreman project, complete with the script used.

Wu shares how he manages Windows Servers with Ansible on CentOS 8.

Here’s Part 1 and Part 2 of Kubernetes Configuration Management with Ansible by Baptiste Mille-Mathias, who also joined us at the virtual contributor summit.

Tadej Borovšak of XLAB Steampunk covers an important topic - testing - with Adding integration tests to Ansible Content Collections.

Nicolas Leiva describes how you can make your favorite Python library an Ansible module to Automate a Network Security Workflow.

Carol Chen, part of the Ansible Community team, talks about connecting and growing your community with examples from the Ansible community meetup groups.
 

ANSIBLE VIRTUAL MEETUPS

The following virtual meetups are being held in the Ansible community over the next month:

Ansible in DevOps Torun-Bydgoszcz: QA in DevOps World
Wed, Jul 15 · 5:00 PM GMT+2
https://www.meetup.com/Ansible-in-DevOps-Torun-Bydgoszcz/events/271620303/ 

Ansible Minneapolis: Using Ansible to Create AWS AMI Images
Thu, Jul 16 · 6:30 PM GMT-5
https://www.meetup.com/Ansible-Minneapolis/events/sbqkgrybckbvb/

Ansible India Meetup: Getting Started with Ansible Network Automation
Sat, Jul 18 · 9:45 AM GMT+5:30
RSVP with one of the meetup groups “near” you: Aurangabad, Bangalore, Chennai, Delhi, Hyderabad, Kolkata, Mumbai, Pune! (They will link to the same virtual event.)

Ansible Fort Worth/Dallas: Multicloud Networking Leveraging Ansible and Pureport
Tue, Jul 28 · 4:00 PM GMT-6
https://www.meetup.com/Ansible-Fort-Worth/events/271912439/
https://www.meetup.com/Ansible-Dallas/events/271912537/

Ansible New Zealand: building stateless self configuring Ansible Clusters
Thu, Aug 13 · 12:00 PM GMT+12
https://www.meetup.com/Ansible-New-Zealand/events/271707416/ 

Here is the playlist from the previous Ansible India Meetup held on June 27.

Note: For these virtual events, the links to participate in the meetups will be visible once you RSVP to attend. If you’re interested in the topics presented, you can join from anywhere in the world as long as the time zone and language works for you!
 

FEEDBACK

Have any questions you’d like to ask, or issues you’d like to see covered? Please send us an email at the-bullhorn@redhat.com.


Centralize your Automation Logs with Ansible Tower and Splunk Enterprise

Centralize your Automation Logs with Ansible Tower and Splunk Enterprise

For many IT teams, automation is a core component these days. But automation is not something on it's own - it is a part of a puzzle and needs to interact with the surrounding IT. So one way to grade automation is how well it integrates with other tooling of the IT ecosystem - like the central logging infrastructure. After all, through the central logging the IT team can quickly survey what is happening, where, and what the state of it is.

The Red Hat Ansible Automation Platform is a solution to build and operate automation at scale. As part of the platform, Ansible Tower integrates well with external logging solutions, such as Splunk, and it is easy to set that up. In this blog post we will demonstrate how to perform the necessary configurations in both Splunk and Ansible Tower to let them work well together.

Setup of Splunk

The first step is to get Splunk up and running. You can download a Splunk RPM after you register yourself at the Splunk home page.

After the registration, download the rpm and perform the installation:

$ rpm -ivh splunk-8.0.3-a6754d8441bf-linux-2.6-x86_64.rpm
warning: splunk-8.0.3-a6754d8441bf-linux-2.6-x86_64.rpm: Header V4 RSA/SHA256 Signature, key ID b3cd4420: NOKEY
Verifying...                    ################################# [100%]
Preparing...                    ################################# [100%]
Updating / installing...
   1:splunk-8.0.3-a6754d8441bf  ################################# [100%]
complete

After the installation is complete, execute the command below to start the service and make the necessary settings.

$  /opt/splunk/bin/splunk start -accept-license

Accept the terms, set the username and password, and wait for the service to start.

All preliminary checks passed.

Starting splunk server daemon (splunkd)...
Done
                                                        [  OK  ]

Waiting for web server at http://127.0.0.1:8000 to be available... Done


If you get stuck, we're here to help.
Look for answers here: http://docs.splunk.com

The Splunk web interface is at http://splunk-server:8000

Access the web interface and enter the username and password. 

Configuring Data Input with Red Hat Ansible Content Collections

To receive the Ansible Tower logs in Splunk, we need to create a Data Input TCP. To do that we will use the Splunk Enterprise Security Content Collection available on Automation Hub as part of the Red Hat-Maintained Content Collections release.

This Collection has been created to support Splunk Enterprise Security, a security product delivered as an add-on application for Splunk Enterprise and extends that to deliver Security Information and Event Management (SIEM) functionalities. Splunk Enterprise Security leverages many capabilities of the underlying platform hence, despite having been developed for security automation use cases, most of the modules in this Collection can be used to support Day 0 and  Day 1 IT Operations use cases as well. If you want to read more about how Ansible Content Collections developed as part of the Ansible security automation initiative can help to overcome security operation challenges, check out our blog post "Getting started with Ansible security automation: investigation enrichment" from our Roland Wolters.

The Splunk Enterprise Security Content Collection has the following modules as of today:

  • adaptive_response_notable_event - Manage Splunk Enterprise Security Notable Event Adaptive Responses
  • correlation_search - Manage Splunk Enterprise Security Correlation Searches
  • correlation_search_info - Manage Splunk Enterprise Security Correlation Searches
  • data_input_monitor - Manage Splunk Data Inputs of type Monitor
  • data_input_network - Manage Splunk Data Inputs of type TCP or UDP

If you want to learn more about collections in general and how to get started with them, check out our blog post "Hands on with Ansible collections" from our Ajay Chenampara.

Coming back to our use case, we will use the data_input_network module. First let's install the Collection splunk.es:

$ ansible-galaxy collection install splunk.es
Process install dependency map
Starting collection install process
Installing 'splunk.es:1.0.0' to '/root/.ansible/collections/ansible_collections/splunk/es'

After the installation of the Collection, the next step is to create our inventory:

[splunk]
splunk.customer.com

[splunk:vars]
ansible_network_os=splunk.es.splunk
ansible_user=USER
ansible_httpapi_pass=PASS
ansible_httpapi_port=8089
ansible_httpapi_use_ssl=yes
ansible_httpapi_validate_certs=True
ansible_connection=httpapi

Note that we set the connection type to httpapi: the communication with Splunk Enterprise Security takes place via REST API. Also, remember to adjust the authentication, port and certificate data according to your environment.

Next let's create the playbook which will set up the input network:

---
- name: Splunk Data Input
  hosts: splunk
  gather_facts: False
  collections:
    - splunk.es

  tasks:
    - name: create splunk_data_input_network
      splunk.es.data_input_network:
        name: "9199"
        protocol: "tcp"
        source: "http:tower_logging_collections"
        sourcetype: "httpevent"
        state: "present"

Let's run the playbook to create the input network:

$ ansible-playbook -i inventory.ini splunk_with_collections.yml

Validating Data Input

To validate if our data input was created, in the Splunk web interface, click on Settings -> Data inputs -> TCP. Verify that the TCP port is listed as a source type "httpevent" like in the screenshot below:

Splunk blog one

We can also validate the data input by checking if the port 9199 is open and does receive connections:

$  telnet splunk.customer.com 9199
Trying 1.2.3.4...
Connected to splunk.customer.com.
Escape character is '^]'.

Configuring Ansible Tower

The activity stream logs in Ansible Tower provide information on creating and deleting objects, such as logging activities within the Ansible Tower, for more information and details, check out the documentation.

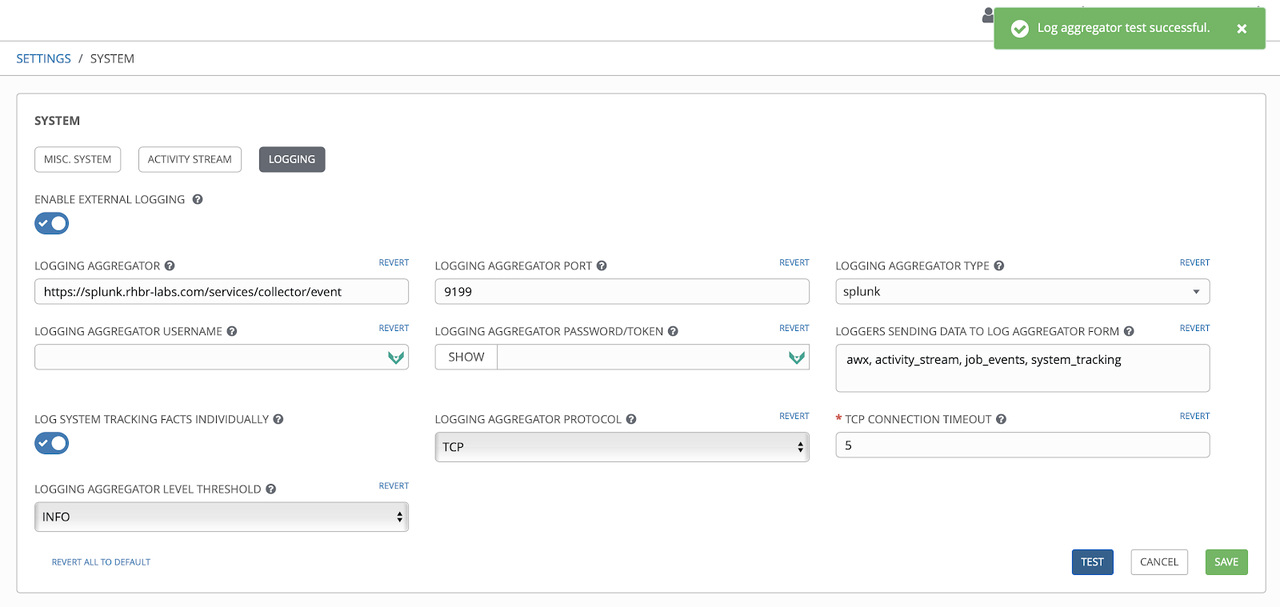
After Splunk is all set up, let's dive into Ansible Tower, and connect both tools with each other! First we are going to configure Ansible Tower to send logs to Data Input  in Splunk. For this, we enter the Ansible Tower Settings: there, pick "System" and click  "Logging". This opens an overview of the logging configuration of Ansible Tower as shown below. In there, we specify the URL for Splunk as well as the URL context /services/collector/event. Also, we have to provide the port, here 9199, and select the right aggregator type, here Splunk. Now select protocol TCP, and click first the "Save" button and then, to verify our configuration, the "Test" button.

Splunk blog two

Viewing the logs in Splunk

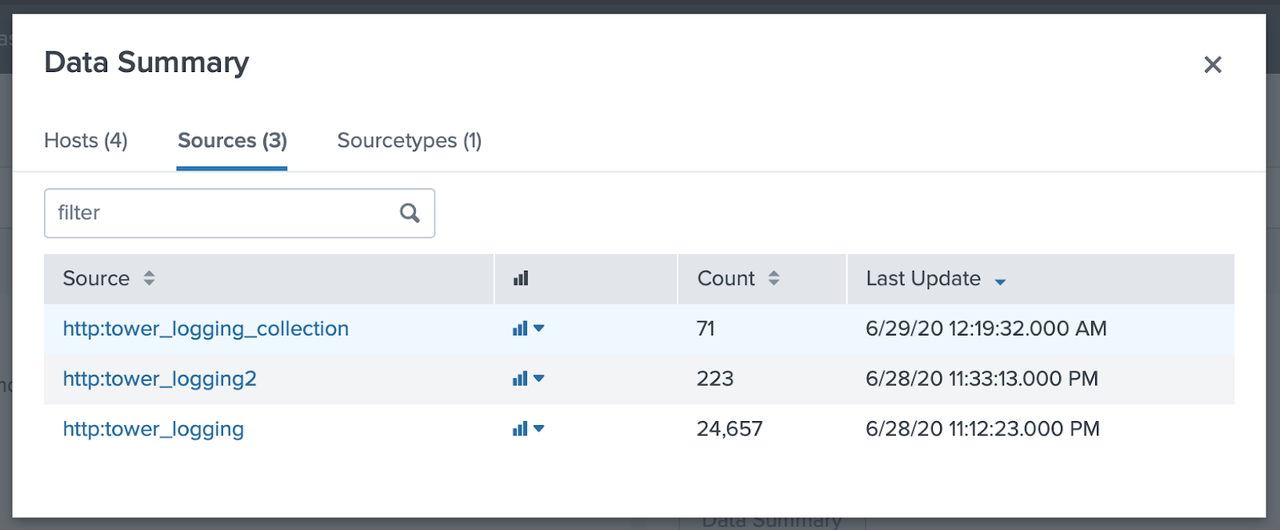
Now that Ansible Tower is all set up, let's head back to Splunk and check if the logs are making their way there. In Splunk home, click on "Search & Reporting". In "What to Search" pick "Data Summary". A window will open up, where you can click on the "Sources" column:

Splunk blog three

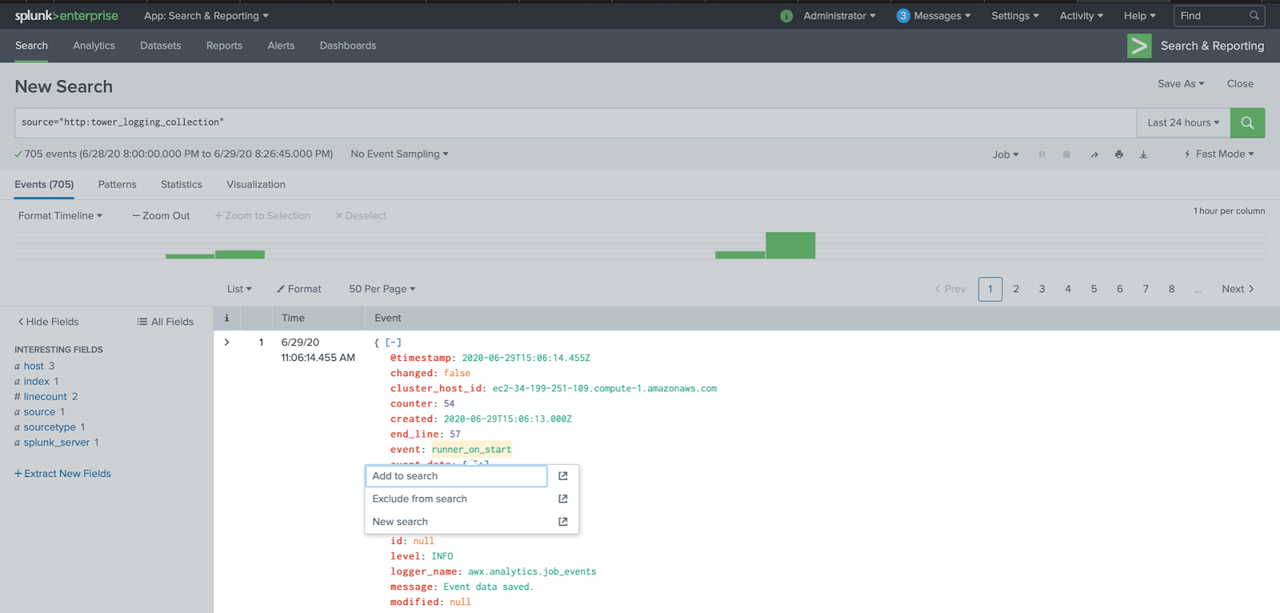
Click on the source http:tower_logging_collection, this will take us to the Search screen, where it is possible to view the records received from Ansible Tower:

splunk blog

If all is working fine, you should see the last log events received from Ansible Tower, showing that the two tools are now properly connected. Congratulations!

But we don't want to stop there: after all, logging is all about analyzing the incoming information and making sense of it. So let's create a filter: click on the field you'd like to filter, to be filtered and then pick "Add to search".

splunk blog five

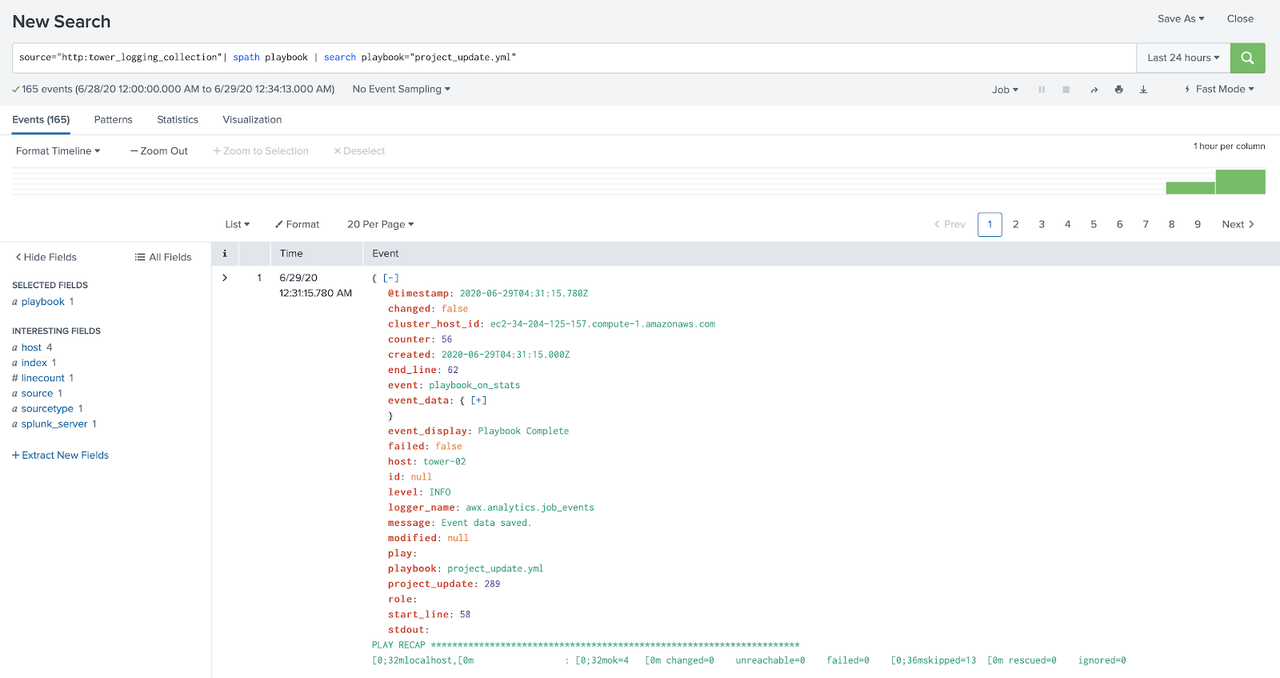
After that, the search field will be filled with our filter.

splunk blog six

Creating a simple dashboard

In this example, we will create a simple graph of the events generated by Ansible Tower.

We will use the previous step on how to create a filter, but this time we will filter the event field and in the search field we will leave it this way:

source="http:tower_logging_collection"| spath event | search event=*

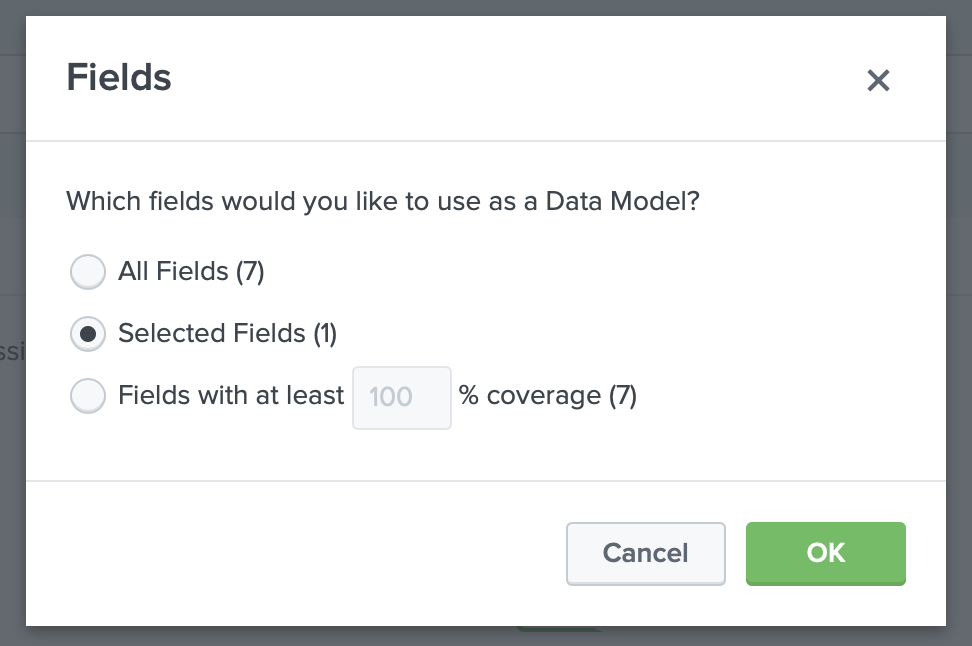
With event = * all events are filtered.  After that click on the "All Fields" button on the left side menu, select the event field and click on exit. That done, click on Visualization and then select the Pivot option, in the window select "Selected Fields (1)" and click OK.

splunk blog seven

In this window, we will keep the filters as "All time", in "Split Columns" select event and then "Add To Table", after that we can already have a view of the information separated in columns with the name of the column being the event and their number of appearances in the logs.

splunk blog eight

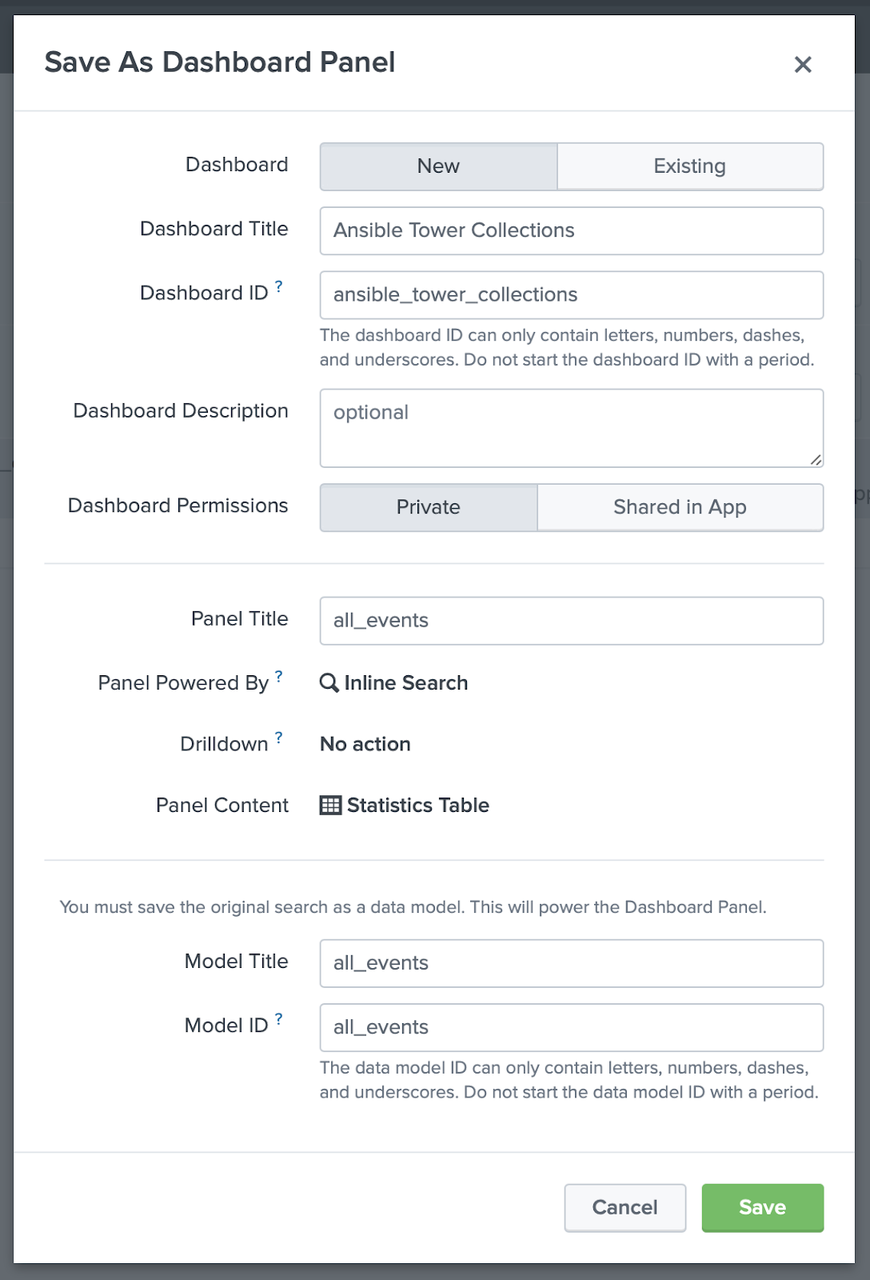
After viewing the information in columns, click "Save As" and select "Dashboard Panel".  In "Dashboard" select "New", in "Dashboard Title" define the name you want for the Dashboard, this name will generate the Dashboard ID, in Panel Title and Model Title, define the name of this search, for example all_events and click Save and then View Dashboard.

splunk blog nine

In the following screen, click on Edit in the upper right menu then in the all_events panel click on "Select Visualization", choose the visualization you want, in this example we select "Bar Chart" and click "Save".

splunk blog ten

Now that we have our dashboard with a chart listing all events, repeat the process of creating filters and in saving the search, select an existing dashboard to add new panels to the dashboard we created.

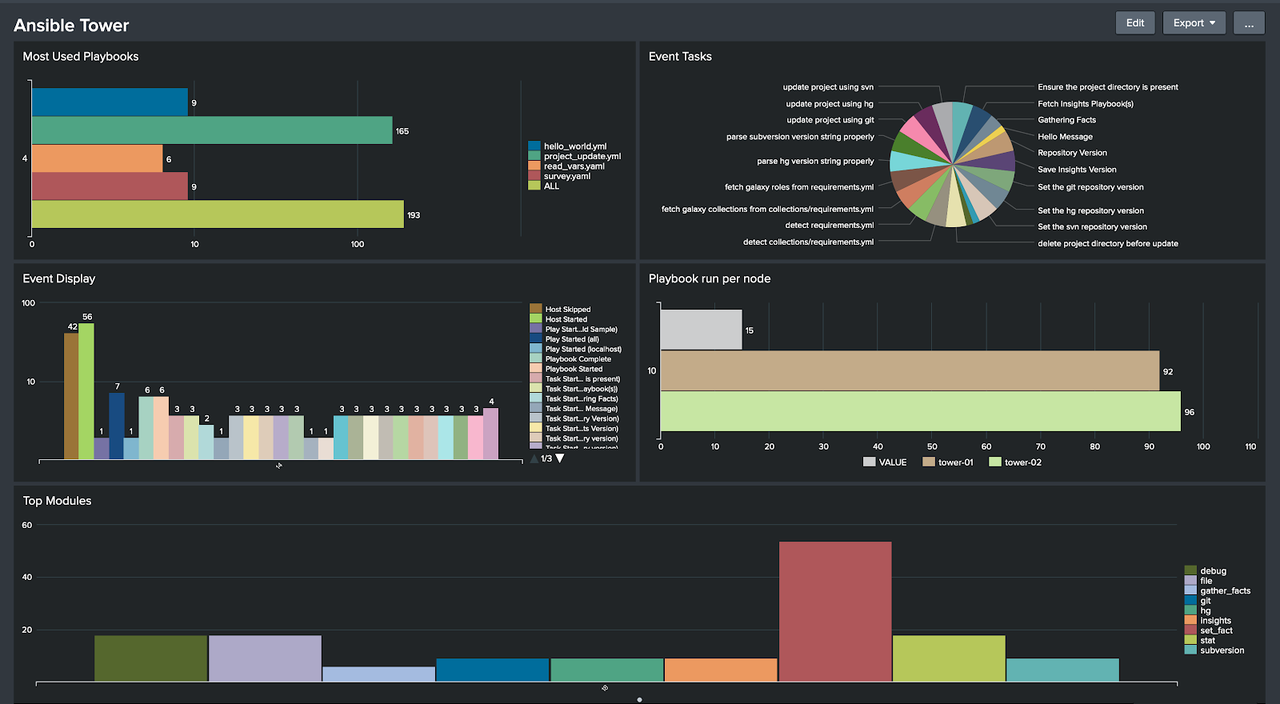
After creating some panels and adding them to the existing dashboard, we will have a visualization like this:

splunk blog eleven

To use more advanced features of integrating Ansible Tower with Splunk, see the Collection Splunk_enterprise_security, which will allow you to configure Data Inputs and search correlation options, among other features.

Takeaways and where to go next

In this post, we demonstrate how to send the Ansible Tower usage logs to Splunk to enable a centralized view of all events generated by Ansible Tower. That way we can create graphs from various information, such as the number of playbooks that failed or succeeded, modules most used in the executed playbooks and so on.


Deep dive on Cisco ASA resource modules

Deep dive on Cisco ASA resource modules

Recently, we published our thoughts on resource modules applied to the use cases targeted by the Ansible security automation initiative. The principle is well known from the network automation space and we follow the established path. While the last blog post covered a few basic examples, we'd like to show more detailed use cases and how those can be solved with resource modules.

This blog post goes in depth into the new Cisco ASA Content Collection, which was already introduced in the previous article. We will walk through several examples and describe the use cases and how we envision the Collection being used in real world scenarios.

The Cisco ASA Certified Content Collection: what is it about?

The Cisco ASA Content Collection provides means to automate the Cisco Adaptive Security Appliance family of security devices - short Cisco ASA, hence the name. With a focus on firewall and network security they are well known in the market.

The aim of the Collection is to integrate the Cisco ASA devices into automated security workflows. For this, the Collection provides modules to automate generic commands and config interaction with the devices as well as resource oriented automation of access control lists (ACLs) and object groups (OGs).

How to install the Cisco ASA Certified Ansible Content Collection

The Cisco ASA Collection is available to Red Hat Ansible Automation Platform customers at Automation Hub, our software as a service offering on cloud.redhat.com and a place for Red Hat subscribers to quickly find and use content that is supported by Red Hat and our technology partners.

Once that is done, the Collection is easily installed:

ansible-galaxy collection install cisco.asa

Alternatively you can also find the collection in Ansible Galaxy, our open source hub for sharing content in the community.

What's in the Cisco ASA Content Collection?

The focus of the Collection is on the mentioned modules (and the plugins supporting them): there are three modules for basic interaction, asa_facts, asa_cli and asa_config. If you are familiar with other networking and firewall Collections and modules of Ansible you will recognize this pattern: these three modules provide the most simple way of interacting with networking and firewall solutions. Using those, general data can be received, arbitrary commands can be sent and configuration sections can be managed.

While these modules already provide a great value for environments where the devices are not automated at all, the focus of this blog article is on the other modules in the Collection: the resource modules asa_ogs and asa_acls. Being resource modules they have a limited scope, but enable users of the Collection to focus on that particular resource without being disturbed by other content or configuration items. They also enable a simpler cross-product automation since other Collections follow the same pattern.

If you take a closer look, you will find two more modules: asa_ogs and asa_acls. As mentioned in our first blog post about security automation resource modules, those are deprecated modules, which previously were used to configure ACLs and OGs. They are superseded by the resource modules.

Connect to Cisco ASA, the Collection way

The Collection supports network_cli as a connection type. Together with the network OS cisco.asa.asa, a username and a password, you are good to go. To get started quickly, you can simply provide these details as part of the variables in the inventory:

[asa01]
host_asa.example.com

[asa01:vars]
ansible_user=admin
ansible_ssh_pass=password
ansible_become=true
ansible_become_method=ansible.netcommon.enable
ansible_become_pass=become_password
ansible_connection=ansible.netcommon.network_cli
ansible_network_os=cisco.asa.asa
ansible_python_interpreter=python

Note that in a productive environment those variables should be supported in a secure way, for example, with the help of Ansible Tower credentials.

Use Case: ACLs

After all this is setup, we are now ready to dive into the actual Collections and how they can be used. For the first use case, we want to look at managing ACLs within ASA. Before we dive into Ansible Playbook examples, let's quickly discuss what ASA ACLs are and what an automation practitioner should be aware of.

ASA Access-lists are created globally and are then applied with the access-group "command". They can either be applied inbound or outbound. There are few things users should be aware with respect to access-lists on the Cisco ASA firewall:

  • When a user creates an ACL for higher to lower security level i.e. outbound traffic then the source IP address is the address of the host or the network (not the NAT translated one).

  • When a user creates an ACL for lower to higher security level i.e. inbound traffic then the destination IP address has to be either of the below two:

    • The translated address for any ASA version before 8.3.
    • The address for ASA 8.3 and newer.
  • The access-list is always checked before NAT translation.

Additionally, changing ACLs can become very complex quickly. It is not only about the configuration itself, but also the intent of the automation practitioner: should a new ACL just be added to the existing configuration? Or should it replace it? And what about merging them?

The answer to these questions usually depends on the environment and situation the change is deployed in. The different ways of changing ACLs are noted here and in the Cisco ASA Content Collection as "states": different ways to deploy changes to ACLs.

The ACLs module knows the following states:

  • Gathered
  • Merged
  • Overridden
  • Replaced
  • Deleted
  • Rendered
  • Parsed

In this use case discussion, we will have a look at all of them, though not always in full detail. However, we will provide links to full code listings for the interested readers.

Please note that while we usually use network addresses for the source and destination examples, other values like network object-groups are also possible.

State Gathered: Populating an inventory with configuration data

Given that resource modules allow to read-in existing network configuration and convert that into structured data models, the state "gathered" is the equivalent for gathering Ansible Facts for this specific resource. That is helpful if specific configuration pieces should be reused as variables later on. Another use case is to read-in the existing network configuration and store it as a flat-file. This flat file can be committed to a git repository on a scheduled base, effectively tracking the current configuration and changes of your security tooling.

To showcase how to store existing configuration as a flat file, let's take the following device configuration:

ciscoasa# sh access-list
access-list cached ACL log flows: total 0, denied 0 (deny-flow-max 4096)
            alert-interval 300
access-list test_access; 2 elements; name hash: 0x96b5d78b
access-list test_access line 1 extended deny tcp 192.0.2.0 255.255.255.0 192.0.3.0 255.255.255.0 eq www log default (hitcnt=0) 0xdc46eb6e
access-list test_access line 2 extended deny icmp 198.51.100.0 255.255.255.0 198.51.110.0 255.255.255.0 alternate-address log errors interval 300 (hitcnt=0) 0x68f0b1cd
access-list test_R1_traffic; 1 elements; name hash: 0x2c20a0c
access-list test_R1_traffic line 1 extended deny tcp 2001:db8:0:3::/64 eq www 2001:fc8:0:4::/64 eq telnet (hitcnt=0) 0x11821a52

To gather and store the content as mentioned above, we need to first gather the data from each device, then create a directory structure mapping our devices and then store the configuration there, in our case as YAML files. The following playbook does exactly that. Note the parameter state: gathered in the first task.

---
- name: convert interface to structured data
  hosts: asa
  gather_facts: false
  tasks:


    - name: Gather facts
       cisco.asa.asa_acls:
         state: gathered
       register: gather

    - name: Create inventory directory
      become: true
      delegate_to: localhost
      file:
       path: "{{ inventory_dir }}/host_vars/{{ inventory_hostname }}"
       state: directory

    - name: Write each resource to a file
      become: true
      delegate_to: localhost
      copy:
        content: "{{ gather[‘gathered’][0] | to_nice_yaml }}"
        dest: "{{ inventory_dir }}/host_vars/{{ inventory_hostname }}/acls.yaml"

The state "gathered" only collects existing data. In contrast to most other states, it does not change any configuration. The resulting data structure from reading in a brownfield configuration can be seen below:

$ cat lab_inventory/host_vars/ciscoasa/acls.yaml
- acls:
   - aces:
       - destination:
           address: 192.0.3.0
           netmask: 255.255.255.0
           port_protocol:
                 eq: www
         grant: deny
         line: 1
         log: default
         protocol: tcp
         protocol_options:
           tcp: true
         source:
           address: 192.0.2.0
           netmask: 255.255.255.0
...

You can the full detailed listing of all the commands and outputs of the example in the state: gathered reference gist.

State Merged: Add/Update configuration

After the first, non-changing state we now have a look at a state which changes the target configuration: "merged". This state is also the default state for any of the available resource modules - because it just adds or updates the configuration provided by the user. Plain and simple.

For example, let's take the following existing device configuration:

ciscoasa# sh access-list
access-list cached ACL log flows: total 0, denied 0 (deny-flow-max 4096)
            alert-interval 300
access-list test_access; 1 elements; name hash: 0x96b5d78b
access-list test_access line 1 extended deny tcp 192.0.2.0 255.255.255.0 192.0.3.0 255.255.255.0 eq www log debugging interval 300 (hitcnt=0) 0xdc46eb6e

Let us assume we want to deploy the configuration which we stored as a flat-file in the gathered example. Note that the content of the flat file is basically one variable called "acls". Given this flat file and the variable name, we can use the following playbook to deploy the configuration on a device:

---
- name: Merged state play
  hosts: cisco
  gather_facts: false
  collections:
   - cisco.asa

  tasks:
    - name: Merge ACLs config with device existing ACLs config
      asa_acls:
        state: merged
        config: "{{ acls }}"

Once we run this merge play all of the provided parameters will be pushed and configured on the Cisco ASA appliance.

Afterwards, the network device configuration is changed:

ciscoasa# sh access-list
access-list cached ACL log flows: total 0, denied 0 (deny-flow-max 4096)
            alert-interval 300
ccess-list test_access; 2 elements; name hash: 0x96b5d78b
access-list test_access line 1 extended deny tcp 192.0.2.0 255.255.255.0 192.0.3.0 255.255.255.0 eq www log default (hitcnt=0) 0xdc46eb6e
access-list test_access line 2 extended deny icmp 198.51.100.0 255.255.255.0 198.51.110.0 255.255.255.0 alternate-address log errors interval 300 (hitcnt=0) 0x68f0b1cd
access-list test_R1_traffic; 1 elements; name hash: 0x2c20a0c
access-list test_R1_traffic line 1 extended deny tcp 2001:db8:0:3::/64 eq www 2001:fc8:0:4::/64 eq telnet (hitcnt=0) 0x11821a52

All the changes we described in the playbook with the resource modules are now in place in the device configuration.

If we dig slightly into the device output there are following observations:

  • The merge play configured 2 ACLs:

    • test_access, configured with 2 Access Control Entries (ACEs) 
    • test_R1_traffic with only 1 ACEs
  • test_access is an IPV4 ACL where for the first ACE we have specified the line number as 1 while for the second ACE we only specified the name which is the only required parameter. All the other parameters are optional and can be chosen depending on the particular ACE policies . Note however that it is considered best practice to configure the line number if we want to avoid an ACE to be configured as the last in an ACL.

  • test_R1_traffic is an IPV6 ACL 

  • As there weren't any pre-existing ACLs on this device, all the play configurations have been added. If we had any  pre-existing ACLs and the play also had the same ACL with either different ACEs or same ACEs with different configurations, the merge operation would have updated the existing ACL configuration with the new provided ACL configuration.

Another benefit of automation shows when we run the respective merge play a second time: Ansible's charm of idempotency comes into the picture! The play run results in "changed=False" which confirms to the user that all of the provided configurations in the play are already configured on the Cisco ASA device.

You can the full detailed listing of all the commands and outputs of the example in the state: merged reference gist.

State Replaced: Old out, new in

Another typical situation is when a device is already configured with an ACL with existing ACEs, and the automation practitioner wants to update the ACL with a new set of ACEs while entirely discarding all the already configured ones.

In this scenario the state "replaced" is an ideal choice: as the name suggests, the replaced state will replace ACL existing ACEs with a new set of ACEs given as input by the user. If a user tries to configure any new ACLs that are not already pre-configured on the device it'll act as a merge state and the asa_acls module will try to configure the ACL ACEs given as input by the user inside the replace play.

Let's take the following brown field configuration:

ciscoasa# sh access-list
access-list cached ACL log flows: total 0, denied 0 (deny-flow-max 4096)
            alert-interval 300
access-list test_access; 2 elements; name hash: 0x96b5d78b
access-list test_access line 1 extended deny tcp 192.0.2.0 255.255.255.0 192.0.3.0 255.255.255.0 eq www log default (hitcnt=0) 0xdc46eb6e
access-list test_access line 2 extended deny icmp 198.51.100.0 255.255.255.0 198.51.110.0 255.255.255.0 alternate-address log errors interval 300 (hitcnt=0) 0x68f0b1cd
access-list test_R1_traffic; 1 elements; name hash: 0x2c20a0c
access-list test_R1_traffic line 1 extended deny tcp 2001:db8:0:3::/64 eq www 2001:fc8:0:4::/64 eq telnet (hitcnt=0) 0x11821a52

Now we assume we want to configure a new ACL named "test_global_access", and we want to replace the already existing "test_access" ACL configuration with a new source and destination IP. The corresponding ACL configuration for our new desired state is:

- acls:
   - name: test_access
     acl_type: extended
     aces:
       - grant: deny
         line: 1
         protocol: tcp
         protocol_options:
           tcp: true
         source:
           address: 192.0.3.0
           netmask: 255.255.255.0
         destination:
           address: 192.0.4.0
           netmask: 255.255.255.0
           port_protocol:
             eq: www
         log: default
   - name: test_global_access
     acl_type: extended
     aces:
       - grant: deny
         line: 1
         protocol_options:
           tcp: true
         source:
           address: 192.0.4.0
           netmask: 255.255.255.0
           port_protocol:
             eq: telnet
         destination:
           address: 192.0.5.0
           netmask: 255.255.255.0
           port_protocol:
             eq: www

Note that the definition is again effectively contained in the variable "acls" - which we can reference as a value for the "config" parameter of the asa_acls module just as we did in the last example. Only the value for the state parameter is different this time:

---
- name: Replaced state play
  hosts: cisco
  gather_facts: false
  collections:
   - cisco.asa

  tasks:
    - name: Replace ACLs config with device existing ACLs config
      asa_acls:
        state: replaced
        config: "{{ acls }}"

After running the playbook, the network device configuration has changed as intended: the old configuration was replaced with the new one. In cases where there was no corresponding configuration in place to be replaced, the new one was added:

ciscoasa# sh access-list
access-list cached ACL log flows: total 0, denied 0 (deny-flow-max 4096)
            alert-interval 300
access-list test_access; 1 elements; name hash: 0x96b5d78b
access-list test_access line 1 extended deny tcp 192.0.3.0 255.255.255.0 192.0.4.0 255.255.255.0 eq www log default (hitcnt=0) 0x7ab83be2
access-list test_R1_traffic; 1 elements; name hash: 0x2c20a0c
access-list test_R1_traffic line 1 extended deny tcp 2001:db8:0:3::/64 eq www 2001:fc8:0:4::/64 eq telnet (hitcnt=0) 0x11821a52
access-list test_global_access; 1 elements; name hash: 0xaa83124c
access-list test_global_access line 1 extended deny tcp 192.0.4.0 255.255.255.0 eq telnet 192.0.5.0 255.255.255.0 eq www (hitcnt=0) 0x243cead5

Note that the ACL test_R1_traffic was not modified or removed in this example!

You can the full detailed listing of all the commands and outputs of the example in the state: replaced reference gist.

State Overridden: Drop what is not needed

As noted in the last example, ACLs which are not explicitly mentioned in the definition remain untouched. But what if there is the need to reconfigure all existing and pre-configured ACLs with the input ACL ACEs configuration - and also affect those that are not mentioned? This is where the state "overridden" comes into play.

If you take the same brown field environment from the last example and deploy the same ACL definition against it, but this time switch the state to "overridden", the resulting configuration of the device looks quite different:

Brownfield device configuration before deploying the ACLs:

ciscoasa# sh access-list
access-list cached ACL log flows: total 0, denied 0 (deny-flow-max 4096)
            alert-interval 300
access-list test_access; 2 elements; name hash: 0x96b5d78b
access-list test_access line 1 extended deny tcp 192.0.2.0 255.255.255.0 192.0.3.0 255.255.255.0 eq www log default (hitcnt=0) 0xdc46eb6e
access-list test_access line 2 extended deny icmp 198.51.100.0 255.255.255.0 198.51.110.0 255.255.255.0 alternate-address log errors interval 300 (hitcnt=0) 0x68f0b1cd
access-list test_R1_traffic; 1 elements; name hash: 0x2c20a0c
access-list test_R1_traffic line 1 extended deny tcp 2001:db8:0:3::/64 eq www 2001:fc8:0:4::/64 eq telnet (hitcnt=0) 0x11821a52

Device configuration after deploying the ACLs via the resource module just list last time, but this time with state "overridden":

ciscoasa# sh access-list
access-list cached ACL log flows: total 0, denied 0 (deny-flow-max 4096)
            alert-interval 300
access-list test_access; 1 elements; name hash: 0x96b5d78b
access-list test_access line 1 extended deny tcp 192.0.3.0 255.255.255.0 192.0.4.0 255.255.255.0 eq www log default (hitcnt=0) 0x7ab83be2
access-list test_global_access; 1 elements; name hash: 0xaa83124c
access-list test_global_access line 1 extended deny tcp 192.0.4.0 255.255.255.0 eq telnet 192.0.5.0 255.255.255.0 eq www (hitcnt=0) 0x243cead5

Note that this time the listing is considerably shorter - the ACL test_R1_traffic was dropped since it was not explicitly mentioned in the ACL definition which was deployed. This showcases the difference between "replaced" and "overridden" state.

You can the full detailed listing of all the commands and outputs of the example in the state: overridden reference gist.

State Deleted: Remove what is not wanted

Another more obvious use case is the deletion of existing ACLs on the device, which is implemented in the "deleted" state. In that case the input is the ACL name to be deleted and the corresponding delete operation will delete the entry of the particular ACL by deleting all of the ACEs configured under the respective ACL.

As an example, let's take our brown field configuration already used in the other examples. To delete the ACL test_access we name it in the input variable:

- acls:
   - name: test_access

The playbook looks just like the one in the other examples, just with the parameter and value state: deleted. After executing it, the configuration of the device is:

ciscoasa# sh access-list
access-list cached ACL log flows: total 0, denied 0 (deny-flow-max 4096)
            alert-interval 300
access-list test_R1_traffic; 1 elements; name hash: 0x2c20a0c
access-list test_R1_traffic line 1 extended deny tcp 2001:db8:0:3::/64 eq www 2001:fc8:0:4::/64 eq telnet (hitcnt=0) 0x11821a52

The output is clearly shorter than the previous configuration since an entire ACL is missing.

You can the full detailed listing of all the commands and outputs of the example in the state: deleted reference gist.

State Rendered and State Parsed: For development and offline work

There are two more states currently available : "rendered" and "parsed". Both are special in that they are not meant to be used in production environments, but during development of your playbooks and device configuration. They do not change the device configuration - instead they output what would be changed in different formats.

The state "rendered" returns a listing of the commands that would be executed to apply the provided configuration. The content of the returned values given the above used configuration against our brown field device configuration:

"rendered": [
   "access-list test_access line 1 extended deny tcp 192.0.2.0 255.255.255.0 192.0.3.0 255.255.255.0 eq www log default",
   "access-list test_access line 2 extended deny icmp 198.51.100.0 255.255.255.0 198.51.110.0 255.255.255.0 alternate-address log errors",
   "access-list test_R1_traffic line 1 extended deny tcp 2001:db8:0:3::/64 eq www 2001:fc8:0:4::/64 eq telnet"
]

You can the full detailed listing of all the commands and outputs of the example in the state: rendered reference gist.

State "parsed" acts similar, but instead of returning the commands that would be executed, it returns the configuration as a JSON structure, which can be reused in subsequent automation tasks or by other programs. See our full detailed listing of all the commands and outputs of the parsed example in the state: parsed reference gist.

Use Case: OGs

As mentioned before, the Ansible Content Collection does support a second resource: object groups. Think of networks, users, security groups, protocols, services and the like. The resource module can be used to define them or alter their definition. Much like the ACLs resource module, the basic workflow defines them via a variable structure and then deploys them in a way identified by a state parameter. The states are basically the same as the ACLs resource module understands.

Due to this similarity, we will not go into further details here but instead refer to the different state examples mentioned above.

From a security perspective however, the object group resource module is crucial: in a modern IT environment, communication relations are not only defined by IP addresses, but can also be defined by the types of objects that are in focus: it is crucial for security practitioners to be able to abstract those types in object groups and address their communication relations in ACLs later on.

This also explains why we picked these two resource modules to start with: they work closely hand in hand and together pave the way for an automated security approach using the family of Cisco ASA devices.