Getting Started With OSPFV2 Resource Modules

Getting Started With OSPFV2 Resource Modules

With the increasing size and complexity of modern enterprise networks, the demand on simplifying the networks management becomes more intense. The introduction of resources modules with Ansible 2.9 provide a path to users to ease the network management, especially across multiple different product vendors.

In the past, we've already covered resource modules for VLAN management and for ACLs. However, simplifying network management is not limited to rather local network setups: Open Shortest Path First (OSPFv2) is a protocol used to distribute IP routing information throughout a single Autonomous System (AS). It is used in larger network setups, as the Wikipedia page so aptly observes

OSPF is a widely used IGP in large enterprise networks. IS-IS, another LSR-based protocol, is more common in large service provider networks.

Managing OSPFv2 manually for a network device can be a very difficult and tedious task, and more often this needs to be performed carefully, as the manual process is more prone to human error.

This blog post goes through the OSPFV2 resource module for the VyOS network platform. We will walk through several examples and describe the use cases for each state parameter and how we envision these being used in real world scenarios.

OSPFv2 resource modules example: Vyos

The goal of OSPFv2 resource modules is to make sure configurations are consistently applied across the infrastructure with less effort. It simplifies management and makes it faster and easier to scale without worrying about the actual implementation details of the network platforms working under the hood.

In October of 2019, as part of Red Hat Ansible Engine 2.9, the Ansible Network Automation team introduced the concept of resource modules to make network automation easier and more consistent for those automating various network platforms in production.

Ansible Content refers to Ansible Playbooks, modules, module utilities and plugins. Basically all of the Ansible tools that users utilize to create their Ansible and the OSPFv2 resource module is part of Ansible Content Collections.

Let's have a closer look at how the OSPFv2 resource modules work. As an example, we pick the vyos_ ospfv2 resource module. In this blog, we'll be using a VyOS router with version 1.1.8 (helium) for all the configuration management specific operations. Also, to better showcase the effect of the modules, we will start with some OSPF version 2 specific attributes already configured. Check out the linked listing for further details.

Accessing and using the VyOS Collection

To download the VyOS Collection, refer to Automation Hub (fully supported, requires a Red Hat Ansible Automation Platform subscription) or Ansible Galaxy (upstream community supported):

Before we get started, let's quickly explain the rationale behind naming the network resource modules. Notice for resource modules that configure OSPFV2 routes, the newly added modules will be named based on the IP address type. This was done so that those using existing network modules would not have their Ansible Playbooks stop working and have sufficient time to migrate to the new network automation modules.

A module to configure OSPFv2 is also available for the following supported platforms:

The OSPFV2 resource module provides the same level functionality that a user can achieve when configuring manually on to the VyOS device with all advantages of Ansible, plus with an added edge of Ansible facts gathering and resource module approach, which is more closely aligned with network professionals day to day working.

Use Case: OSPFv2 configuration changes

Using state gathered - Building an Ansible inventory

Resource modules allow the user to read in existing network configuration and convert that into a structured data model. The state: gathered is the equivalent for gathering Ansible Facts for this specific resource. This example will read in the existing network configuration and store it as a flat-file.

Here is an Ansible Playbook example of using state: gathered and storing the result as YAML into host_vars. If you are new to Ansible Inventory and want to learn about group_vars and host_vars, please refer to the documentation here.

---
- name: convert configured OSPFV2 resource to structured data
  hosts: vyos
  vars:
    inventory_dir: "lab_inventory"
    inventory_hostname: "vyos"
  gather_facts: false
  tasks:

  - name: Use the OSPFV2 resource module to gather the current config
    vyos.vyos.vyos_ospfv2:
      state: gathered
    register: ospfv2

  - name: Create inventory directory
    file:
      path: "{{ inventory_dir }}/host_vars/{{ inventory_hostname }}"
      state: directory

  - name: Write the OSPFV2 configuration to a file
    copy:
      content: "{{ {'ospfv2': ospfv2['gathered']} | to_nice_yaml }}"
      dest: "{{ inventory_dir }}/host_vars/{{ inventory_hostname }}/ospfv2.yaml"

Execute the Ansible Playbook with the ansible-playbook command:

$ ansible-playbook example.yml

Here is the data structure that was created from reading/gathered operation  in a brown-field configuration:

$ cat nw_inventory/host_vars/vyos/ospfv2.yaml
ospfv2:
  areas:
  - area_id: '2'
    area_type:
      normal: true
    authentication: plaintext-password
    shortcut: enable
  - area_id: '4'
    area_type:
      stub:
        default_cost: 20
        set: true

You can check out the full detailed listing of the output of this example in the state: gathered reference gist.

Using state merged - Pushing configuration changes

The state merged will take your Ansible configuration data (i.e. Ansible variables) and merges them into the network device's running configuration. This will not affect existing configuration not specified in your Ansible configuration data. Let's walk through an example.

We will modify the flat-file created in the first example with a configuration to be merged.

Here are the most important pieces:

areas:
 - area_id: '2'
   area_type:
     normal: true
   authentication: "plaintext-password"
   shortcut: 'enable'
 - area_id: '3'
   area_type:
     nssa:
       set: true

Now let's create an Ansible Playbook to merge this new configuration into the network device's running configuration:

---
- name: Merged state play
  hosts: vyos
  gather_facts: false
  tasks:
    - name: Merge OSPFV2 config with device existing OSPFV2 config
      vyos.vyos.vyos_ospfv2:
        state: merged
        config: "{{ ospfv2 }}"

Execute the Ansible Playbook with the ansible-playbook command:

$ ansible-playbook merged.yml

And, once we run the respective Merge play, all of the provided parameters will be configured on the VyOS router with Ansible changed=True.

Note the network configuration after the merge operation:

vyos@vyos:~$ show configuration commands | grep ospf
set protocols ospf area 2 area-type 'normal'
set protocols ospf area 2 authentication 'plaintext-password'
set protocols ospf area 2 shortcut 'enable'
set protocols ospf area 3 area-type 'nssa'
set protocols ospf area 4 area-type stub default-cost '20'

Note that this listing only shows a few highlights; the full listing is available in the merged gist.

Let's take a look at what has changed through this operation: if we go through the device output, there are a few observations:

  • Attribute area with area_id '3' got added to the OSPF areas list. 
  • The redistribute and parameter attribute got configured for OSPF.
  • If there was an already configured OSPF with AREA and the user wanted to update any parameter for that particular AREA, then the user can also use the Merged state to update the AREA under OSPFV2.

With the second run, the respective Merge Play runs again and Ansible charm of Idempotency comes to picture. If nothing's changed, play run results into changed=False, which confirms to the user that all of the provided configurations in the play are already configured on the IOS device.

Using state replaced - Replacing configuration

If the user wants to re-configure the VyOS device entirely pre-configured OSPFV2 with the provided OSPFV2 configuration, then the resource module replaced state comes into picture.

The scope of the replaced operation is up to the individual processes. In the case of VyOS only a single process is supported. As a result, the replaced state acts similar to the overridden state. For that reason a dedicated overridden state is not required with the VyOS modules. Other network platforms that support multiple OSPFV2 processes do have the overridden state operation.

Using the overridden state, a user can override all OSPFV2 resource attributes with user-provided OSPFV2 configuration. Since this resource module state overrides all pre-existing attributes of the resource module, the overridden state should be used cautiously, as OSPFV2 configurations are very important; if all the configurations are mistakenly replaced with the play input configuration, it might create unnecessary issues for the network administrators. 

In this scenario, OSPF with 'n' number AREAs are already configured on the VyOS device, and now the user wants to update the AREA list with a new set of AREAs and discard all the already configured OSPF AREAs. Here, the resource module replaced state will be an ideal choice and, as the name suggests, the replaced state will replace OSPF existing AREA list with a new set of AREAs given as input by the user.

If a user tries to configure any new OSPFV2 AREA/attribute that's not already pre-configured on the device, it'll act as a merged state and the vyos_ospfv2 module will try to configure the OSPF AREAs given as input by the user inside the replace play.

We will modify the flat-file created in the first example:

areas:
 - area_id: '2'
   area_type:
     normal: true
   authentication: "plaintext-password"
   shortcut: 'enable'
 - area_id: '4'
   area_type:
     stub:
      default_cost: 20

Check out the full input config structure if you want to learn more details.

Again, we create an Ansible Playbook to merge this new configuration into the network device's running configuration:

---
- name: Replaced state play
  hosts: vyos
  gather_facts: false
  tasks:
    - name: Replace OSPFV2 config with device existing OSPFV2 config
      vyos.vyos.vyos_ospfv2:
        state: replaced
        config: "{{ ospfv2 }}"

Once we run the respective Replaced play, all of the provided parameters will override all the existing OSPFv2 resource specific config on the VyOS router with Ansible changed=True.

The network device configuration after the Replaced operation:

vyos@vyos:~$ show configuration commands | grep ospf
set protocols ospf area 2 area-type 'normal'
set protocols ospf area 2 authentication 'plaintext-password'
set protocols ospf area 2 shortcut 'enable'
set protocols ospf area 4 area-type stub default-cost '20'
set protocols ospf area 4 network '192.0.2.0/24'

Check out the corresponding gist for more details.

If we dig into the above output, we note the following changes:

  • Replaced negates all of the pre-existing OSPFV2 resource-specific attributes and deletes those configurations, which are not present inside the replaced play. In the above example, ospfv2 area-id 3 got deleted.
  • For the OSPFV2 configurations that are pre-existing and also in the play, vyos_ospfv2 replaced state will try to delete/negate all the pre-existing OSPFV2 config and then configure the new OSPFV2 config as mentioned in the play.
  • For any non-existing OSPFV2 specific attribute, the replaced state will configure the OSPFV2 in the same manner as the Merged state. In the above example, a new network address configured for OSPFv2 area-id 4.

With the second run of the above play, there are no changes reported which satisfies the Ansible idempotency.

Using state deleted - Delete configuration

Now that we've talked about how we can configure OSPFV2 specific attributes on the VyOS device by using vyos_ospfv2 resource module merged and replaced state, it's time we talk about how we can delete the pre-configured OSPFV2 attributes and what level of granularity is available with the deleted operational state for the user.

Deleting ALL OSPFV2 config in one go leads to deleting all the pre-configured OSPFV2 specific attributes from the VyOS device. But that said, this is a very critical delete operation and if not used judiciously, it has the power to delete all pre-configured OSPFV2 and can result in the production environment with the router having no pre-configured OSPFV2 attributes.

Let's create an Ansible Playbook to merge this new configuration into the network device's running configuration:

---
- name: Deleted state play
  hosts: vyos
  gather_facts: false
  tasks:
    - name: Delete ALL OSPFV2 config
      vyos.vyos.vyos_ospfv2:
        state: deleted

After we execute the playbook, the network device configuration changed:

vyos@vyos:~$ show configuration commands | grep ospf
vyos@vyos:~$

Make sure to look at the full listing of the changed values. If we dig into the above output briefly, we can see that all the ospfv2 resource-specific config has been removed from the network configuration.

Using state rendered - Development and working offline

Ansible renders the provided configuration in the task in the device-native format (for example, VyOS CLI). Ansible returns this rendered configuration in the rendered key in the result. Note this state does not communicate with the network device and can be used offline.

To have a config to be rendered, modify the YAML file created in the first scenario.  For example, if this is the vyos_ospfv2 module, you can just add a few more attributes to show we change the data model yet again.

areas:
 - area_id: '2'
   area_type:
     normal: true
   authentication: "plaintext-password"

See the full listing in the corresponding rendered gist.

We create a playbook to execute this:

---
- name: Rendered state play
  hosts: vyos
  gather_facts: false
  tasks:
    - name: Render the provided configuration
      vyos.vyos.vyos_ospfv2:
        config: "{{ ospfv2 }}"
        state: rendered

This produces the following output:

"rendered": [
       "set protocols ospf log-adjacency-changes 'detail'",
       "set protocols ospf max-metric router-lsa administrative",
       "set protocols ospf max-metric router-lsa on-shutdown 10",

Check out the corresponding gist for more details.

If we dig into the above output, we can see that nothing has changed at all; rendered doesn't even require the connection establishment with an actual network device.

Using state parsed - Development and working offline

Ansible parses the configuration from the running_configuration option into Ansible structured data in the parsed key in the result. Note this does not gather the configuration from the network device, so this state can be used offline.

As the config to be parsed we take device-native format configuration:

set protocols ospf area 2 area-type 'normal'
set protocols ospf area 2 authentication 'plaintext-password'
set protocols ospf area 2 shortcut 'enable'
set protocols ospf area 4 area-type stub default-cost '20'
set protocols ospf area 4 network '192.0.2.0/24'
set protocols ospf area 4 range 192.0.3.0/24 cost '10'

The playbook to apply this configuration is:

---
- name: Parsed state play
  hosts: vyos
  gather_facts: false
  tasks:
    - name: Parse the provided OSPFV2 configuration
      vyos.vyos.vyos_ospfv2:
        running_config:
           "set protocols ospf area 2 area-type 'normal'
            set protocols ospf area 2 authentication 'plaintext-password'
            set protocols ospf area 2 shortcut 'enable'
        state: parsed

Execute the playbook generates the following output:

"parsed": {
        "areas": [
            {
                "area_id": "2",
                "area_type": {
                    "normal": true
                },
                "authentication": "plaintext-password",
                "shortcut": "enable"
             }

                ]
            }
...

If we dig into the above output, we can see that nothing has changed at all, parsed operation doesn't even require the connection establishment with an actual network device.

Note: parsed input to be provided as value to running_config key.

Takeaways & Next Steps

As shown above, with the help of the resource modules management of OSPFV2, resource-specific configurations can be greatly simplified. Users don't need to bother much about OSPFV2 implementation details for each platform, they can just enter the actual data. By using the merged, replaced and overridden parameters, we allow much more flexibility for network engineers to adopt automation in incremental steps. The other operations like gathered, rendered and parsed allow a better, user friendly handling of the facts and the data managed within these tasks.


Ansible Certified Content Collection for Chocolatey

Ansible Certified Content Collection for Chocolatey

It's a constant battle to keep your Windows estate updated and secure. Using Red Hat Ansible Automation Platform and Chocolatey, you can easily keep your software up-to-date and react quickly to bug fixes, security issues and 0-days on dozens, hundreds or thousands of nodes.

We're going to take you through three simple steps to show you how simple it is to deploy and update software using Chocolatey and Ansible.

Before We Start: Windows Prerequisites

Ansible  uses Winrm by default to communicate with Windows machines. Therefore, we need to ensure we have that enabled by running Enable-PSRemoting on the remote Windows computer.

For production use, we recommend enabling HTTPS for WinRM

The code examples shown below are all using the user 'ansible' as the default. If you are using a different username, make sure you change it!

Step 1: Configure Ansible to use Chocolatey.

We need to install the Chocolatey module so that Ansible can use. The  Chocolatey Ansible Content Collection is called chocolatey:chocolatey and is maintained by the Chocolatey Team. To install the Collection, and therefore the win_chocolatey modules, on your Ansible server, run:

ansible-galaxy collection install chocolatey.chocolatey

That's all there is to it! Ansible can now work with Chocolatey using the modules in the Collection.

Step 2: Install software on a remote computer

Now that we have the win_chocolatey module installed, we can go ahead and install or manage software on our remote computers.

Let's create a file called install_notepadplusplus.yml with the following contents:

---
- hosts: all
  gather_facts: false

  vars_prompt:
    - name: password
      prompt: "Enter the password for the node"

  vars:
      ansible_user: ansible
      ansible_password: "{{ password }}"
      ansible_connection: winrm
      ansible_winrm_transport: ntlm
      ansible_winrm_server_cert_validation: ignore

  tasks:
      - name: Install Notepad++ version 7.8
        win_chocolatey:
          name: notepadplusplus
          version: 7.8

Run ansible-playbook install_notepadplusplus.yaml -i <ip address>, (note the comma after the IP address) to install Notepad++ on your remote computer. Note that we are not installing the latest version in this example as we will update to that in the next step.

Once installed, open Notepad++ and press F1 to ensure we have installed the requested version. 

Step 3: Update software on a remote computer

To ensure you always have the latest version of software installed on your computers, you can use Chocolatey to upgrade them. We'll upgrade to the latest version of Notepad++.

Create a file called upgrade_notepadplusplus.yml with the following contents:

---
- hosts: all
  gather_facts: false

  vars_prompt:
    - name: password
      prompt: "Enter the password for the node"

  vars:
    ansible_user: ansible
    ansible_password: "{{ password }}"
    ansible_connection: winrm
    ansible_winrm_transport: ntlm
    ansible_winrm_server_cert_validation: ignore

  tasks:
    - name: Install latest Notepad++
      win_chocolatey:
        name: notepadplusplus
        state: latest

Run ansible-playbook upgrade_notepadplusplus.yaml -i <ip address>, (note the comma after the IP address) to update, or install, the latest Notepad++ on your remote computer. Once installed, open Notepad++ and press F1 to ensure we have installed the latest version. 

Next Steps

While we have only worked with one remote computer in this blog post, Ansible allows you to replicate this across dozens, hundreds and thousands of remote computers.

Now that you have the Ansible Chocolatey modules installed, you can install, uninstall, update and manage packages on your computers. Other modules in the Chocolatey Ansible  Content Collection give you the ability to manage the configuration, features and sources for Chocolatey itself. You can find more information on the Ansible Galaxy Chocolatey collection page.

Chocolatey has a recommended architecture for organizations, which includes setting up an internal repository. To speed up that process, there is a Quick Deployment Environment that allows you to be up and running with an internal repository with useful packages already loaded, Jenkins for automation and Chocolatey Central Management for reporting in around two hours.

For package management on Windows, Chocolatey is the package manager of choice. Working in harmony with Ansible, you can use it to update and manage your Windows computers in a similar way as you would with Linux.


Developing and Testing Ansible Roles with Molecule and Podman - Part 1

Developing and Testing Ansible Roles with Molecule and Podman - Part 1

One of the beauties of the Red Hat Ansible Automation Platform is that the language to describe automation is readable not only by a few dedicated experts, but by almost anyone across the IT ecosystem. That means all IT professionals can take part in the automation, enabling cross team collaboration and really drive automation as a culture inside an organization. With so many people contributing to the automation, it is crucial to test the automation content in-depth. So when you're developing new Ansible Content like playbooks, roles and collections, it's a good idea to test the content in a test environment before using it to automate production infrastructure. Testing ensures the automation works as designed and avoids unpleasant surprises down the road. 

Testing automation content is often a challenge, since it requires the deployment of specific testing infrastructure as well as setting up the testing conditions to ensure the tests are relevant. Molecule is a complete testing framework that helps you develop and test Ansible roles, which allows you to focus on the content instead of focusing on managing testing infrastructure.

According to its official documentation, Molecule is a project:

"designed to aid in the development and testing of Ansible roles. It encourages an approach that results in consistently developed roles that are well-written, easily understood and maintained."

Molecule allows you to test your role with many instances, ensuring it works properly across different combinations of operating systems and virtualization environments. Without it, you would have to provision and maintain a testing environment separately. You would also have to configure connectivity to those instances and ensure they are clean and ready before every test. Molecule manages those aspects for you in an automated and repeatable manner.

In this two part series, we will use Molecule to develop and test a new Ansible role. The first article will guide you through installing and configuring Molecule. In Part 2, we will use Molecule to aid with the role development.

If this role is part of a Collection, use this approach to develop and "unit" test the role. In a future article, we'll see how to use Molecule to run integrated tests in a Collection.

Molecule uses drivers to provision testing instances using different technologies, including Linux containers, virtual machines and cloud providers. By default, it comes with three drivers pre-installed: Docker and Podman drivers to manage containers, and Delegated that allows you to customize your integration. Drivers for other providers are available through the open source community.

In this article, we will use the Podman driver to develop and test a new role using Linux containers. Podman is a lightweight container engine for Linux that does not require a running daemon, and allows execution of containers in "rootless" mode for increased security. 

By using Molecule with the Podman driver, we will develop and test a new Ansible role from scratch. This basic role deploys a web application supported by the Apache web server. It must run on Red Hat Enterprise Linux (RHEL) 8 or Ubuntu 20.04 operating systems.

This example shows a common scenario where a role is expected to work on different versions of operating systems. Using Podman and Linux containers allows us to create many instances to test the role with the specific required versions. Since containers are lightweight, they also allow us to quickly iterate over the role functionality while developing it. Using containers for testing roles is applicable in this situation because the role is configuring the running Linux instances only. To test other provisioning scenarios or cloud infrastructure, we can use the delegated driver or another appropriate driver provided by the community.

What do you need?

To follow this tutorial, use a physical or virtual machine running Linux with Python 3 and Podman installed. For these examples, we're running RHEL 8.2. You also need Podman configured to run rootless containers. The installation of Podman is out of the scope of this blog, so please refer to the official documentation for more information. To install Podman on RHEL 8, you can also check the RHEL 8 container documentation.

Getting Started

Molecule is available as a Python package and thus can be installed via pip. As a first step, we create a dedicated Python environment for our Molecule installation, and install it there:

$ mkdir molecule-blog
$ cd molecule-blog
$ python3 -m venv molecule-venv
$ source molecule-venv/bin/activate
(molecule-venv) $ pip install "molecule[lint]"

Note that we installed Molecule with the "lint" option. By using this option, pip also installed the "yamllint" and "ansible-lint" tools that allow you to use Molecule to  perform static code analysis of your role, ensuring it complies with Ansible coding standards.

The installation downloads all of the dependencies from the Internet, including Ansible. Verify the installed version:

$ molecule --version
molecule 3.0.4
   ansible==2.9.10 python==3.6

Next, let's use the "molecule" command to initialize a new Ansible role.

Initializing a New Ansible Role

Generally speaking, when developing a new Ansible role, you initialize it by running the "ansible-galaxy role init" command. In this case, instead use "molecule" to initialize the new role. By doing this, you'll have the same role structure provided by the "ansible-galaxy" command and the basic boilerplate code required to run Molecule tests.

By default, Molecule uses the Docker driver to execute tests. Since we want to execute tests using "podman", we need to specify the driver name using the option --driver-name=podman when initializing the role with "molecule". 

Switch back to the "molecule-blog" directory and initialize the new role "mywebapp" with this command: 

$ molecule init role mywebapp --driver-name=podman
--> Initializing new role mywebapp...
Initialized role in /home/ricardo/molecule-blog/mywebapp successfully.

Molecule created the structure for your new role in a directory named "mywebapp". Switch into this directory and check the content created by Molecule:

$ cd mywebapp
$ tree
.
├── defaults
│   └── main.yml
├── files
├── handlers
│   └── main.yml
├── meta
│   └── main.yml
├── molecule
│   └── default
│       ├── converge.yml
│       ├── INSTALL.rst
│       ├── molecule.yml
│       └── verify.yml
├── README.md
├── tasks
│   └── main.yml
├── templates
├── tests
│   ├── inventory
│   └── test.yml
└── vars
    └── main.yml

10 directories, 12 files

Molecule includes its configuration files under the "molecule" subdirectory. When initializing a new role, Molecule adds a single scenario named "default". Later, you can add more scenarios to test different conditions. For this tutorial, we'll use the "default" scenario.

Verify the basic configuration in the file molecule/default/molecule.yml:

$ cat molecule/default/molecule.yml
---
dependency:
  name: galaxy
driver:
  name: podman
platforms:
  - name: instance
    image: docker.io/pycontribs/centos:7
    pre_build_image: true
provisioner:
  name: ansible
verifier:
  name: ansible

As per our requirements, this file specifies the Podman driver for tests. It also defines a default platform "instance" using the container image docker.io/pycontribs/centos:7 that you'll change later.

Unlike Molecule v2, Molecule v3 does not specify a linter by default. Open the configuration file molecule/default/molecule.yml using your favorite editor to include the lint configuration at the end:

$ vi molecule/default/molecule.yml
...
verifier:
  name: ansible
lint: |
  set -e
  yamllint .
  ansible-lint .

Save and close the configuration file. Run "molecule lint" from the project root to lint the entire project:

$ molecule lint

This command returns a few errors because the file "meta/main.yml" is missing some required values. Fix these issues by editing the file "meta/main.yml" and adding "author", "company", "license", "platforms", and removing the blank line at the end. Without comments - for brevity - the "meta/main.yaml" looks like this:

$ vi meta/main.yml
galaxy_info:
  author: Ricardo Gerardi
  description: Mywebapp role deploys a sample web app
  company: Red Hat

  license: MIT

  min_ansible_version: 2.9

  platforms:
  - name: rhel
    versions:
    - 8
  - name: ubuntu
    versions:
    - 20.04

  galaxy_tags: []

dependencies: []

Now re-lint the project and verify that there are no errors this time.

$ molecule lint
--> Test matrix

└── default
    ├── dependency
    └── lint

--> Scenario: 'default'
--> Action: 'dependency'
Skipping, missing the requirements file.
--> Scenario: 'default'
--> Action: 'lint'
--> Executing: set -e
yamllint .
ansible-lint .

The role is initialized and the basic molecule configuration is in place. Let's set up the test instances next.

Setting up Instances

By default, Molecule defines a single instance named "instance" using the "Centos:7" image. According to our requirements, we want to ensure our role works with RHEL 8 and Ubuntu 20.04. In addition, because this role starts the Apache web server as a system service, we need to use container images that enable "systemd".

Red Hat provides an official Universal Base Image for RHEL 8, which enables "systemd": 

  • registry.access.redhat.com/ubi8/ubi-init

For Ubuntu, there's no official "systemd" enabled images so we'll use an image maintained by Jeff Geerling from the Ansible open-source community:

  • geerlingguy/docker-ubuntu2004-ansible

To enable the "systemd" instances, modify the "molecule/default/molecule.yml" configuration file, remove the "centos:7" instance and add the two new instances.

$ vi molecule/default/molecule.yml
---
dependency:
  name: galaxy
driver:
  name: podman
platforms:
  - name: rhel8
    image: registry.access.redhat.com/ubi8/ubi-init
    tmpfs:
      - /run
      - /tmp
    volumes:
      - /sys/fs/cgroup:/sys/fs/cgroup:ro
    capabilities:
      - SYS_ADMIN
    command: "/usr/sbin/init"
    pre_build_image: true
  - name: ubuntu
    image: geerlingguy/docker-ubuntu2004-ansible
    tmpfs:
      - /run
      - /tmp
    volumes:
      - /sys/fs/cgroup:/sys/fs/cgroup:ro
    capabilities:
      - SYS_ADMIN
    command: "/lib/systemd/systemd"
    pre_build_image: true
provisioner:
  name: ansible
verifier:
  name: ansible
lint: |
  set -e
  yamllint .
  ansible-lint .

With these parameters, we're mounting the temporary filesystem "/run" and "/tmp", as well as the "cgroup" volume for each instance. We're also enabling the "SYS_ADMIN" capability, as they are required to run a container with Systemd.

Also, if you're following this tutorial on a RHEL 8 machine with SELinux enabled - as it should - you need to set the "container_manage_cgroup" boolean to true to allow containers to run Systemd. See the RHEL 8 documentation for more details:

sudo setsebool -P container_manage_cgroup 1

Molecule uses an Ansible Playbook to provision these instances. Modify and add parameters for provisioning by modifying the "provisioner" dictionary in the "molecule/default/molecule.yml" configuration file. It accepts the same configuration options provided in an Ansible configuration file "ansible.cfg". For example, update the provisioner configuration by adding a "defaults" section. Set the Python interpreter to "auto_silent" to prevent warnings. Enable the "profile_tasks", "timer", and "yaml" callback plugins to output profiling information with the playbook output. Then, add the "ssh_connection" section and disable SSH pipelining because it does not work with Podman:

provisioner:
  name: ansible
  config_options:
    defaults:
      interpreter_python: auto_silent
      callback_whitelist: profile_tasks, timer, yaml
    ssh_connection:
      pipelining: false

Save the configuration file and create the instances by running "molecule create" from the role root directory:

$ molecule create

Molecule runs the provisioning playbook and creates both instances. You can check the instances by running "molecule list":

$ molecule list
Instance Name    Driver Name    Provisioner Name    Scenario Name    Created    Converged
---------------  -------------  ------------------  ---------------  ---------  -----------
rhel8            podman         ansible             default          true       false
ubuntu           podman         ansible             default          true       false

You can also verify that both containers are running in Podman:

$ podman ps
CONTAINER ID  IMAGE                                                   COMMAND               CREATED             STATUS                 PORTS  NAMES
2e2f14eaa37b  docker.io/geerlingguy/docker-ubuntu2004-ansible:latest  /lib/systemd/syst...  About a minute ago  Up About a minute ago         ubuntu
2ce0a0ea8692  registry.access.redhat.com/ubi8/ubi-init:latest         /usr/sbin/init        About a minute ago  Up About a minute ago         rhel8

While developing the role, Molecule uses the running instances to test it. In case a test fails, or an error causes an irreversible change that requires you to start over, delete these instances by running "molecule destroy" and recreate them with "molecule create" at any time.


Bullhorn #8

Ansible Bullhorn banner

The Bullhorn

A Newsletter for the Ansible Developer Community

Welcome to The Bullhorn, our newsletter for the Ansible developer community. If you have any questions or content you’d like to share, please reach out to us at the-bullhorn@redhat.com, or comment on this GitHub issue.
 

ANSIBLE 2.10.0 ALPHA 9 NOW AVAILABLE

The Ansible Community team announced the availability of Ansible 2.10.0 Alpha 9 on August 14th. This new Ansible package should be a drop-in replacement for Ansible 2.9; the roles and playbooks that you currently use should work out of the box with ansible-2.10.0 alpha9. For more information on how to download, test, and report issues, read Toshio Kuratomi’s announcement to the ansible-devel mailing list.
 

ANSIBLE-BASE 2.10.0 NOW GENERALLY AVAILABLE

The Ansible Base team announced the general availability of ansible-base 2.10.0 on August 13th. This ansible-base package consists of only the Ansible execution engine, related tools (e.g. ansible-galaxy, ansible-test), and a very small set of built-in plugins, and is also bundled with the larger Ansible distribution. For more information on how to download, test, and report issues, read Rick Elrod’s announcement to the ansible-devel mailing list.
 

ANSIBLE 2.9.12 AND 2.8.14 RELEASED

The Ansible Core team announced the availability of Ansible 2.9.12 and Ansible 2.8.14 on August 10th, both of which are maintenance releases. Follow this link for Rick Elrod’s email to the ansible-devel mailing list, to obtain details on what’s new, installation instructions, and links to the full changelogs.
 

NEW/UPDATED COMMUNITY COLLECTIONS

Ansible Podman collection has been updated recently with new Podman modules: podman_volume to manage Podman container volumes on the host, podman_pod and podman_pod_info - for managing Podman pods. Podman and Buildah connection plugins now support non-root users connections. All modules and plugins support Podman both versions v1 and v2. A few bugs of idempotency for podman_container module have been fixed. You can find updated documentation here.

The Red Hat Automation Community of Practice has created a Galaxy Collection for AWX and Tower Configuration. The goal is to allow users to define all AWX/Tower Objects as Code. If you manage large scale, complex AWX or Tower instances it is worth checking out.

Here's an update on the latest beta release of the IBM z/OS core collection, including three new z/OS core modules in Ansible Galaxy: zos_mvs_raw, zos_lineinfile, and zos_copy.

The collections for Zabbix and Grafana are now both at version 1.0.0, freshly released by the community over the weekend on August 16th! They are available on Ansible Galaxy: Grafana collection and Zabbix collection.
 

COLLECTION PROPOSALS

YANG and NETCONF are vendor agnostic IETF standards that are used mainly for network device management. The proposal linked here outlines how Ansible plugins in community.yang collection will ease managing YANG and NETCONF enabled devices using structured data. The plugins will provide maximum flexibility (YANG variant independent) and provide a simple-to-use approach. Review comments/suggestions/feedback are welcomed from the community.
 

ANSIBLE-LINT 4.3.0 RELEASED WITH ANSIBLE 2.10 SUPPORT

The ansible-lint community is happy to announce the release of ansible-lint 4.3.0. This release includes more than 330 commits since v4.2.0.1, made over the past 6 months.
 

ANSIBLE COMMUNITY STATS UPDATE

With two Virtual Contributor Summits under our belt (and thus two surveys) we can start to look at the data they provide. Greg plans to do a longer post after the next Summit, looking at trends and so forth, but for now, here’s how people felt about the July Summit - pretty positive!


CONTENT FROM THE ANSIBLE COMMUNITY


THE ANSIBLE COMMUNITY TEAM IS HIRING

The Ansible Community team is hiring engineers to help with onboarding Ansible contributors. For more info, please see the following job descriptions:  

ANSIBLEFEST VIRTUAL EXPERIENCE 2020

This year’s AnsibleFest will be a virtual experience! Find out the latest details about the event in this blog post, and register here. We are also having our Ansible Contributor Summit alongside AnsibleFest. More details will be shared soon!
 

ANSIBLE VIRTUAL MEETUPS

The following virtual meetups are being held in the Ansible community over the next month:
  • Ansible Minneapolis: Enhancing Cisco ACI Automation with Ansible Tower and Collections
    • Thu, Aug 20 · 6:30 PM CDT
       
  • Ansible Toronto August 2020 (virtual)
    • Tue, Aug 25 · 12:00 PM EDT
       
  • Ansible NYC: Multicloud Networking Leveraging Ansible and Pureport
    • Tue, Aug 25 · 6:00 PM EDT
       
  • Ansible London [virtual] meetup – 10th Sept
    • Thu, Sep 10 · 5:45 PM GMT+1
 
Note: For these virtual meetups, the links to participate will be visible once you RSVP to attend. If you’re interested in the topics presented, you can join from anywhere in the world as long as the time zone and language works for you!
 

FEEDBACK

Have any questions you’d like to ask, or issues you’d like to see covered? Please send us an email at the-bullhorn@redhat.com.


Using an Inventory Plugin from a Collection in Ansible Tower

Using an Inventory Plugin from a Collection in Ansible Tower

Many IT environments grow more and more complex. It is more important than ever that an automation solution always has the most up to date information about what nodes are present and need to be automated. To answer this challenge, the Red Hat Ansible Automation Platform uses inventories: lists of managed nodes.

In its simplest form, inventories can be static files. This is ideal when getting started with Ansible, but as the automation is scaled, a static inventory file is not enough anymore:

  1. How do we update and maintain a list of all of our managed nodes if something changes, if workloads are spun up or teared down?
  2. How do we classify our infrastructure so that we can be more selective in what managed nodes we automate against?

The answer to both of these questions is to use a dynamic inventory: a script or a plugin that will go to a source of truth and discover the nodes that need to be managed. It will also automatically classify the nodes by putting them into groups, which can be used to more selectively target devices when automating with Ansible.

Inventory plugins allow Ansible users to use external platforms to dynamically discover target hosts and use those platforms as a Source of Truth for their Ansible inventory. Common sources of truth include AWS EC2, Google GCP and Microsoft Azure , but there are a number of other inventory plugins available with Ansible.

Ansible Tower ships with a number of inventory plugins that work out of the box. These include the cloud examples mentioned earlier as well as VMware vCenter, Red Hat OpenStack Platform and  Red Hat Satellite. To use these inventory plugins, credentials need to be added that can query the source platform. Afterwards, the inventory plugins can be used as a source for an inventory in Ansible Tower. 

There are additional inventory plugins available, which are not shipped with Ansible Tower, but which are written by the Ansible community. With the move to Red Hat Ansible Content Collections these inventory plugins are being packaged as part of the corresponding Collections.

In this example, we are having a look at the ServiceNow inventory plugin. ServiceNow is a very popular IT Service Management platform and customers often use the ServiceNow CMDB to store details of all of their devices. A CMDB can provide additional context to automation. For example, server owner, service level (production/non-production) and patch & maintenance windows. Their Ansible Inventory plugin can be used to query the ServiceNow CMDB and is delivered as part of the servicenow.servicenow collection available on galaxy

Git Repository

To use an inventory plugin from a Collection in Ansible Tower, we need to source it from a Project. A Project within Ansible Tower is the integration of a source control repository like a git repository. In Ansible Tower, projects are used to pull Ansible Playbooks but also variables and inventories. 

The contents of my source control repository are very simple:

├── collections
│   └── requirements.yml
└── servicenow.yml

The servicenow.yml file contains the details for the inventory plugin. In our case, we  specify the correct table in the ServiceNow CMDB that we want to use. We also select the fields we want to add as host_vars and some information on the groups that we want it to create.

$ cat servicenow.yml
plugin: servicenow.servicenow.now
table: cmdb_ci_linux_server
fields: [ip_address,fqdn,host_name,sys_class_name,name,os]
keyed_groups:
  - key: sn_sys_class_name | lower
    prefix: ''
    separator: ''
  - key: sn_os | lower
    prefix: ''
    separator: ''

Note that no details of the ServiceNow instance that we want to connect to or any credentials are defined here. Those will be configured within Ansible Tower later on.

The collections/requirements.yml file is needed so that Ansible Tower can download the Collection and therefore the inventory plugin. Otherwise, we would have to install and maintain the Collection on all of our Ansible Tower nodes manually.

$ cat collections/requirements.yml
---
collections:

- name: servicenow.servicenow

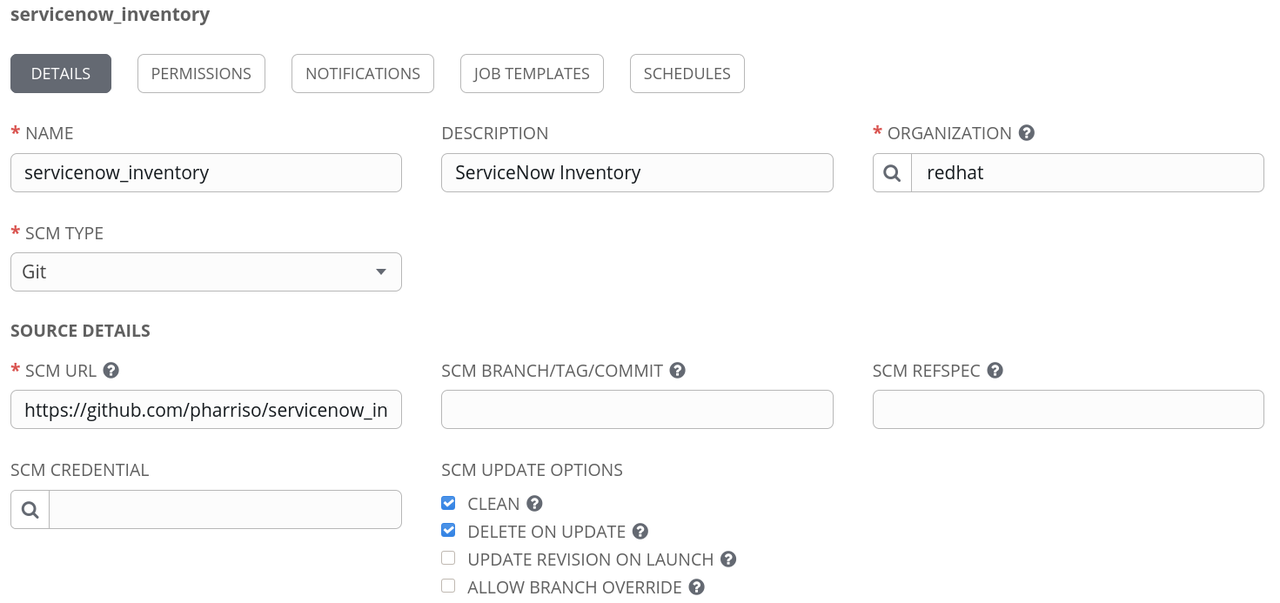
Once we have pushed this configuration into the source control repository, we can create a project in Ansible Tower referencing the repository. Below is an example that links Ansible Tower to my github repository. Note the SCM URL. We can optionally specify a credential if the repository is private and also specify a specific branch, tag or commit to pull from.

plugin blog image one

Create the ServiceNow Credential

As mentioned, the configuration in our repository does not include credentials to use with ServiceNow, or the definition of the ServiceNow instance to speak to. Thus we will create a credential in Ansible Tower to define those values. Looking at the documentation for the ServiceNow inventory plugin, we can see that there are a number of environment variables that we can set to define the connection details. For example:

= username
        The ServiceNow user account, it should have rights to read cmdb_ci_server (default), or table specified by SN_TABLE

        set_via:
        env:
        - name: SN_USERNAME

In this case, if the SN_USERNAME environment variable is set then the inventory plugin will use it as the user account to connect to ServiceNow.

The other variables we need to set are - SN_INSTANCE and SN_PASSWORD

However, in Ansible Tower, there is no credential type for ServiceNow where we can enter these details. Luckily for such use cases, Ansible Tower allows us to define custom credential types.

In our case, the input configuration for a custom credential for ServiceNow is as follows:

fields:
  - id: SN_USERNAME
    type: string
    label: Username
  - id: SN_PASSWORD
    type: string
    label: Password
    secret: true
  - id: SN_INSTANCE
    type: string
    label: Snow Instance
required:
  - SN_USERNAME
  - SN_PASSWORD
  - SN_INSTANCE

The credentials will be exposed as environment variables of the same name. This is described in the injector configuration:

env:
  SN_INSTANCE: '{{ SN_INSTANCE }}'
  SN_PASSWORD: '{{ SN_PASSWORD }}'
  SN_USERNAME: '{{ SN_USERNAME }}'

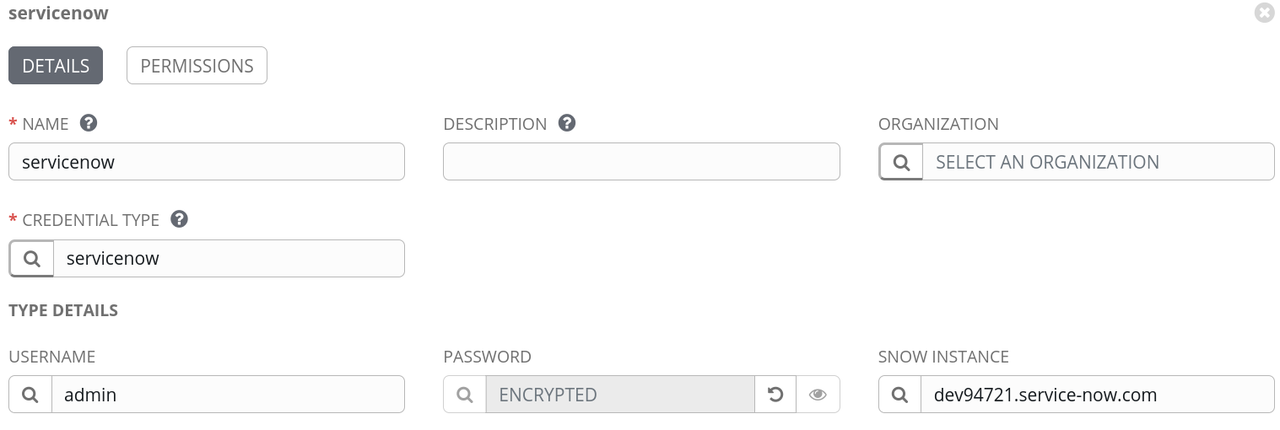
With the custom credential type defined, we can now add a ServiceNow credential and set the instance, username and password as shown:

plugin blog image two

Create the Inventory

The final step is to create the inventory within Ansible Tower. We need a name - here ServiceNow: 

plugin blog image three

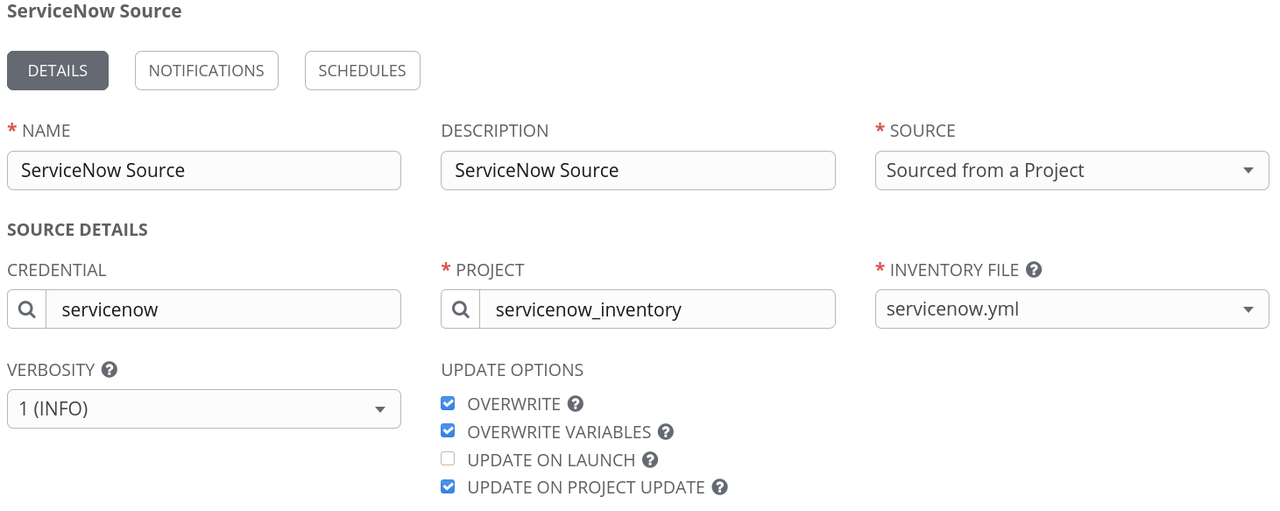
With the inventory created, we can now attach a source to it. Here we specify the Project that we created earlier and enter the path to our inventory YAML file in the source control repository- in this case, that is servicenow.yml in the root of the project. We also need to associate our ServiceNow credential.

plugin blog image four

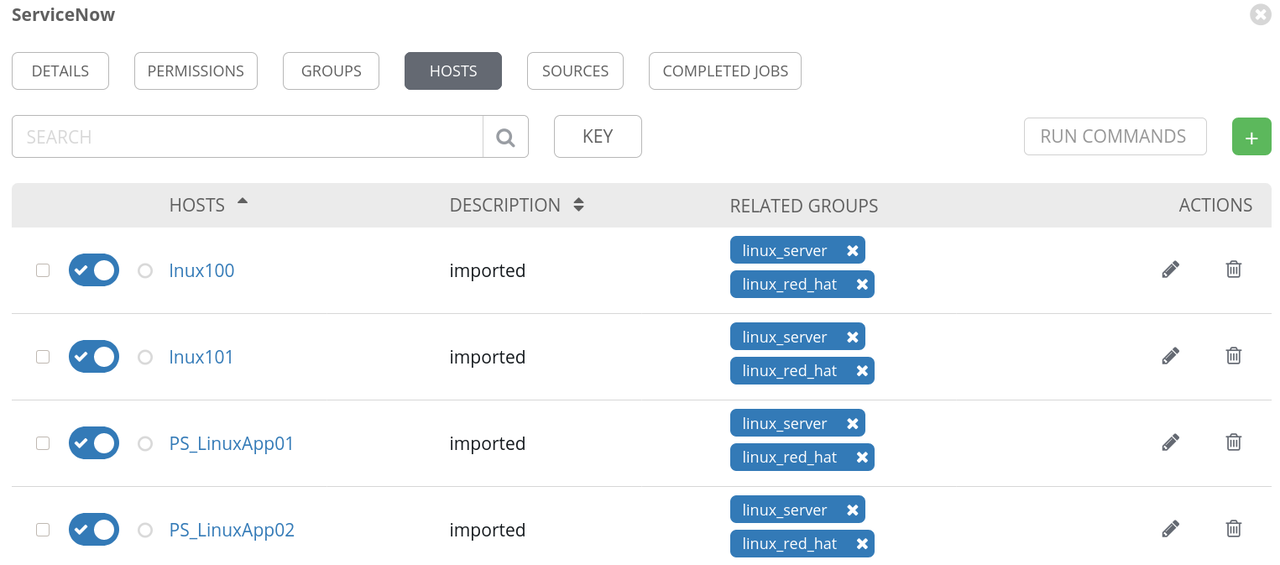
To test the setup, we can try syncing with the source. Pressing the button "Sync all" does just that. If everything was configured correctly, the hosts should be imported into the inventory:

plugin blog image 5

Note the groups that we requested were also created.

Summary

In this example, we have shown how to use inventory plugins from Collections within  Ansible Tower using the ServiceNow inventory plugin. We have also securely defined the credentials to authenticate to our ServiceNow instance. Sourcing an inventory plugin from a Project is not exclusive to third party or custom plugins either: this is a valid method for modifying the behaviour of some of the built-in inventory plugins as well. These capabilities enable the Ansible Automation Platform to seamlessly integrate with existing tools while automating IT environments of growing complexity.