Using the win_dsc Module in Ansible

Using the win_dsc Module in Ansible

Hello, and welcome to another Getting Started with Ansible + Windows post! In this article we'll be exploring what Desired State Configuration is, why it's useful, and how to utilize it with Ansible to manage your Windows nodes.

What is DSC?

So what exactly is Desired State Configuration? It's basically a system configuration management platform that uses the declarative model; in other words, you tell DSC the "what", and it will figure out the "how". Much like Ansible, DSC uses push-mode execution to send configurations to the target hosts. This is very important to consider when delivering resources to multiple targets.

This time-saving tool is built into PowerShell, defining Windows node setup through code. It uses the Local Configuration Manager (which is the DSC execution engine that runs on each node).

Microsoft fosters a community effort to build and maintain DSC resources for a variety of technologies. The results of these efforts are curated and published each month to the Powershell Gallery as the DSC Resource Kit. If there isn't a native Ansible module available for the technology you need to manage, there may be a DSC resource.

How Do You Use DSC with Ansible?

DSC Resources are distributed as PowerShell modules, which means that it works similarly to Ansible, just implemented in a different manner. The win_dsc module has been available since the release of Ansible 2.4, and it can influence existing DSC resources whenever it interacts with a Windows host.

To use this module, you will need PowerShell 5.1 or later. Once you make sure that you have the correct version of PowerShell installed on your Windows nodes, using DSC is as easy as executing a task using the win_dsc module.

Let's look at it in action. For this example we'll ensure a DNS server is installed, the xDnsServer DSC resource module is present, and also use a couple of the DSC resources under it to define a zone and an A Record:

- hosts: Erasmus
  tasks:
  - win_feature:
      name:
      - DNS
      - RSAT-DNS-Server
      state: present
  - win_psmodule:
      name: xDnsServer
      repository: PSGallery
  - win_dsc:
      resource_name: xDnsServerPrimaryZone
      Name: my-arbre.com
  - win_dsc:
      resource_name: xDnsRecord
      Name: test
      Zone: my-arbre.com
      Target: 192.168.17.75
      Type: ARecord

Let's walk through what's happening in the above playbook: it starts by installing the DNS Server on the target, then the xDnsServer DSC resource module is installed. With the DSC resources now installed the xDnsServerPrimaryZone resource is called to create the zone, then the xDnsRecord resource is invoked with arguments to fill in the zone details for our my-arbre.com site. The xDnsServer resource is downloaded from PowerShellGallery.com which has a reliable community for DSC resources.

Keep in mind that the win_dsc module is designed for driving a single DSC Resource provider to make it work like an Ansible module. It is not intended to be used for defining the DSC equivalent of a playbook on the host and running it.

A couple more points to remember:

  • The resource_name must be set to the name of a DSC resource already installed on the target when defining the task.
  • Matching the case to the documentation is best practices; this also makes it easier to tell the difference of DSC resource options from Ansible's win_dsc options.

Conclusion

Now you know the basics of how to use DSC for your Windows nodes by invoking the win_dsc module in an Ansible Playbook. To read more about Ansible + DSC, check out our official documentation page on the topic.

Special thanks to my teammate John Lieske for lots of technical assistance with this post. And as always, happy automating!


Getting Started with Workflow Job Templates

Getting Started with Workflow Job Templates

Welcome to another post in the Getting Started series! Today we're going to get into the topic of Workflow Job Templates. If you don't know what regular Job Templates are in Red Hat Ansible Tower, please read the previously published article that describes them. It'll provide you with some technical details that'll be a useful jumping-off point for the topic of workflows.

Once you're familiar with the basics, read on! We'll be covering what exactly Workflow Job Templates are, what makes them useful, how to generate/edit one, and a few extra pointers as well as best practices to make the most out of this great tool.

What is a Workflow Job Template?

The word "workflow" says it all. This particular feature in Ansible Tower (available as of version 3.1) enables users to create sequences consisting of any combination of job templates, project syncs, and inventory syncs that are linked together in order to execute them as a single unit. Because of this, workflows can help you organize playbooks and job templates into separate groups.

Why are Workflows Useful?

By utilizing this feature, you can set up ordered structures for different teams to use. For example, two different environments (i.e., networking and developers) can interface via workflows as long as they have permissions to access it. Not everyone involved will need to know what job run goes after what, since the structure is set up for them by the user who created the workflow. This connects disparate job types and unifies projects without each team needing to know everything about what the other does.

Another reason workflows are useful is because they allow the user to take any number of playbooks and "daisy chain" them, with the ability to make a decision tree depending on a job's success or failure. You can make them as simple or as complex as they need to be!

How Do You Create One?

[Go into the Templates section on the top menu of Ansible Tower:

Getting-Started-Tower-Workflows-13

From there, click on "Add", but make sure to select "Workflow Template":

Getting-Started-Tower-Workflows-15

You'll see this new screen, where you can name your workflow template anything you like and save it:

Getting-Started-Tower-Workflows-10

Once you've done that, go into "Edit Workflow":

Getting-Started-Tower-Workflows-1

This screen will come up, where you can add different job templates and make sure they run on failure, success, or with either outcome:

Getting-Started-Tower-Workflows-11

Note that you can decide if things run on success, on failure, or always.

[**Getting-Started-Tower-Workflows-9

As mentioned in the previous section, you can make your Ansible workflow as simple...

Getting-Started-Tower-Workflows-4

...or complex as you need to!

Getting-Started-Tower-Workflows-12

After everything is set and saved, you're ready to launch your template, which you can do by clicking on the rocket icon next to the workflow you'd like to run:

Getting-Started-Tower-Workflows-7

What More Can You Do With Workflows?

You can schedule your workflows to run when you need them to! Just click on the calendar icon next to any workflow job template:

Getting-Started-Tower-Workflows-5

... and fill out the information for when you want the specified workflow to automatically run:

Getting-Started-Tower-Workflows-8   If you have a workflow template created that works very well for you and you'd like to copy it, click on the button highlighted below:

Getting-Started-Tower-Workflows-2

Keep in mind that copying a workflow won't also copy over any of the permissions, notifications, or schedules associated with the original.

If you need to set extra variables for the playbooks involved in a workflow template and/or allow for authorization of user input, then setting up surveys is the way to go. In order to set one up, select a workflow template and click on the "Add Survey" button:

Getting-Started-Tower-Workflows-3

A survey screen that you can fill out with specific questions and answer types will show up:

Getting-Started-Tower-Workflows-14

Notifications can give you more control and knowledge related to specific workflows. To activate one, select the workflow that you want to set notifications for, then click the Notifications button:

Getting-Started-Tower-Workflows-16

Keep in mind that you'll have to already have some notifications set up in the Notifications list. The screen that comes up will enable you to select specific notifications; in the example below the "Workflow-Specific Notification" has been set to activate on either a successful or failed run:

Getting-Started-Tower-Workflows-6

Note: Make sure you have "update on launch" on your inventory selected when you make a new workflow job template if you're acting against a dynamic inventory!

Conclusion

Now you know how to combine any number of playbooks into a customized decision tree, with the ability to schedule those jobs, add notifications, and much more. An added bonus is the fact that this isn't an enterprise-only feature, so no matter your Ansible Tower license type, you can log into your instance and have fun creating workflows!

To read more about how to create and modify workflow job templates, check out our official documentation page on the topic.

I hope this article was helpful, and that it enables you to take advantage of the powerful automation features that are possible with Ansible Tower!


An Introduction to Windows Security with Ansible

An Introduction to Windows Security with Ansible

Welcome to another installment of our Windows-centric Getting Started Series! In the prior posts we talked about connecting to Windows machines, gave a brief introduction on using Ansible with Active Directory, and discussed package management options on Windows with Ansible. In this post we'll talk a little about applying security methodologies and practices in relation to our original topics.

The Triad

In order to discuss security issues in relation to Ansible and Windows, we'll be applying concepts from the popular CIA Triad: Confidentiality, Integrity, and Availability.

Confidentiality is pretty self-evident --- protecting confidentiality helps restrict private data to only authorized users and helps to prevent non-authorized ones from seeing it. The way this is accomplished involves several techniques such as authentication, authorization, and encryption. When working with Windows, this means making sure the hosts know all of the necessary identities, that each user is appropriately verified, and that the data is protected (by, for example, encryption) so that it can only be accessed by authorized parties.

Integrity is about making sure that the data is not tampered with or damaged so that it is unusable. When you're sending data across a network you want to make sure that it arrives in the same condition as it was sent out. This will apply to the tasks in an Ansible Playbook, any files that may be transferred, or packages that are installed (and more!).

Availability is mainly about making data available to those authorized users when they need to access it. Think about things like redundancy, resiliency, high-availability, or clustering as ways to help ensure availability of systems and data.

Confidentiality

As Bianca mentioned in the first installment of this series, Ansible uses WinRM and sends user/password with variables (or, in the case of Ansible Tower, by using credentials). In the example below, which shows an inventory file that includes variables as [win:vars], the certificate is ignored:

[win:vars]
ansible_user=vagrant
ansible_connection=winrm
ansible_winrm_server_cert_validation=ignore

In an Active Directory environment the domain-joined hosts won't require ignoring certificates that validate if your control node has been set to trust the Active Directory CS.

Integrity

Active Directory, discussed by John in the second installment, adds more verification to credentials and authority for validating certificates on domains in its scope. The directory services provide added strength to confidentiality by being the authoritative credential store. Joining a host to the domain establishes its trust, so as long as a user requesting resources is valid, then a domain-joined host will have established integrity.

Ansible is able to add and manage users (win_domain_user), groups (win_domain_group), or hosts (win_domain_membership) securely and with valid domain credentials. See the example below for how these tasks can be done with the use of a playbook:

- name: Join to domain
  win_domain_membership:
    dns_domain_name: tycho.local
    hostname: mydomainclient
    domain_admin_user: "{{ win_domain_admin_user }}"
    domain_admin_password: "{{ win_domain_admin_password }}"
    domain_ou_path: "OU=Windows,OU=Servers,DC=tycho,DC=local"
    state: domain
  register: domain_state

- name: set group with delete protection enabled
  win_domain_group:
    name: Users
    scope: domainlocal
    category: security
    ignore_protection: no

Availability

In the a recent Windows-related post, which was about package management, Jake gave a few examples that used the Ansible Modules win_package and win_chocolatey. This is related to the third part of that security triad because the data model's physical and transport layers get a lot of attention in terms of obtainability, but fast and efficient software/patch management is also a part of maintaining this availability. The less time eaten up through rolling out updates reduces downtime. Shaving minutes or even seconds in a rollout can pay off with more consistent service delivery.

An important availability-related security function which can be executed using an Ansible module is related to updates. As the name suggests, win_updates searches, downloads, and installs updates on all Windows hosts simultaneously by automating the Windows update client. Let's explore this module further.

The example below is taken from the example that's part of a collection of Ansible Roles related to security automation. Here you can see the win_updates module in action:

tasks:
 - name: Install security updates
   win_updates:
     category_names:
       - SecurityUpdates
     Notify: reboot windows system

Another example shows how you can use this module within a playbook for patching Windows nodes, along with the win_reboot module which is used for--- you guessed it!--- automating the restarting of Windows machines:

– name: Install missing updates
  win_updates:
    Category_names:
       – ServicePacks
       – UpdateRollups
       – CriticalUpdates
    Reboot: yes

Conclusion

Security is a complex and ever-evolving field that's dependent on each organization's particular environment, vulnerabilities, and specific needs. It's extremely important to read the above as a guideline and not a checklist; no amount of implementation is going to have any long-lasting effect if continual improvement isn't implemented.

We hope you found this information helpful, and that this five-part series has provided you with the tools for automating your Windows hosts with confidence by using Ansible to do the work for you!


Red Hat Single Sign-on Integration with Ansible Tower

Red Hat Single Sign-on Integration with Ansible Tower

As you might know, Red Hat Ansible Tower supports SAML authentication (both N and Z) by default. This document will guide you through the steps for configuring both products to delegate the authentication to RHSSO/Keycloak (Red Hat Single Sign-On).

Requirements:

  • A running RHSSO/Keycloak instance
  • Ansible Tower
  • Admin rights for both
  • DNS resolution

Hands-On Lab

Unless you have your own certificate already, the first step will be to create one. To do so, execute the following command:

openssl req -new -x509 -days 365 -nodes -out saml.crt -keyout saml.key

Now we need to create the Ansible Tower Realm on the RHSSO platform. Go to the "Select Realm" drop-down and click on "Add new realm":

Ansible-Tower-SSO-Screen-16

Once created, go to the "Keys" tab and delete all certificates, keys, etc. that were created by default.

Now that we have a clean realm, let's populate it with the appropriate information. Click on "Add Keystore" in the upper right corner and click on RSA:

Ansible-Tower-SSO-Screen-15

Click on Save and create your Ansible Tower client information. It is recommend to start with the Tower configuration so that you can inject the metadata file and customize a few of the fields.

Log in as the admin user on Ansible Tower and go to "Settings > Configure Tower > Authentication > SAML". Here you will find many fields (two of them read-only), that give us the information necessary to make this work:

  • Assertion Consumer Service
  • Metadata URL for the Service Provider (this will return the configuration for your IDP)

Ansible-Tower-SSO-Screen-18

Now let's fill all the required fields:

  • EntityID for SAML Service Provider: tower.usersys.redhat.com (must be the same on RHSSO as client_id name)
  • Pub Cert: use the saml.crt (cat saml.crt and copy/paste)
  • Private Key: use the same.key (cat saml.key and copy/paste)

Ansible-Tower-SSO-Screen-17

  • Org info of Service Provider:
{
  "en-US": {
    "url": "https://rhsso.usersys.redhat.com:8443",
    "displayname": "RHSSO Solutions Engineering",
    "name": "RHSSO"
  }
}

Ansible-Tower-SSO-Screen-4

  • Technical contact for SAML Service Provider:
{
  "givenName": "Juan Manuel Parrilla",
  "emailAddress": "jparrill@redhat.com"
}

Ansible-Tower-SSO-Screen-7

  • Support contact for SAML Service Provider:
{
  "givenName": "Juan Manuel Parrilla",
  "emailAddress": "jparrill@redhat.com"
}

Ansible-Tower-SSO-Screen-7

  • Enabled SAML Identity Providers:
{
   "RHSSO": {
      "attr_last_name": "last_name",
      "attr_username": "username",
      "entity_id": "https://rhsso.usersys.redhat.com:8443/auth/realms/tower",
      "attr_user_permanent_id": "name_id",
      "url": "https://rhsso.usersys.redhat.com:8443/auth/realms/tower/protocol/saml",
      "attr_email": "email",
      "x509cert": "",
      "attr_first_name": "first_name",
      "attr_groups": "groups"
   }
}

Note: To provide the x509cert field on the JSON, just execute this command and paste the result on the Ansible Tower interface:

sed ':a;N;$!ba;s/\n//g' saml.crt

Ansible-Tower-SSO-Screen-20

  • Organization SAML Map:
{
   "Default": {
      "users": true
   },
   "Systems Engineering": {
      "admins": [
         "acheron@redhat.com",
         "jparrill@redhat.com",
         "covenant@redhat.com",
         "olympia@redhat.com
      ],
      "remove_admins": false,
      "remove_users": false,
      "users": true
   }
}

Ansible-Tower-SSO-Screen-10

Recommended Steps and Things to Check

  • RHSSO is the chosen name, which can be whatever you want and is not tied to DNS or server configurations. This is simply a visual marker.
  • All the attr_ fields are required to work and will be mappers on the client that we will create on the next step.
  • Entity_id will point to your realm. Go to your RHSSO realm through WebUI and in "General" you will see "OpenID Endpoint Configuration". Just click and catch the "issuer" field to fulfill the entity_id.
  • "For url" is a fixed field; put your entity_id there, followed by /protocol/saml.
  • If you generated your cert/key in RHSSO, you will have them in one line. To convert to PEM format you can just wrap them in "-----BEGIN CERTIFICATE-----" etc. and use fold -w64 to split the single line.

RHSSO Client Configuration

Now that you've configured SAML on Ansible Tower save the changes and start with the RHSSO Client configuration.

First, log in as the admin user on the RHSSO platform and go to the "Tower" realm. From there, go to "Clients" and select "Create". Click on "select file" to import the data that we already have on Ansible Tower (to get the configuration execute this command from your laptop: curl -L -k https://tower.usersys.redhat.com/sso/metadata/saml/). Modify the Client ID by pointing it to tower.usersys.redhat.com, then set the "Client Protocol" to SAML as displayed below:

Ansible-Tower-SSO-Screen-19

Next, fix the configuration to fit the following screenshot:

Ansible-Tower-SSO-Screen-1

The last step to take is to create the mappers on Tower's RHSSO client. The purpose of this is to define the information that comes from your RHSSO, which will be mapped against Ansible Tower users.

To do this, we must go to Mappers tab:

Ansible-Tower-SSO-Screen-14

Displayed below are the necessary mappers:

Ansible-Tower-SSO-Screen-6

The following screenshot shows proper configuration of user name, last name, email, user ID, and first name:

Ansible-Tower-SSO-Screen-22

Ansible-Tower-SSO-Screen-11

Ansible-Tower-SSO-Screen-8

Ansible-Tower-SSO-Screen-9

Ansible-Tower-SSO-Screen-3

Note: "firstName" and "lastName" are case sensitive since they map the RHSSO user property.

Now you're all set!

Let's test with a user that we already have on our RHSSO (we have RHSSO with a user federation against ldap.example.com). For testing purposes, you can create a user on "Manage > Users" if you wish.

Now go to the Ansible Tower login page and you should see "Sign in With S":

Ansible-Tower-SSO-Screen-21

Click on this "S" and you will be redirected to login on your RHSSO server:

Ansible-Tower-SSO-Screen-2

And that's it! Ansible-Tower-SSO-Screen-5

Hope this was a helpful guide to Red Hat Single Sign-On integration with Ansible Tower!


Shell Scripts to Ansible

Shell Scripts to Ansible

During a recent client visit, we were asked to help migrate the following script for deploying a centralized sudoers file to RHEL and AIX servers. This is a common scenario which can provide some good examples of leveraging advanced Ansible features. Additionally, we can consider the shift in approach from a script that does a task to describing and enforcing the state of an item idempotently.

Here is the script:

#!/bin/sh
# Desc: Distribute unified copy of /etc/sudoers
#
# $Id: $
#set -x

export ODMDIR=/etc/repos

#
# perform any cleanup actions we need to do, and then exit with the
# passed status/return code
#
clean_exit()
{
cd /
test -f "$tmpfile" && rm $tmpfile
exit $1
}

#Set variables
PROG=`basename $0`
PLAT=`uname -s|awk '{print $1}'`
HOSTNAME=`uname -n | awk -F. '{print $1}'`
HOSTPFX=$(echo $HOSTNAME |cut -c 1-2)
NFSserver="nfs-server"
NFSdir="/NFS/AIXSOFT_NFS"
MOUNTPT="/mnt.$$"
MAILTO="unix@company.com"
DSTRING=$(date +%Y%m%d%H%M)
LOGFILE="/tmp/${PROG}.dist_sudoers.${DSTRING}.log"
BKUPFILE=/etc/sudoers.${DSTRING}
SRCFILE=${MOUNTPT}/skel/sudoers-uni
MD5FILE="/.sudoers.md5"

echo "Starting ${PROG} on ${HOSTNAME}" >> ${LOGFILE} 2>&1

# Make sure we run as root
runas=`id | awk -F'(' '{print $1}' | awk -F'=' '{print $2}'`
if [ $runas -ne 0 ] ; then
echo "$PROG: you must be root to run this script." >> ${LOGFILE} 2>&1
exit 1
fi

case "$PLAT" in
SunOS)
export PINGP=" -t 7 $NFSserver "
export MOUNTP=" -F nfs -o vers=3,soft "
export PATH="/usr/sbin:/usr/bin"
echo "SunOS" >> ${LOGFILE} 2>&1
exit 0
;;
AIX)
export PINGP=" -T 7 $NFSserver 2 2"
export MOUNTP=" -o vers=3,bsy,soft "
export PATH="/usr/bin:/etc:/usr/sbin:/usr/ucb:/usr/bin/X11:/sbin:/usr/java5/jre/bin:/usr/java5/bin"
printf "Continuing on AIX...\n\n" >> ${LOGFILE} 2>&1
;;
Linux)
export PINGP=" -t 7 -c 2 $NFSserver"
export MOUNTP=" -o nfsvers=3,soft "
export PATH="/usr/local/sbin:/usr/local/bin:/sbin:/bin:/usr/sbin:/usr/bin:/root/bin"
printf "Continuing on Linux...\n\n" >> ${LOGFILE} 2>&1
;;
*)
echo "Unsupported Platform." >> ${LOGFILE} 2>&1
exit 1
esac

##
## Exclude Lawson Hosts
##
if [ ${HOSTPFX} = "la" ]
then
echo "Exiting Lawson host ${HOSTNAME} with no changes." >> ${LOGFILE} 2>&1
exit 0
fi

##
## * NFS Mount Section *
##

## Check to make sure NFS host is up
printf "Current PATH is..." >> ${LOGFILE} 2>&1
echo $PATH >> $LOGFILE 2>&1
ping $PINGP >> $LOGFILE 2>&1
if [ $? -ne 0 ]; then
echo " NFS server is DOWN ... ABORTING SCRIPT ... Please check server..." >> $LOGFILE
echo "$PROG failed on $HOSTNAME ... NFS server is DOWN ... ABORTING SCRIPT ... Please check server ... " | mailx -s "$PROG Failed on $HOSTNAME" $MAILTO
exit 1
else
echo " NFS server is UP ... We will continue..." >> $LOGFILE
fi

##
## Mount NFS share to HOSTNAME. We do this using a soft mount in case it is lost during a backup
##
mkdir $MOUNTPT
mount $MOUNTP $NFSserver:${NFSdir} $MOUNTPT >> $LOGFILE 2>&1

##
## Check to make sure mount command returned 0. If it did not odds are something else is mounted on /mnt.$$
##
if [ $? -ne 0 ]; then
echo " Mount command did not work ... Please check server ... Odds are something is mounted on $MOUNTPT ..." >> $LOGFILE
echo " $PROG failed on $HOSTNAME ... Mount command did not work ... Please check server ... Odds are something is mounted on $MOUNTPT ..." | mailx -s "$PROG Failed on $HOSTNAME" $MAILTO
exit 1
else
echo " Mount command returned a good status which means $MOUNPT was free for us to use ... We will now continue ..." >> $LOGFILE
fi

##
## Now check to see if the mount worked
##
if [ ! -f ${SRCFILE} ]; then
echo " File ${SRCFILE} is missing... Maybe NFS mount did NOT WORK ... Please check server ..." >> $LOGFILE
echo " $PROG failed on $HOSTNAME ... File ${SRCFILE} is missing... Maybe NFS mount did NOT WORK ... Please check server ..." | mailx -s "$PROG Failed on $HOSTNAME" $MA
ILTO
umount -f $MOUNTPT >> $LOGFILE
rmdir $MOUNTPT >> $LOGFILE
exit 1
else
echo " NFS mount worked we are going to continue ..." >> $LOGFILE
fi


##
## * Main Section *
##

if [ ! -f ${BKUPFILE} ]
then
cp -p /etc/sudoers ${BKUPFILE}
else
echo "Backup file already exists$" >> ${LOGFILE} 2>&1
exit 1
fi

if [ -f "$SRCFILE" ]
then
echo "Copying in new sudoers file from $SRCFILE." >> ${LOGFILE} 2>&1
cp -p $SRCFILE /etc/sudoers
chmod 440 /etc/sudoers
else
echo "Source file not found" >> ${LOGFILE} 2>&1
exit 1
fi

echo >> ${LOGFILE} 2>&1
visudo -c |tee -a ${LOGFILE}
if [ $? -ne 0 ]
then
echo "sudoers syntax error on $HOSTNAME." >> ${LOGFILE} 2>&1
mailx -s "${PROG}: sudoers syntax error on $HOSTNAME" "$MAILTO" << EOF

Syntax error /etc/sudoers on $HOSTNAME.

Reverting changes

Please investigate.

EOF
echo "Reverting changes." >> ${LOGFILE} 2>&1
cp -p ${BKUPFILE} /etc/sudoers
else
#
# Update checksum file
#
grep -v '/etc/sudoers' ${MD5FILE} > ${MD5FILE}.tmp
csum /etc/sudoers >> ${MD5FILE}.tmp
mv ${MD5FILE}.tmp ${MD5FILE}
chmod 600 ${MD5FILE}
fi

echo >> ${LOGFILE} 2>&1

if [ "${HOSTPFX}" = "hd" ]
then
printf "\nAppending #includedir /etc/sudoers.d at end of file.\n" >> ${LOGFILE} 2>&1
echo "" >> /etc/sudoers
echo "## Read drop-in files from /etc/sudoers.d (the # here does not mean a comment)" >> /etc/sudoers
echo "#includedir /etc/sudoers.d" >> /etc/sudoers
fi

##
## * NFS Un-mount Section *
##

##
## Unmount /mnt.$$ directory
##
umount ${MOUNTPT} >> $LOGFILE 2>&1
if [ -d ${MOUNTPT} ]; then
rmdir ${MOUNTPT} >> $LOGFILE 2>&1
fi

##
## Make sure that /mnt.$$ got unmounted
##
if [ -f ${SRCFILE} ]; then
echo " The umount command failed to unmount ${MOUNTPT} ... We will not force the unmount ..." >> $LOGFILE
umount -f ${MOUNTPT} >> $LOGFILE 2>&1
if [ -d ${MOUNTPT} ]; then
rmdir ${MOUNTPT} >> $LOGFILE 2>&1
fi
else
echo " $MOUNTPT was unmounted ... There is no need for user intervention on $HOSTNAME ..." >> $LOGFILE
fi

#
# as always, exit cleanly
#
clean_exit 0

That's 212 lines of code; there's no versioning of the sudoers file. The customer has an existing process that runs weekly to validate the checksum of the file for security. Although the script references Solaris, for this customer we did not need to migrate the Solaris requirement.

We started with the idea of creating a role and placing the sudoers file into Git for version control. This also removes the need for NFS mounts.

With the "validate" and "backup" parameters for the copy and template modules, we can eliminate the need for code to backup and restore the file. The validation is run before the file is placed in the destination and, if failed, the module errors out.

We'll need tasks, templates and vars for the role. Here's the file layout:

├── README.md
├── roles
│ └── sudoers
│ ├── tasks
│  └── main.yml
│ ├── templates
│  └── sudoers.j2
│ └── vars
│ └── main.yml
└── sudoers.yml

The role playbook, sudoers.yml, is simple:

---
##
# Role playbook
##
- hosts: all
  roles:
  - sudoers
...

Role variables are located in the vars/main.yml file. I've set variables for the checksum file, and include/exclude variables that will be used to create the logic that skips "Lawson" hosts and only adds the sudoers.d include to "hd" hosts.

Below is what is in the vars/main.yml file:

---
MD5FILE: /root/.sudoer.md5
EXCLUDE: la
INCLUDE: hd
...

If we use the copy and lineinfile modules, the role will not be idempotent. Copy will deploy the base file, and lineinfile will have to reinsert the includes on every run. As this role will be scheduled in Ansible Tower, idempotence is a requirement. We'll convert the file to a jinja2 template.

In the first line, we add the following to manage whitespace and indentations:

#jinja2: lstrip_blocks: True, trim_blocks: True

Note that newer versions of the template module include parameters for trim_blocks (added in Ansible 2.4).

Here is the code to insert the include line at the end of the file:

{% if ansible_hostname[0:2] == INCLUDE %}
#includedir /etc/sudoers.d
{% endif %}

We use a conditional ( {% if %}, {% endif %} ) to replace the shell that inserts the line for hosts where "hd" is in the first two characters of the hostname. We leverage Ansible facts and the filter [0:2] to parse the hostname.

Now for the tasks. First, set a fact to parse the hostname. We will use the "parhost" fact in conditionals.

---
##
# Parse hostnames to grab 1st 2 characters
##
- name: "Parse hostname's 1st 2 characters"
  set_fact: parhost={{ ansible_hostname[0:2] }}

Next, I noticed that csum doesn't exist on a stock RHEL server. In case it's needed, we can use another fact to conditionally set the name of the checksum binary. Note that further coding may be needed if that differs between AIX, Solaris and Linux. As the customer was not concerned with the Solaris hosts, I skipped that development.

We'll also deal with the difference in root's groups between AIX and RHEL.

##
# Conditionally set name of checksum binary
##
- name: "set checksum binary"
  set_fact:
    csbin: "{{ 'cksum' if (ansible_distribution == 'RedHat') else 'csum' }}"

##
# Conditionally set name of root group
##
- name: "set system group"
  set_fact:
    sysgroup: "{{ 'root' if (ansible_distribution == 'RedHat') else 'sys' }}"

Blocks will allow us to provide a conditional around the tasks. We'll use a conditional at the end of the block to exclude the "la" hosts.

##
# Enclose in block so we can use parhost to exclude hosts
##
- block:

The template module validates and deploys the file. We register the result so we can determine if there was a change in this task. Using the validate parameter of the module ensures the new sudoers file is valid before putting it in place.

##
# Validate will prevent bad files, no need to revert
# Jinja2 template will add include line
##
- name: Ensure sudoers file
  template:
    src: sudoers.j2
    dest: /etc/sudoers
    owner: root
    group: "{{ sysgroup }}"
    mode: 0440
    backup: yes
    validate: /usr/sbin/visudo -cf %s
    register: sudochg

If a new template was deployed, we run shell to generate the checksum file. The conditional updates the checksum file when the sudoers template is deployed, or if the checksum file is missing. As the existing process also monitors other files, we use the shell code provided in the original script:

- name: sudoers checksum
  shell: "grep -v '/etc/sudoers' {{ MD5FILE }} > {{ MD5FILE }}.tmp ; {{ csbin }} /etc/sudoers >> {{ MD5FILE }} ; mv {{ MD5FILE }}.tmp {{ MD5FILE }}"
  when: sudochg.changed or MD5STAT.exists == false

The file module enforces the permissions:

- name: Ensure MD5FILE permissions
  file:
  path: "{{ MD5FILE }}"
  owner: root
  group: "{{ sysgroup }}"
  mode: 0600
  state: file

Since the backup parameter does not provide any options for cleanup of older backups, we'll add some code to handle that for us. This also demonstrates leveraging the "register" and "stdout_lines" features.

##
# List and clean up backup files. Retain 3 copies.
##
- name: List /etc/sudoers.*~ files
  shell: "ls -t /etc/sudoers*~ |tail -n +4"
  register: LIST_SUDOERS
  changed_when: false

- name: Cleanup /etc/sudoers.*~ files
  file:
  path: "{{ item }}"
  state: absent
  loop: "{{ LIST_SUDOERS.stdout_lines }}"
  when: LIST_SUDOERS.stdout_lines != ""

Closing the block:

##
# This conditional restricts what hosts this block runs on
##
when: parhost != EXCLUDE
...

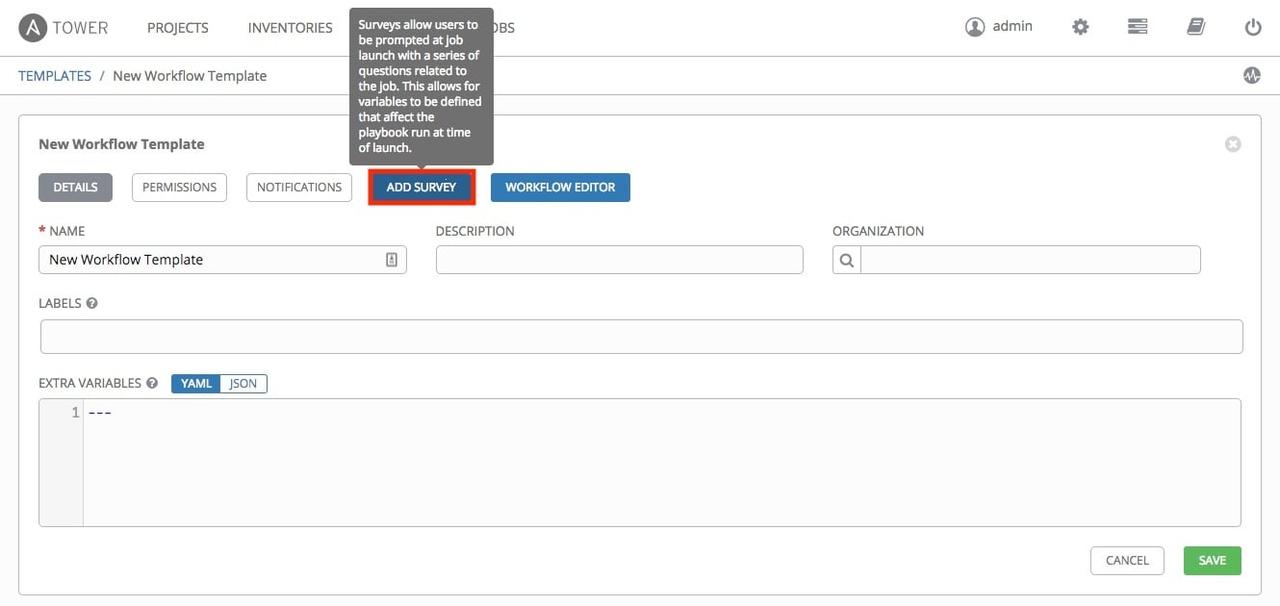
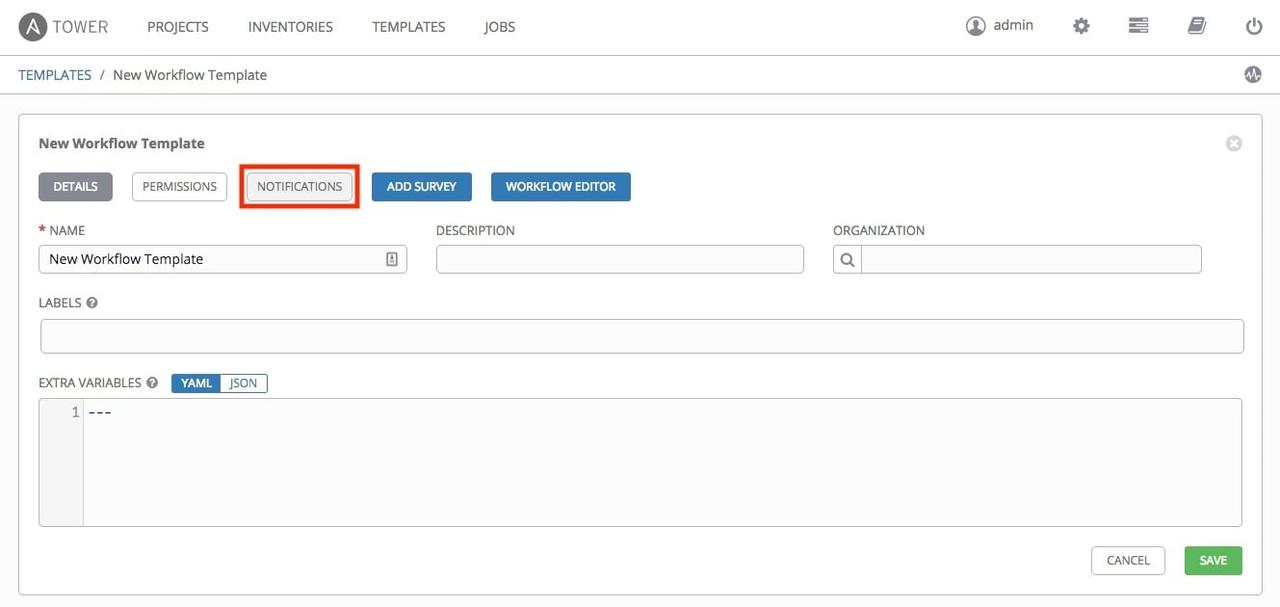
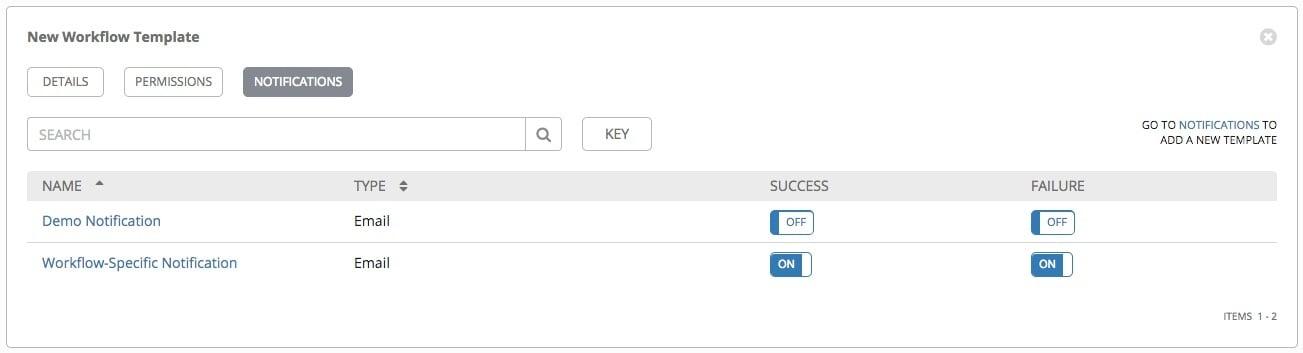
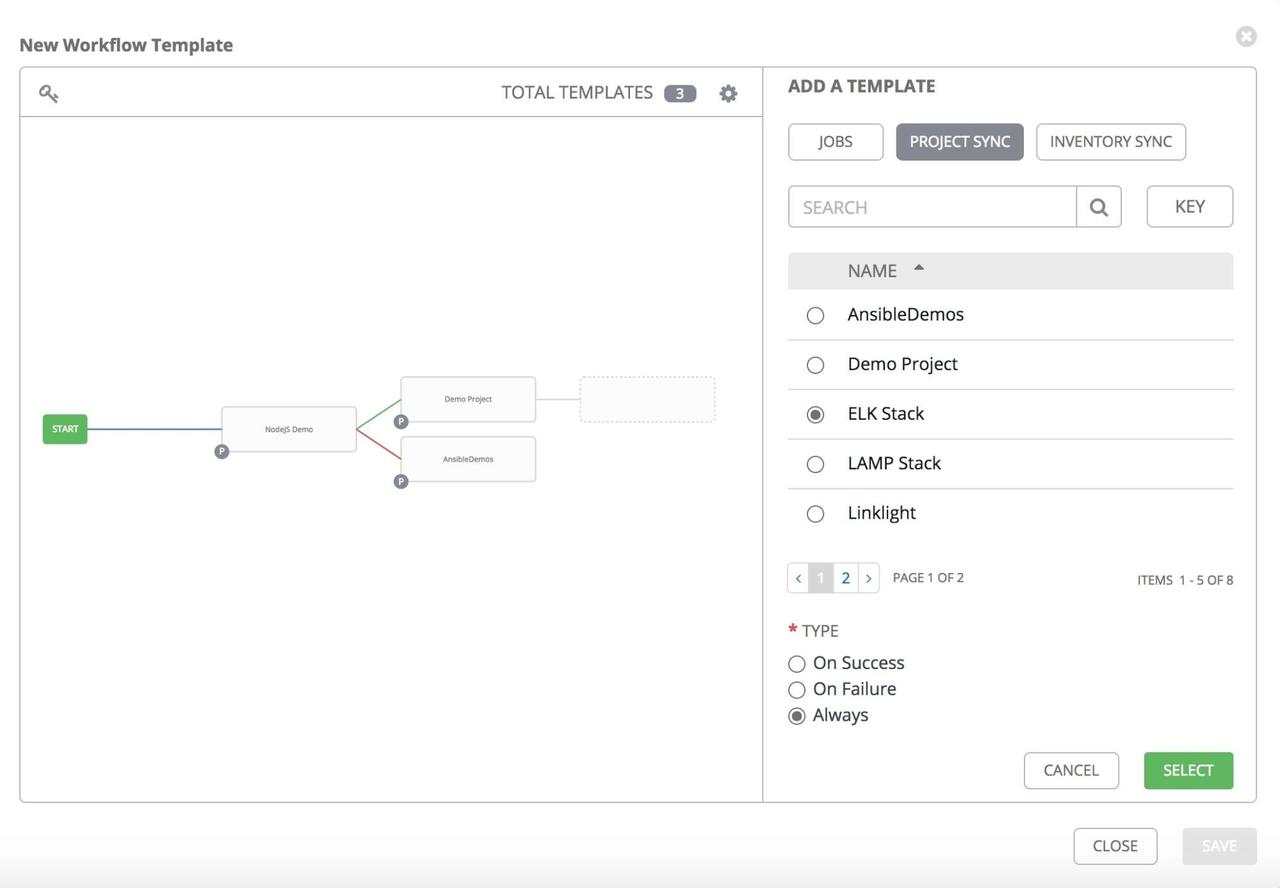
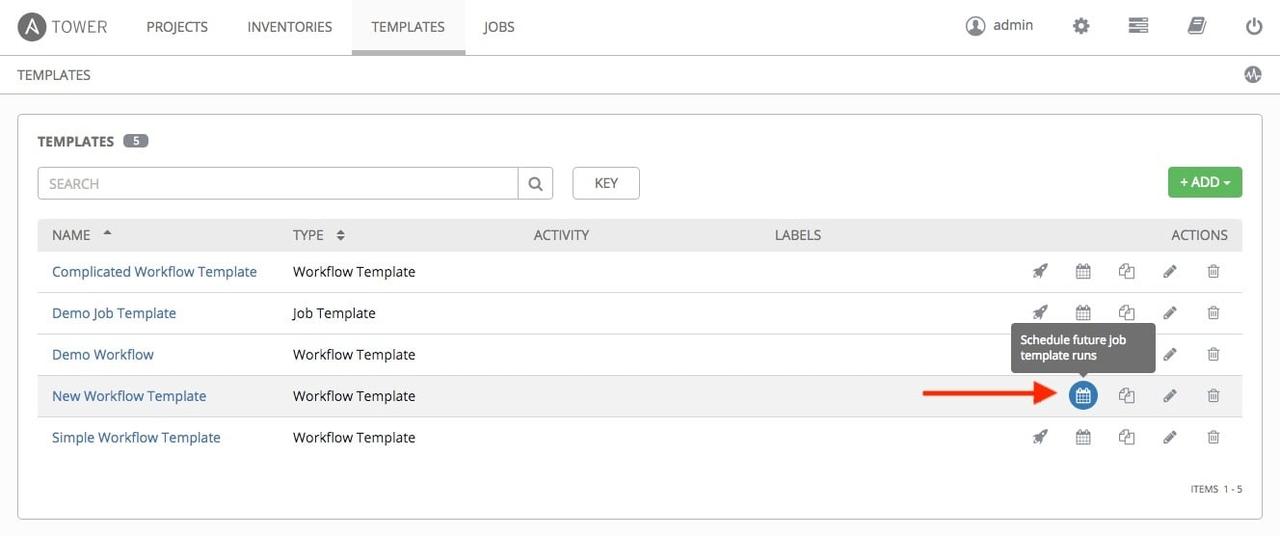
The intended use here is to run this role in Ansible Tower. Ansible Tower notifications can be configured for job failure via email, Slack or other methods. This role runs in Ansible, Ansible Engine or Ansible Tower.

We've condensed the script and created a fully idempotent role that can enforce the desired state of the sudoers file. Use of SCM provides versioning, better change management and accountability. CI/CD with Jenkins or other tools can provide automated testing of the Ansible code for future changes. The Auditor role in Ansible Tower can oversee and maintain the compliance requirements of organizations.

We could remove the process around the checksum, but the customer will have to have conversations with their Security team first. If desired, the sudoers template can be protected with Ansible Vault. Finally, use of groups could replace the logic around the includes and excludes.

You can find the role on GitHub.
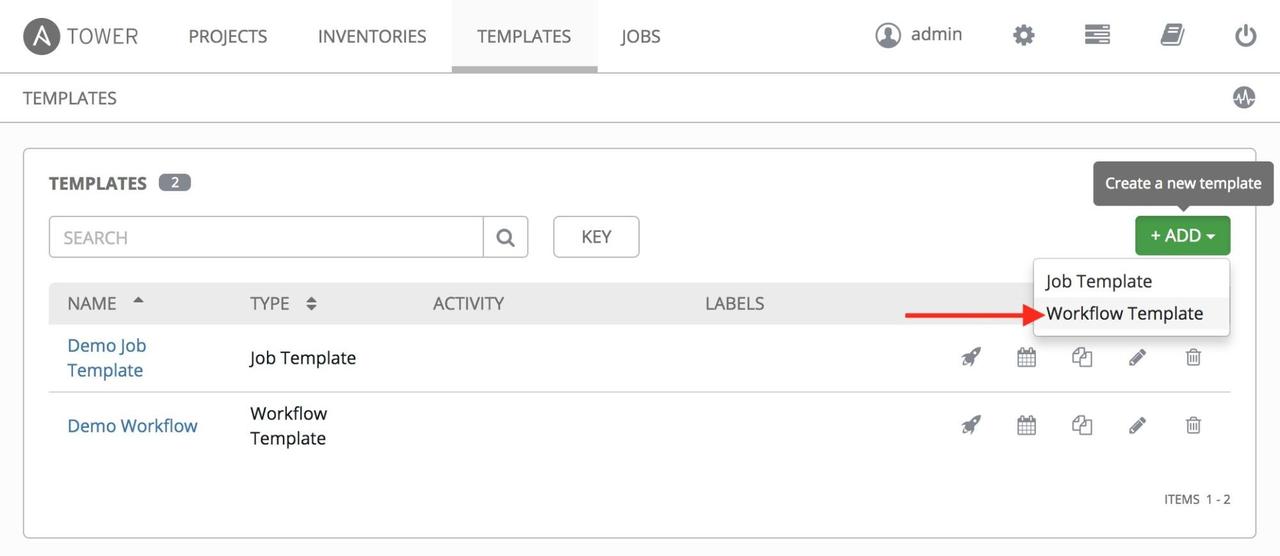
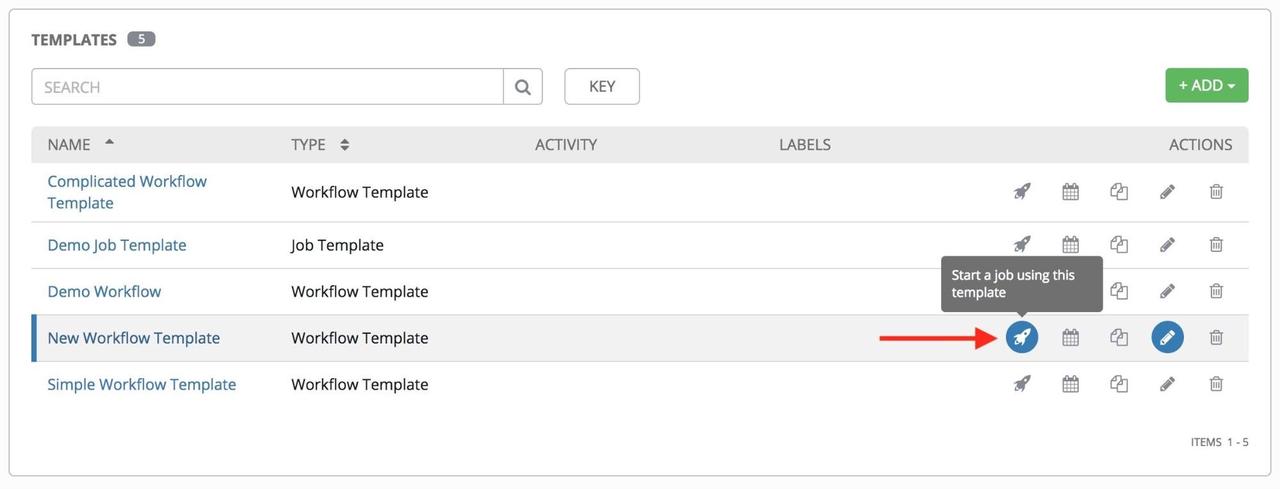
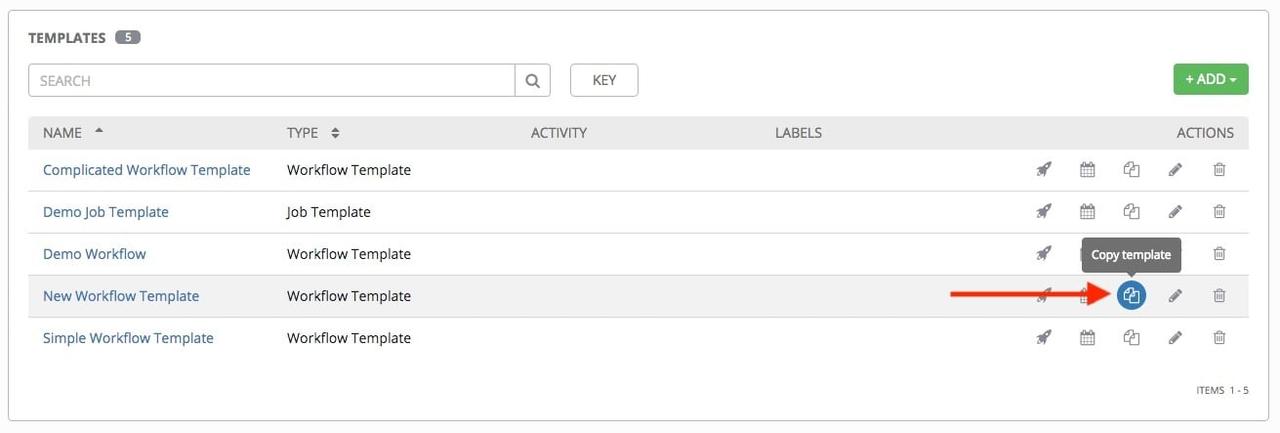