Ansible and Infoblox Roles Deep Dive

Ansible and Infoblox Roles Deep Dive

As Sean Cavanaugh mentioned in his earlier Infoblox blog post, the release of Ansible 2.5 introduced a lookup plugin, a dynamic inventory script, and five modules that allow for Infoblox automation. A combination of these modules and lookups in a role provides a powerful DNS automation framework.

Summary

Today we are going to demonstrate how automating Infoblox Core Network Services using Ansible can help make managing IP addresses and routing traffic across your network easy, quick, and reliable. Your network systems for virtualization and cloud require rapid provisioning life cycles; Infoblox helps you manage those lifecycles. When paired with Infoblox, Ansible lets you automate that work. Ansible's integration with Infoblox is flexible and powerful: you can automate Infoblox tasks with modules or with direct calls to the Infoblox WAPI REST API.

This post will walk you through six real-world scenarios where Ansible and Infoblox can streamline your network tasks:

  1. Creating a provider in one place that is reusable across a collection of roles.
  2. Expanding your network by creating a new subnet with a forward DNS zone. Ansible modules for Infoblox make this common two-part task simple.
  3. Creating a reverse DNS zone, for example, to flag email from any IP addresses that don't have an associated address name. You must do this task with calls to the Infoblox API for older versions of Ansible, but this is now supported functionality in the nios_zone module as of Ansible v2.7.
  4. Reserving a host record for the gateway address of your new subnet with Ansible's powerful Jinja2 templates.
  5. Creating additional hosts in the subnet using a loop and host_count.
  6. Managing Infoblox Grids to automate your network at scale, where one Infoblox appliance may not be enough. Grids physically separate your managed network and eliminate single points of failure.

To follow along with these examples on your own Infoblox devices, you'll need to install the dynamic-infoblox Roles and set up your Infoblox credentials as a provider.

Infoblox credentials and the nios_provider

[Any time you use Ansible with Infoblox, invoking an Infoblox lookup or module, you must specify the Infoblox IP, username, and the user's password. Our Roles call these credentials, taken together, the nios_provider. By creating a nios_provider dictionary as a group variable, you can apply these values consistently in all your playbooks and roles, referring to them in a single line whenever you need them.

*group_vars/all/main.yml*

nios_provider:
   #Infoblox out-of-the-box defaults specified here
    host: 192.168.1.2
    username: admin
    password: infoblox
wapi_version: v2.7

Using modules to set up a subnet and forward DNS zone

Once you've got your credentials ready, you can run a playbook that leverages the dynamic Infoblox Role to create a subnet and a forward DNS zone; Ansible modules take care of this with ease. Creating a subnet is a common network project: subnets allow an administrator to expand the network, responding to a new company branch, office, or line of business. Forward DNS zones establish the single direction mapping of address names to IP addresses. A new DNS zone may be required for a business to expand its global reach into an additional country (e.g. .uk) or respond to a merger. The tasks shown here define ansible_subnet and ansible_zone as variables, so you can override them each time you create a new subnet.

- name: Create a test network subnet
  nios_network:
     network: "{{ ansible_subnet }}"
     comment: Test network subnet to add host records to
     state: present
     provider: "{{ nios_provider }}"

- name: "Create a forward DNS zone called {{ ansible_zone }}"
  nios_zone:
     name: "{{ ansible_zone }}"
     comment: local DNS zone
     state: present
     provider: "{{ nios_provider }}"

In this example, we've used the default Infoblox View. Infoblox allows multiple Views within a single DNS zone. If you want to route internal traffic to on-premise servers and route external traffic to public cloud servers, you can do that by designing a DNS zone with two DNS Views. This type of setup ensures that traffic to your employee intranet does not burden the servers your customers use, providing better geographic coverage and higher levels of around-the-clock coverage for customers. However, for the simple example above (and subsequent examples), we've stuck to using the default View.

Using the Infoblox API to set up a reverse DNS zone

So far you've seen how to use Ansible modules to automate Infoblox changes. Our next example shows how to use the Infoblox WAPI REST API to automate a task that may not be available in your current version of Ansible. Reverse DNS zones allow a client to look up an address name if they know the equivalent IP address. The importance of reverse zones can be illustrated with a common example: email servers. Incoming traffic from an IP address that does not have an associated address name through reverse DNS can often be flagged as spam. Reverse zones can also help with other use cases, like gathering authentic data about other businesses that visit your websites.

The nios_zone module can already create a forward DNS zone, but it can only create reverse zones with the latest version of Ansible. However, you can still automate this task in older versions of Ansible - just use Ansible to make calls directly to the WAPI API. You can do this with either the uri module or a shell script. We recommend the uri module, since it helps capture the integration more descriptively and enables idempotent calls leveraging standard REST return codes. Here the uri module serves as a umbrella module to succinctly capture a single WAPI call within the Ansible module ecosystem. It is worth noting that the WAPI API operates much like Ansible modules: JSON in and JSON out. If you express the body of the API call in yaml, it is easy to use a Jinja2 filter (a topic we will revisit in depth) to convert it to JSON at runtime.

- name: Create a reverse DNS zone to complement forward zone
  uri:
    url: https://{{ nios_provider.host }}/wapi/{{ wapi_version }}/zone_auth
    method: POST
    user: "{{ nios_provider.username }}"
    password: "{{ nios_provider.password }}"
    body: "{{ reverse_zone_yml | to_json }}"
    #201 signifies successful creation
    #400 signifies existing entry
    #both signify a successful WAPI call
    status_code: 201,400
    headers:
        Content-Type: "application/json"
    validate_certs: no
  register: reverse_dns_create
  changed_when: reverse_dns_create.status == 201
  vars:
    reverse_zone_yml:
      fqdn: "{{ ansible_subnet }}"
      zone_format: "IPV4"

If you establish the subnet, forward zone, and reverse zone before creating any host records, each host record you create in that forward zone automatically creates the corresponding reverse zone entry! With a network, forward zone, and reverse zone defined, the stage is set to start creating host records for your new subnet.

Using a Jinja2 template to reserve the gateway address

When you start creating host records, you want to reserve the first (or last) host record in the zone as the gateway address, the address that forwards packets of data destined for an IP address outside of the immediate network. As mentioned earlier, you can use Jinja2 filters to manipulate data by calling a short python function on it; the Jinja2 filter syntax effectively acts as a linux pipe. Jinja2 filters are a way to quickly manipulate data and in this case we use two of them (see example below) to adhere to Infoblox gateway address naming conventions. It is important to note that defining the gateway address name relative to the subnet avoids gateway address name overwrites because it is common for each subnet to have its own gateway address.

- name: Create a host record for the gateway address
  nios_host_record:
     name: gateway{{ ansible_subnet | ipaddr(first_usable) |
  replace(".","_") }}.{{ ansible_zone }}
     ipv4:
        - address: "{{ gateway_address }}"
     state: present
     provider: "{{ nios_provider }}"

This task builds your gateway host name step by step with this complex Jinja2 expression. The Ansible-packaged ipaddr filter is versatile - it is capable of achieving a larger number of routine IP address manipulations. For example, if your IP range is 192.168.1.0/24 and your ansible_zone is ansible.local, the filter in the task above creates a name in a single line:

  1. Expression starts with "gateway"
  2. The section in the does a few things: a. Retrieves the templated value of ansible_subnet ansible_subnet => 198.168.1.0/24 b. Uses the retrieved ansible_subnet value and supplies it to the ipaddr('first_usable') filter plugin to obtain first usable IP 192.168.1.0/24 | ipaddr('first_usable') => 192.168.1.1 c. Formats the resulting IP with underscores instead of dots 192.168.1.1 | replace('.', '_') => 192_168_1_1 d. Adds a . separator before the subnet value e. Retrieves the templated value of ansible_zone ansible_zone => ansible.local

The gateway host name, passing the values listed above through the example template, would be:

gateway192_168_1_1.ansible.local

Jinja2 filters are a complex Ansible topic; you should have a solid Ansible foundation before building your own Jinja2 filters. As you start creating filters, you can test expected values locally, or leverage Sivel's Ansible Template Tester to see the results of your filters before you use them in a playbook or role. 

Infoblox-Roles-Deep-Dive-Ansible-Template-Tester

Using loops and host_count to generate host records

Once your gateway address is reserved, you can use a loop to generate a known number of additional host records. In a real-world scenario, you would probably generate groups of servers within the subnet (for example, database servers, application servers, etc.). For this simple demo, you can define a loop that will dynamically generate generic host records based on a user-supplied host_count value. This demo shows the power of nios_next_ip lookup plugin, which can obtain a single next available IP or a range of next available IPs to assign. In a Playbook with both tasks (the one above that creates a host record for the gateway address and the one below that generates host records), if you don't define a host_count, the playbook won't create any additional host records; just the gateway address will be created.

#Generating records this way should be for demo purposes
#Normal scenario would be to iterate over a dictionary/list of hosts or populate via a static csv file
- name: “Dynamically generate {{ host_count }} host records at next available ip in {{ ansible_subnet }}”
  include_tasks: host_record_generation.yml
  loop_control:
     loop_var: count
  with_sequence: start=1 end={{ host_count }}
  when: host_count is defined

If you generate host records with Ansible based on a user-supplied host count, wouldn't looping through a host count potentially cause indexing issues on a second run? Unfortunately it does, but keeping a total count of generated hosts solves this problem. One approach is to maintain a static total host count file on the control node viewed as a source of truth. By leveraging Ansible's lookup plugin feature to retrieve its contents, each time a host is generated the count in this file is incremented so consequent role executions (especially those automated in different subnets) do not overwrite each other's records!

Generating host records this way is different than generating them with naming conventions like most enterprises do, but it is an easy out-of-the-box method using the nios_next_ip lookup to create some records across different zones and/or subnets. Infoblox also supports a csv record import feature for static records.

Infoblox-Roles-Deep-Dive-Records

Predefine Infoblox Grids with Ansible

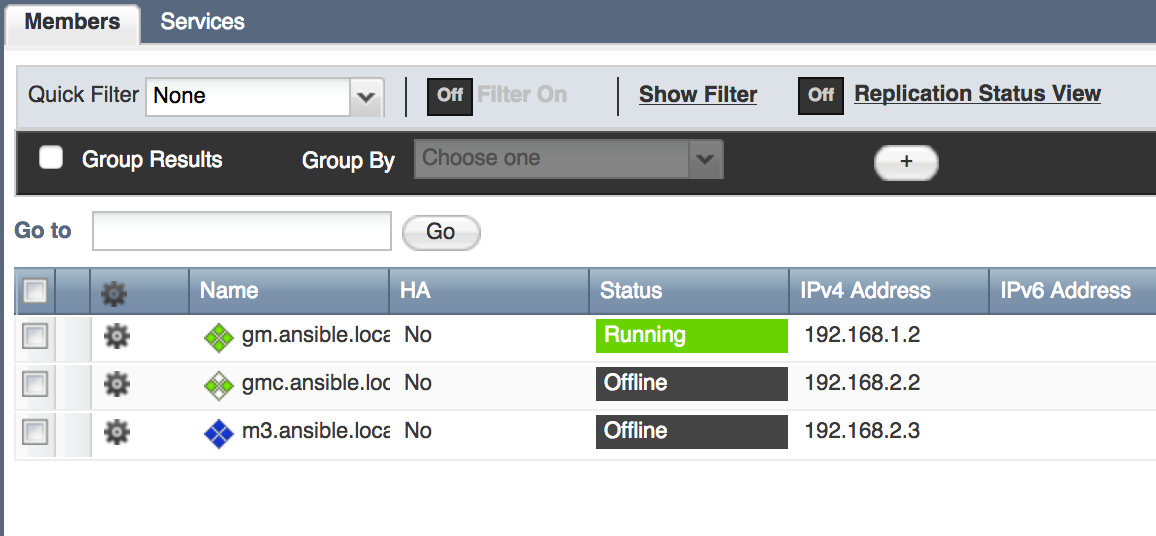
In the first four scenarios, you've seen how Ansible works with Infoblox at the level of hosts and subnets. What can Ansible do with Infoblox at scale? Automating a single Infoblox instance provides value, but production Infoblox systems are often designed in a Grid. The Infoblox website explains the full power of Infoblox Grid technology. The Infoblox Grid establishes a distributed relationship between individual or paired appliances to remove single points of failure and other operational risks inherent in legacy DNS, DHCP, and IP Address Management infrastructure. Each Grid contains one Grid Master and a varying number of additional Grid Members and/or Grid Master candidates. Grid Members only contain a portion of the Infoblox database needed to do their job. Grid Master Candidates, on the other hand, have a real-time full copy of the Grid Master's database to provide disaster recovery functionality. You can use our Ansible Roles to predefine new Grid Master Candidates and Grid Members like this:

- name: Predefine a new Grid Master Candidate
  hosts: localhost
  connection: local
  roles:
    -  role: predefineGridmasterCandidate
       master_candidate_name: gmc.ansible.local
       master_candidate_address: 192.168.2.2
       master_candidate_gateway: 192.168.2.254
       master_candidate_subnet_mask: 255.255.255.0

- name: Predefine a new Grid Member
  hosts: localhost
  connection: local
  roles:
    -  role: predefineGridMember
       member_name: m3.ansible.local
       member_address: 192.168.2.3
       member_gateway: 192.168.2.254
       member_subnet_mask: 255.255.255.0

Infoblox-Roles-Deep-Dive-Members

As you can see from these five examples, Ansible and Infoblox work together to manage your network infrastructure and the traffic it carries quickly, easily, and reliably. Ansible builds on the robust capabilities of the Infoblox WAPI API. Using Ansible modules and direct calls to the WAPI API, you can write reusable Ansible Roles and Playbooks that can be quickly adapted to handle separate networks. If you'd like, you can start by customizing the roles in the ansible-networking repository, which connect all of the Ansible concepts discussed in today's post.


Make your Ansible Playbooks flexible, maintainable, and scalable

Make your Ansible Playbooks flexible, maintainable, and scalable

In the years since, I've learned a lot of tricks to help ease the maintenance burden for my work. It's important to me to have maintainable projects, because many of my projects---like Hosted Apache Solr---have been in operation for over a decade! If it's hard to maintain the project or it's hard to make major architecture changes, then I can lose customers to more nimble competitors, I can lose money, and---most importantly---I can lose my sanity!

I'm presenting a session at AnsibleFest Austin this year, "Make your Ansible Playbooks flexible, maintainable, and scalable", and I thought I'd summarize some of the major themes here.

Stay Organized

I love photography and automation, and so I spend a lot of time building electronics projects that involve Raspberry Pis and cameras. Without the organization system I use, it would be very frustrating putting together the right components for my project.

Similarly, in Ansible, I like to have my tasks organized so I can compose them more easily, test them, and manage them without too much effort.

I generally start a playbook with all the tasks in one file. Once I hit around 100 lines of YAML, I'll work to break related groups of tasks into separate files and include them in the playbook with include_tasks.

After the playbook starts becoming more complete, I often notice sets of tasks that are related and can be isolated---like installing a piece of software, copying a configuration for that software, then starting (or restarting) a daemon. So I create a new role using ansible-galaxy init ROLE_NAME, and then put those tasks into that role.

If the role is generic enough, I'll either put it on GitHub and submit it to Ansible Galaxy, or put it into a separate, private Git repository. Now I can add a generic set of tests for the role (with Molecule or some other testing setup), and I can share the role with many projects---even with projects managed by completely separate teams!

Then I include the external roles into my project via a requirements.yml file. For some projects, where stability is the most important trait, I will also define the version (a git ref or tag) for each included Ansible role. For other projects, where I can afford to sacrifice stability a little for easier maintenance over time (like test playbooks, or one-off server configurations), I'll just put the role name (and repo details if it's not on Galaxy).

For most projects, I don't commit the external roles (those defined in requirements.yml) to the repository---I have a task in my CI system which installs the roles fresh on every run. However, there are some cases where it's best to commit all the roles to the codebase. For example, since developers can run my Drupal VM playbook on a daily basis, and these developers often don't live near where Ansible Galaxy's servers are located, they had trouble installing the large number of Ansible Galaxy roles required. So I committed the roles to the codebase, and now they don't have to wait for all the roles to be installed every time they build a new Drupal VM instance.

If you do commit the roles to your codebase, you need to have a thorough process for updating roles---make sure you don't let your requirements.yml file go out of sync with the installed roles! I often run ansible-galaxy install -r requirements.yml --force to force-replace all the required roles in the codebase, and keep myself honest!

Simplify and Optimize

> YAML is not a programming language.
>
> ---Jeff Geerling

One of the reasons people enjoy using Ansible is because it uses YAML, and has a declarative syntax. You want a package installed, so you have the task package: name=httpd state=present. You want a service running, so you have the task service: name=httpd state=started.

There are many cases where you need to add a little more intelligence, though. For example, if you're using the same role to build both VMs and containers and you don't want the service started in the container, you need to add a when condition, like:

- name: Ensure Apache is started.
  service:
    name: httpd
    state: started
  when: 'server_type != "container"'

This kind of logic is simple, and makes sense when reading a task and figuring out what it does. But some may try to stuff tons of fancy logic inside when conditions or other places where Ansible gives a little exposure to Jinja2 and Python, and that's when things can get off the rails.

As a rule of thumb, if you've spent more than 10 minutes wrestling with escaping quotes in a when condition in your playbook, it's probably time to consider writing a separate module to perform the logic you need to do for the task. Python should generally be in a separate module, not inline with the rest of the YAML. There are exceptions to this (e.g. when comparing more complex dicts and strings), but I try to avoid writing any complex code in my Ansible playbooks.

Besides avoiding complex logic, it's also helpful to have your playbooks run faster. Many times, I'll profile a playbook timer in the ansible.cfg file defaults section and run the playbook, and find that one or two tasks or roles takes a really long time, compared to the rest of the playbook.

For example, one playbook used the copy module for a large directory with dozens of files. Because of the way Ansible performs a file copy internally, this meant there were many seconds wasted waiting for Ansible to ferry each file across the SSH connection.

Converting that task to use synchronize instead saved many seconds per playbook run. For one run, this doesn't seem like much; but when the playbook is run on a schedule (e.g. to enforce a certain configuration on a server), or run as part of your CI suite, it's important to help make it efficient. Otherwise this can burn extra CPU cycles on inefficient code, and developers often hate waiting a long time for CI tests to pass before they can know if their code broke something or not.


Large Scale Deployments Using Ansible

Large Scale Deployments Using Ansible

The Ansible simplicity is about being easy to understand, learn and share. It's about people. The often peddled notion that "Ansible doesn't scale past 500 hosts" is shadowed by the customers we have with over 100,000 nodes under management. But the idea that scale is purely about the number of hosts isn't recognising the greater relevance. Scale is so much more, scale is about the context in your business.

What is scale?

According to most dictionaries, scale is a noun that means the relative size or extent of something.

Technological Scale

When it comes to IT, conclusions about 'scale' usually equate to numbers of something technical. A frequent customer ask might go something like "We need Ansible to scale to 70,000 hosts".

Once we look into that number though, the reality is no technical operation will happen across them all at once. The jeopardy to a business of this size is too great to chance a failure of every system. Operations at large scale happen piecemeal for safety reasons -- rolling updates are not only a safer way to operate, we see the results faster.

Business function, geography, application and networks all affect the big number, and all can be 'sliced up' in ways which minimise risk -- with the added benefit of enabling large scale operation.

Looking at the other side of the equation, the technology itself, also carries nuance. A large and complex operation takes more resources -- memory, compute, etc -- compared to a small and simple task. The numbers of hosts we're able to operate on in parallel will change depending on the ask.

Human Scale

There are at least half a dozen different ways to achieve anything in IT. The choice we settle on can depend on many factors, but a powerful influencer will be people.

A startup might pick a high level programming language to write their application in because it's quick and easy to get going with. A little code produces a lot of results -- unlike writing in C, or even assembler! We all know coding C will result in fast programs requiring fewer compute resources. That will give us greater utilisation for a given piece of hardware. But the act of programming will likely be slower, and the pool of talent shallower. To kickstart a project a 'slower' language leads to faster growth. As the business grows it will add coders with skills in the existing language used, as they'll get up to speed the quickest.

Some technology is harder to learn than others. But a language that is understandable by anyone, with or without existing skills, is going to be faster to pick up.

There's a chapter in Malcolm Gladwell's "Outliers: The story of success" titled "Rice paddies and math tests". In short, he tells us how the Chinese number system means kids get to grips with maths far quicker, so they enjoy it more. The enjoyment means they're happy to indulge in it even further. It's easy to see the snowball effect.

When tech produces results with little effort we get that enjoyment factor--it's not restricted to children :). This draws us to put more time in, which produces results even faster.

Scaling a technology's use in a large organisation happens faster, with a larger reach, when people enjoy using it. Rapid adoption follows.

Scaling Ansible

Scaling across your organisation is going to be context specific, but there are some fundamentals you can start with.

Scaling the Technology

Ensure the hardware you're working with fits the use case. Documentation which will help ...

Most important will be the way you manage inventory (how you group hosts). Spend time thinking about smallest viable reach. If you had to upgrade the whole stack, which bits could you upgrade independently of the others?

Ansible is fundamentally an orchestrator -- it doesn't have to be doing the actual operation. You may already have a tool which Ansible can instruct, so leverage the fact there's no new learning. You get the best of all worlds, not least that the high level instruction set is an easy to read Ansible Playbook.

Scale the Human Reach

Scaling any technology in a large company comes down to two fundamental roots.

  1. Education
  2. Organisation

Everything else spans from these two starting points.

Education

From here two branches emerge -- first, adoption. For a new technology to take hold it needs to be quick to get up and running, and easy to learn. When you can solve a problem in a few minutes it makes it easy to show to others -- and the adoption spreads.

Second, education needs to be ongoing. And this is where implementing other tools and practices around what you do can help. For example, storing your Ansible playbooks and roles in a source code repository allows others to share and learn. We once saw a customer put in place a great system for helping their staff learn Ansible from colleagues. New commits had to be submitted to a source code repository as a 'pull request', which was reviewed by more experienced staff. A feedback loop mimicking open source culture was introduced and reinforced. We've also seen customers push commit messages to their chat systems. Another great way to encourage sharing.

Organisation

"You can have any color as long as it's black". Uniformity is the friend of scalability, as I'm sure Henry Ford would've told us. People enjoy being creative, it's pleasing to finish a day's coding and sit back admiring the job well done. At the same time, to scale we do need to have some organisation around what we produce.

Security, auditing, and accountability all have a place in a large company. We need to be able to give the right access to the right people, as much to prevent accidents as anything. Managing access to tens of thousands of devices is cumbersome without technological help.

Source code repositories, coding standards, credential management and access control can all help put organisational structure around Ansible. Bring together the simplicity of getting the job done, but wrap it in a security blanket to enable safe, managed, scaling.

Ansible, scaled

Scaling anything brings about new challenges, and not just around numbers of hosts. But, a lot of those challenges are met by our customers on a daily basis. If you have a scaling challenge on your hands and would like some help, please get in touch. Our consulting team have worked across every business segment, from the smallest to the largest companies in the world. We'll have a story or two you can relate to, and we can help you solve those difficult problems.


Ansible Tower Advanced Smart Inventory Usage

Ansible Tower Advanced Smart Inventory Usage

Background

Smart Inventory is a feature that was added to Red Hat Ansible Tower 3.2. The feature allows you to generate a new Inventory that is made of up hosts existing in other Inventory in Ansible Tower. This inventory is always-up-to-date and is populated using what we call a host filter. The host filter is a domain specific query language that is a mix of Django Rest Framework GET query language with a JSON query syntax added in. Effectively, this allows you create an Inventory of Hosts and their relational fields as well as related JSON structures.

The ansible_facts field is a related field on a Host that is populated by Job Template runs (Jobs) that have fact caching enabled. Ansible Tower bolts on an Ansible fact cache plugin with Job Template that have fact caching enabled. Job Templates of this kind that run playbooks that invoke Ansible gather_facts will result in those facts being saved to the Ansible Tower database when the Job finishes.

A limitation of the Smart Inventory filter is that it only allows equality matching on ansible_fact JSON data. In this blog post I will show you how to overcome this limitation and add hosts to a Smart Inventory using, for example, a range query on if a host is part of a subnet.

Ansible Tower Objects

Enough talking about it, let's see an example. We are going to have to create objects in Ansible Tower. Specifically, the objects in the table below.

Resource Value
Organization Transformers
Inventory Autobots
Project Facts
Hosts optimus, bumblebee, jazz
Job Templates gather, clear, subnet, set_fact_cacheable

Enable fact cache for all the job templates

1. Fact Cache

Now, let's make something happen. Run the gather job template. Then look at the resulting facts that got gathered in the UI for the Inventory Autobots.

Tower-Facts-2-Screen

Above is an example of how you view the results from the fact gathering process in the UI. Now let's see how we can create a Smart Inventory from the facts gathered.

2. Our First Smart Inventory

We will create a smart inventory that contains only Red Hat hosts. In my example, optimus and bumblebee are both Red Hat hosts while jazz is an Ubuntu host.

Tower-Smart-Iventory-Screen

Create a smart inventory with host filter: ansible_facts.ansible_distribution:RedHat

My new smart inventory, Red Hat Autobots, contains 2 hosts (see below image).

Tower-Inventories-Screen

3. Inject playbook facts

We are now going to leave the Smart Inventory feature and go back to fact caching. Specifically, I am going to show you how to set_fact in a playbook and have that fact stored in Ansible Tower.

Run the job template set_fact_cacheable. Below is the result of that run.

Tower-Jobs-Screen

Now, let's look at the facts for any of the 3 hosts that this playbook ran against. Notice how bumblebee now has a new set of facts (see below image).

Tower-Facts-Screen

Specifically:

a:
   b:
      c:
        - a
        - b

These facts were set by this playbook which uses the set_fact Ansible module with cacheable: true set.

Create a Smart Inventory

I've showed you all the pieces you are going to need to create a Smart Inventory based on host facts that aren't simple equality matching. The pieces are:

  1. Fact Cache
  2. Smart Inventory
  3. Inject playbook facts

Now I'll show you an example using all these pieces to construct a Smart Inventory of hosts within a subnet. This is a good example because selecting hosts based on subnet is a range query, it is not a simple equality query. Therefore, we are going to need to leverage 3. Inject playbook facts to accomplish creating a Smart Inventory to group these hosts.

The overall goal is to set is_subnet on a host to True if the host is in the desired subnet, or False if the host is not in the subnet. Then, we can construct a Smart Inventory host filter like ansible_facts.is_subnet:true to get hosts in the subnet. The below playbook accomplishes this.

- hosts: all
  vars:
    subnet: '172.18.0.0/16'
  tasks:
    - name: "Presume host to not belong to subnet"
      set_fact:
        is_subnet: False
        cacheable: True

    - name: "Figure out if host belongs to subnet"
      set_fact:
        is_subnet: True
        cacheable: True
      when: ansible_all_ipv4_addresses | ipaddr(subnet)

Future

Currently, all traditional relational database fields on Ansible Tower objects can be used in a Smart Inventory host filter query (i.e. Host name, Inventory name, Organization description, etc); the only JSON searchable field related to Hosts is the ansible_facts field. We hope to expand the searchable JSON fields in the future as well as the operators supported (right now we only support equality). However, much consideration must be given to the performance characteristics as well as the storage requirements in doing so.


The Total Economic Impact of Red Hat Ansible Tower

The Total Economic Impact of Red Hat Ansible Tower

The Total Economic Impact of Red Hat Ansible Tower is a Red Hat commissioned Forrester Consulting study published in June 2018. This study demonstrates the cost savings and business benefits enabled by Ansible. Let's dive into the what Ansible Tower enables, the efficiencies gained, the acceleration of revenue recognition, and other tangible benefits.

Faster Revenue Recognition

Revenue recognition is a critical aspect of business operations. Quickening the pace of revenue recognition is something every organization has their eye on. Forrester's TEI of Ansible Tower observed a company cutting delivery lead times by 66%. Imagine the pace of feature deployment an organization experiences when cutting lead times from days to hours!

System reconfiguration times fell as well. Automating changes due to new bugs or policy changes across systems helps mitigate the costly impact of reconfiguration. This company found that the total time savings of being able to reconfigure a fleet of systems through Ansible automation reduced staff hours by 94% for this type of work.

The TEI also measured the security and compliance gains of Ansible Tower. Ansible Tower reduced staff hours spent patching systems by 80%. This also meant that patching systems could occur more often. This helped reduce the number of known vulnerabilities in customer environments at any given moment.

Improving Security and Compliance

Ansible Tower also helps enable the adoption and automation of CIS Benchmarks across systems. CIS Benchmarks are, "guidelines for various technology groups to safeguard systems against today's evolving cyber threats." This enabled the customer interviewed for the study to navigate an ever changing security landscape. Using trusted automation workflows that "maintain the latest and greatest standards" created a more secure environment.

Additionally, the study found Ansible Tower reduced response times to security incidents by 94%. When you consider something as impactful as Heartbleed or WannaCry, being able to rapidly patch systems could prevent a catastrophic impact to business continuity. Ansible Tower helped enable GDPR compliance as well. The laborious tasks for patching systems became significantly easier  thanks to Ansible Tower. "The organization moved to a monthly patching cycle, increasing the frequency of updates."  The best part, for the company surveyed, Red Hat Ansible Tower enabled these security and compliance gains with no extra staff.

Empower Staff to Do More

One of the key benefits observed in the TEI, was better staff enablement. Not only were existing staff accomplishing more tasks in less time but, junior staff could be empowered to take on higher level tasks. Complex tasks could be delegated to greener team members. Ansible Tower eliminated dull, boring, and repetitive tasks through automation.

Red Hat Ansible Tower's ease of use shined in this study. The lead infrastructure architect said, "We had the ability for Tower to be used within our environment in under a week with the tools provided out of the box." Ansible Tower democratizes the flexibility and power of Ansible. Infrastructure staff built functionality to enable end users to act safely in their own environments. End users of Ansible Tower functionality required only one hour of training to be qualified and productive.

Hiring is an increasingly difficult task for IT organizations. The time it takes to find and recruit talent, onboard, and train new hires comes at a cost. The gains made by implementing Ansible Tower reduced the urgency of onboarding more staff for this company. Forrester's TEI indicated Red Hat's customer, "saved 48,000 hours of staff time by automating the process of bringing servers online, stress testing resources and deleting nodes." When assuming a typical, salaried US employee's work hours to be 2,000 hours per year, implementing Ansible Tower has a potential staff hours savings of eight full time employees per year.

No Expensive Hardware Needed

According to the TEI, "Rather than purchase name-brand appliances for its data centers, the interviewed organization created an Ansible Playbook and ran the automated functionality using generic Linux systems Rather than purchase name-brand appliances for cloud configuration, backups, etc. in its data centers, the customer stood up Ansible Tower and ran the automated functionality using generic Linux systems." The organization avoided purchasing 10 name brand infrastructure appliances, representing a three-year present value of $389,707."

In conclusion, we believe that Red Hat Ansible Tower can enable organizations to do what they've done successfully for years at scale. Ansible Tower helps organizations accelerate revenue recognition. Automation with Ansible can improve the safety and surety of IT infrastructure by automating patching and compliance tasks. Ansible can free up staff time and raise the capabilities of all staff to take part in a greater velocity of improvements. What do you want to Ansible today?