Using Infoblox as a dynamic inventory in Red Hat Ansible Tower

Using Infoblox as a dynamic inventory in Red Hat Ansible Tower

Do you still use spreadsheets to keep track of all your device inventory? Do you have Infoblox Appliances deployed in your infrastructure? Do you want to start automating without the burden of maintaining a static register of devices? If you answered yes to any of these questions, this blog is for you.

Operations teams often struggle to keep their Configuration Management Databases (CMDBs) up-to-date, primarily because they were not involved in the specification process to share what pieces of information are relevant to them, or even if they were, once it is put in place:

Teams are not allowed to change any of their Configuration Items (CI) because they have only read-only access!

The reality is that a lot of the time when we talk about a CMDB, we are talking about tables in a database without any version control mechanism, therefore only read access is provided to end users.

The impact is that in order to perform lifecycle management (Create/Update/Decommission) of their configuration items, teams must go through a fastidious and manual process until they give up changing CIs (Configuration Items) in the CMDB and just leave everything as it is. What happens next? Different teams start to rely on their own CMDBs (A.K.A spreadsheets), to track subnets, IP allocations, DNS records, Zones, Views, etc. What's the end result? End users request their machines and still need to wait at least a week before someone from the NetOps team consults their own CMDB (yes, the spreadsheet) to provide them DNS records and IP addresses.

Dynamic Inventory

Dynamic Inventory is one of the most powerful features in Red Hat Ansible Tower. Dynamic Inventory allows Ansible to query external systems and use the response data to construct its inventory. Red Hat Ansible Tower provides some out-of-the-box integrations through dynamic inventory scripts, and also allows users to extend these capabilities by providing their own custom dynamic inventory script.

Red Hat Ansible Tower and Infoblox

Let's take a look at the steps required to configure a custom dynamic inventory script to query Infoblox and rely on it as our inventory source of truth.

Install infoblox-client

First we need to install the infoblox-client python library in Red Hat Ansible Tower's venv of each node of the cluster, and the configuration file required by the infoblox inventory script:

# source /var/lib/awx/venv/awx/bin/activate
# pip install infoblox-client

NOTE: You could also create a playbook to do this, using the Ansible pip_module.

Create the infoblox configuration file in /etc/ansible/infoblox.yaml:

---
filters:
  extattrs: {}
  view: null

NOTE: Follow this Ansible GitHub Issue where I suggest taking configuration items from an environment variable or a file for added flexibility.

Credential Type

After the installation in the previous step completes successfully in all the nodes of the cluster, we need to specify in Ansible Tower the credential and hostname to establish communication with Infoblox Appliances. As of today we don't have any specific Ansible Tower Credential for Infoblox, so let's create a custom credential type. We can then provide the information required to communicate with Infoblox, have the password protected by Ansible Tower and RBAC (Role-Based Access Control).

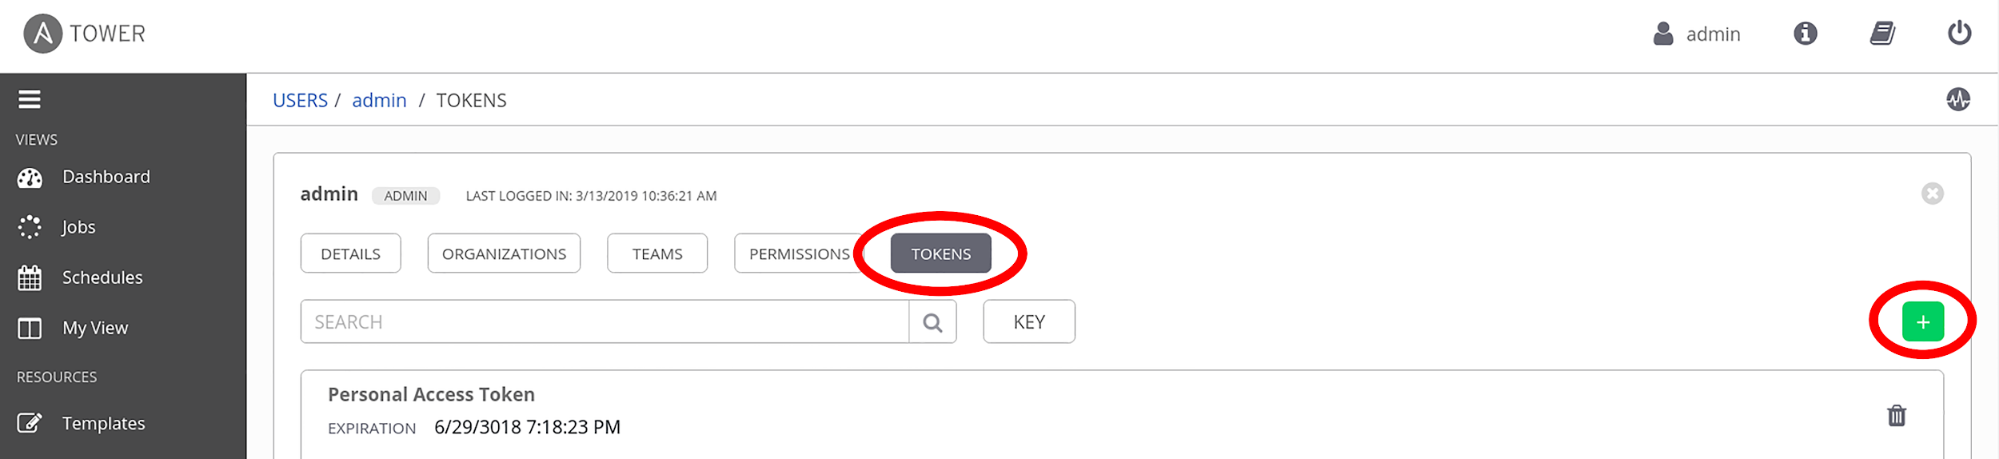
As Administrator, go to Credential Types in the left menu.

Create a new credential type: INFOBLOX_INVENTORY (Green + sign)

Credential Types - Infoblox Inventory

screenshot

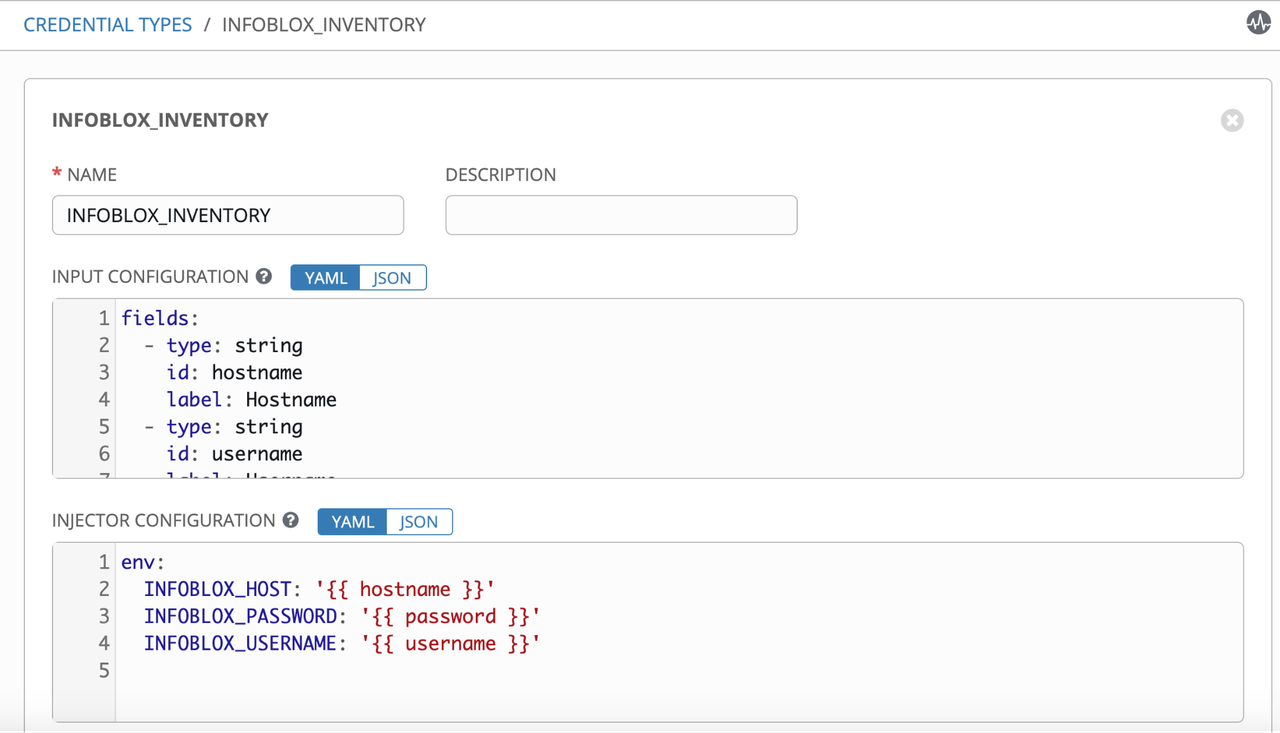
Define the inputs required in the INPUT CONFIGURATION field:

fields:
  - type: string
    id: hostname
    label: Hostname
  - type: string
    id: username
    label: Username
  - secret: true
    type: string
    id: password
    label: Password
required:
  - username
  - password

Define the injection of inputs as environment variables in INJECTOR CONFIGURATION field:

env:
  INFOBLOX_HOST: '{{ hostname }}'
  INFOBLOX_PASSWORD: '{{ password }}'
  INFOBLOX_USERNAME: '{{ username }}'
Credential

After the creation of the credential type INFOBLOX_INVENTORY in Ansible Tower, we can use it to create a new credential, specifying the information to communicate with the Infoblox Appliance.

Create a credential to communicate with Infoblox Appliance: infoblox-ip.ip.ip.ip

Create credential

NOTE: In the example, the name includes the IP or FQDN, so we can know what appliance this particular credential refers to.

Inventory Script

Creation of custom inventory script to query Infoblox Appliances and parse the output to the format expected by Ansible inventory.

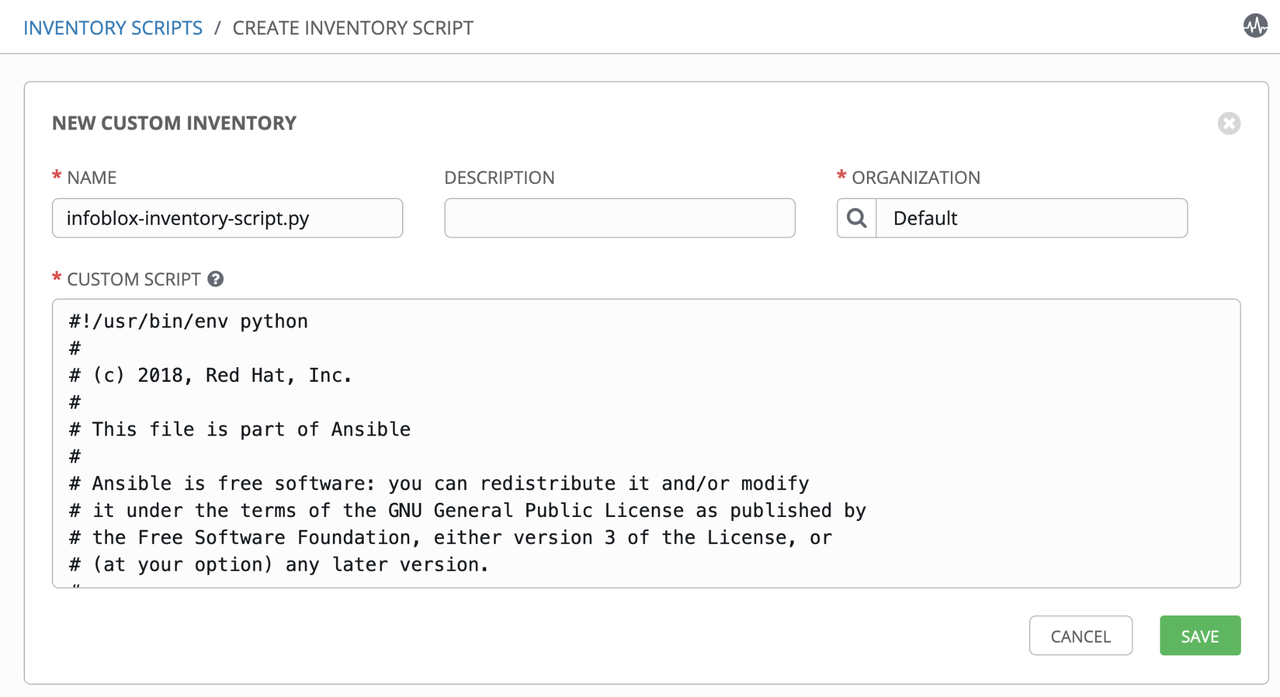
Create a new custom inventory script: _infoblox-inventory-script.py

Get the infoblox.py from Ansible's GitHub and paste into the CUSTOM SCRIPT field:

Create inventory script

Inventory Source

Creation of inventory with the infoblox dynamic script as dynamic source and sync to populate our inventory with entries returned by Infoblox Appliance.

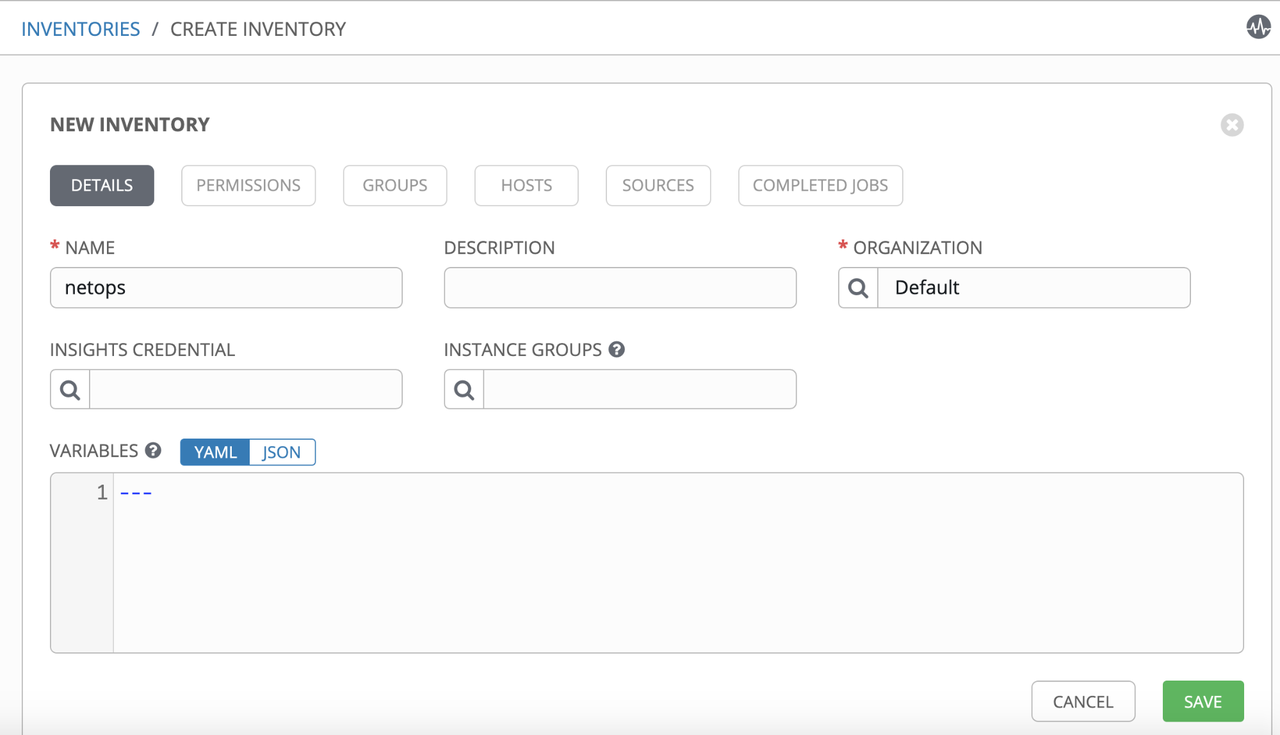
Go to Inventories and create a new Inventory: netops

Create inventory

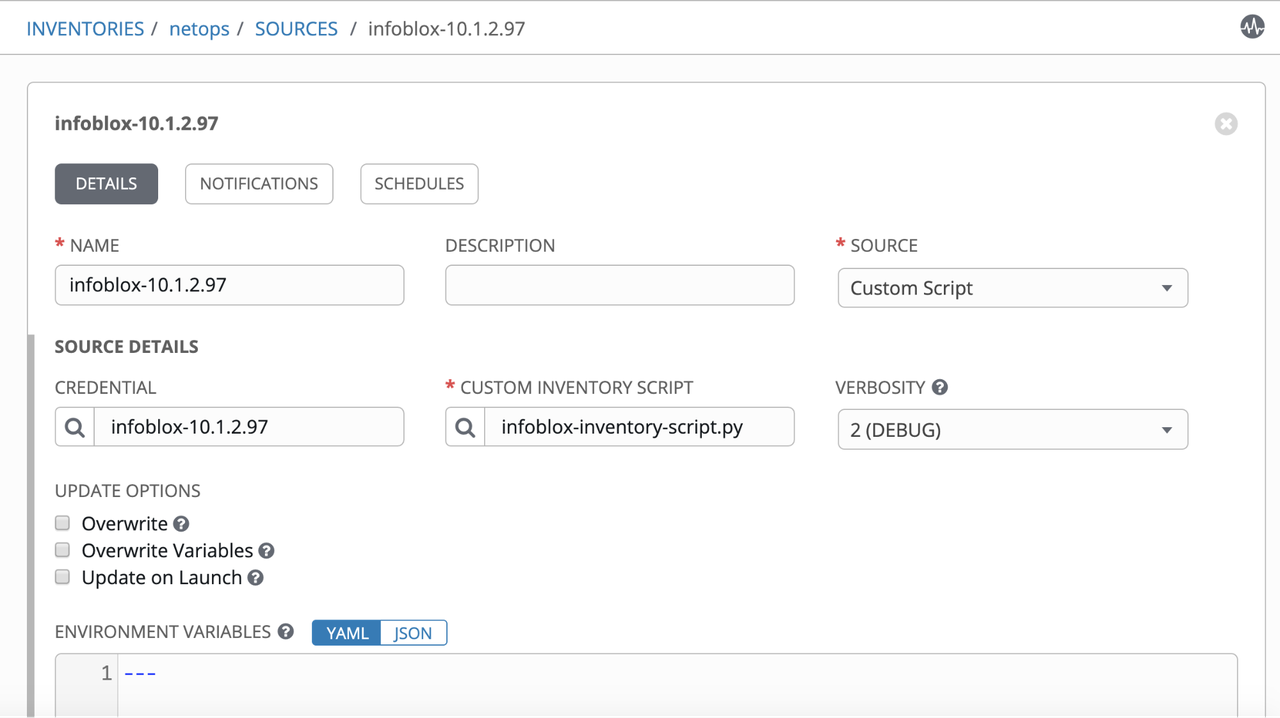
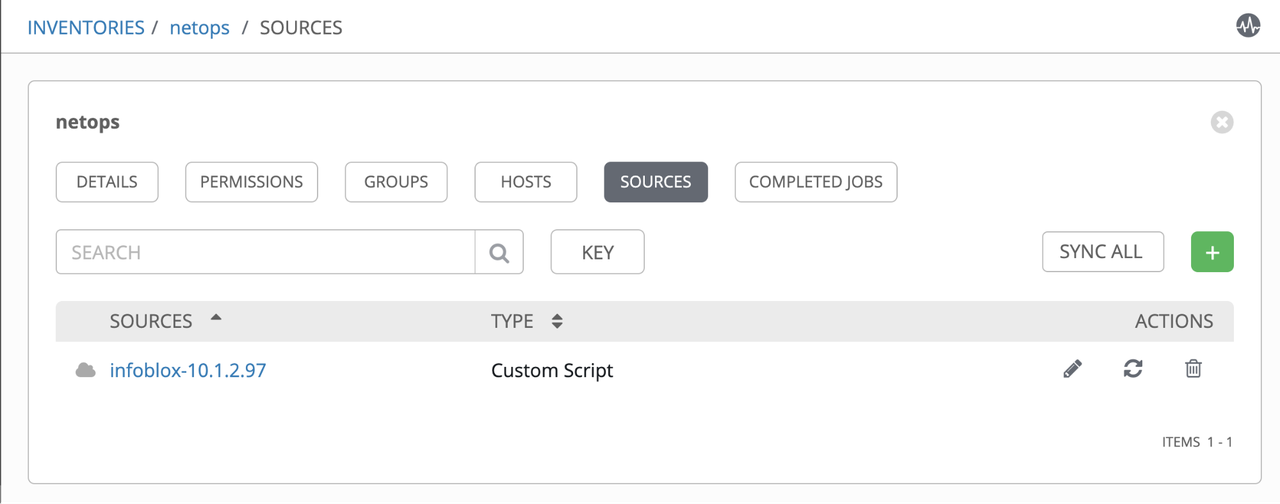
Add Source referring to the infoblox-dynamic-script.py:

add source

Sync the Inventory Source:

sync inventory source

Check Sync Status:

check sync status

Inventory Entries

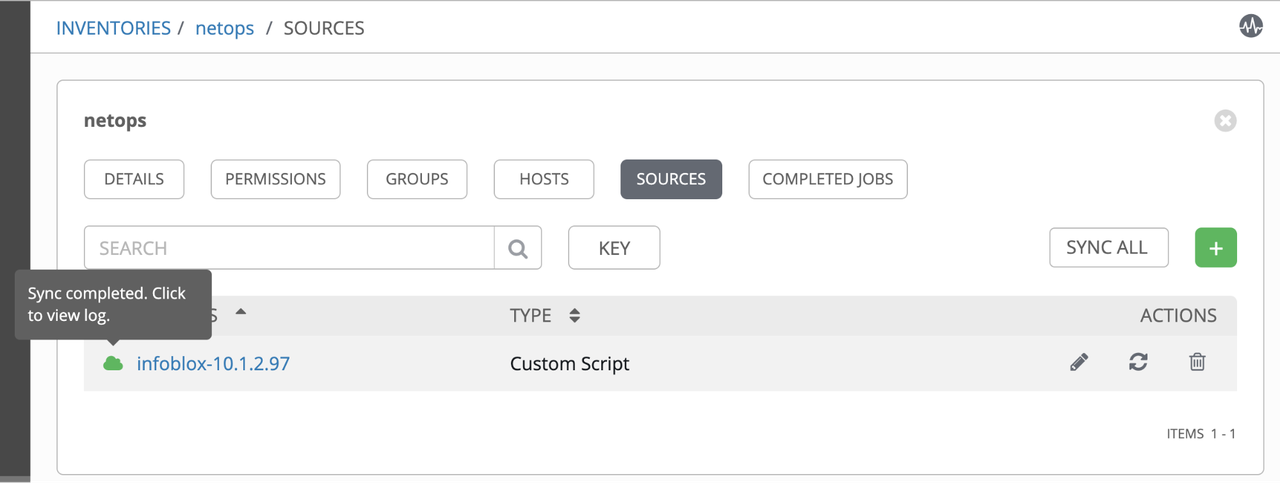
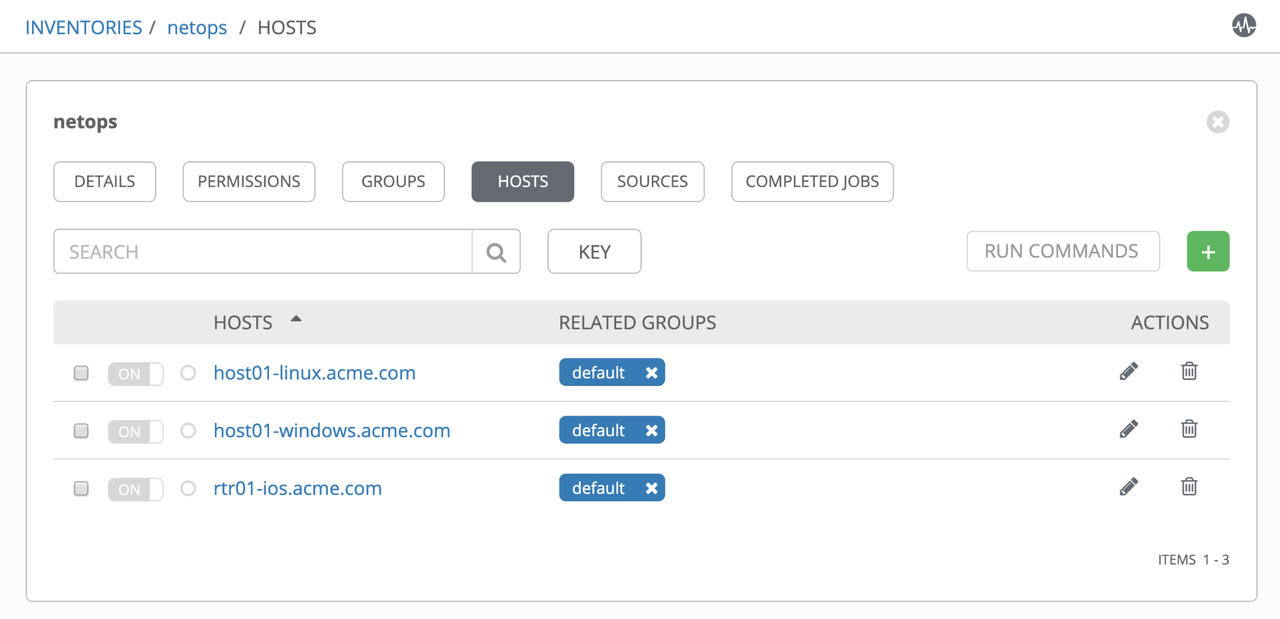
Verification if the hosts, groups and variables are being populated correctly in the inventory, based on existing entries in Infoblox Appliance:

Check host entries in inventory:  netops -> hosts

check host inventory

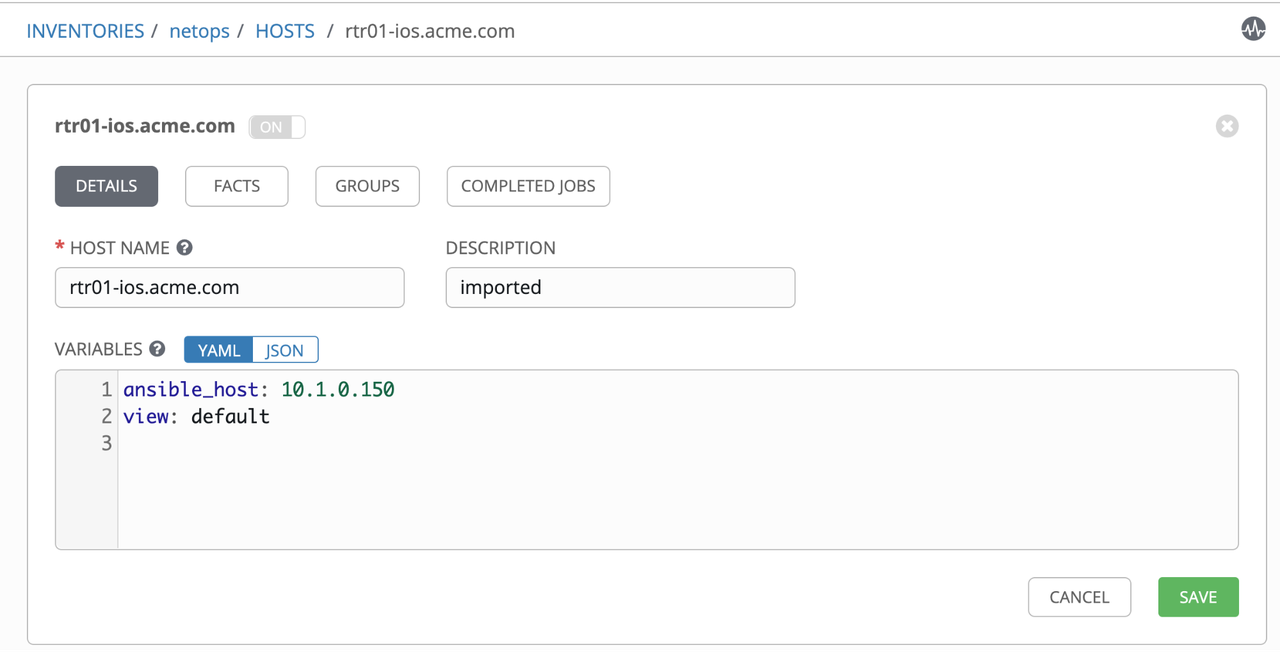
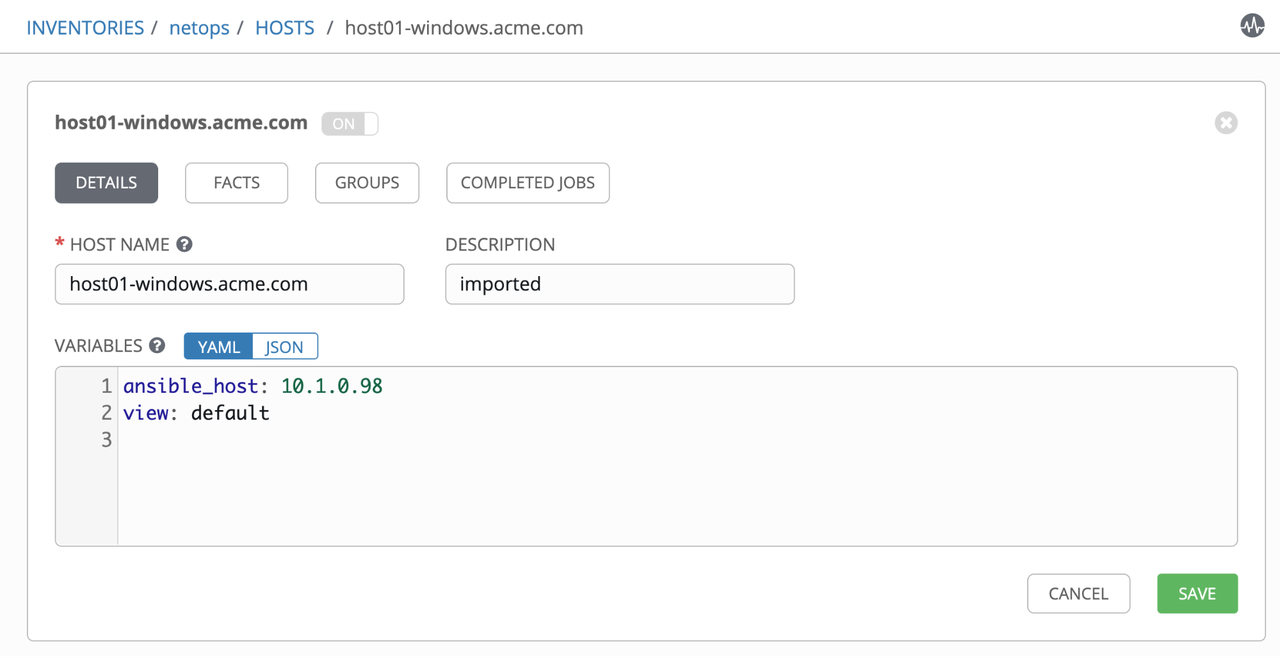
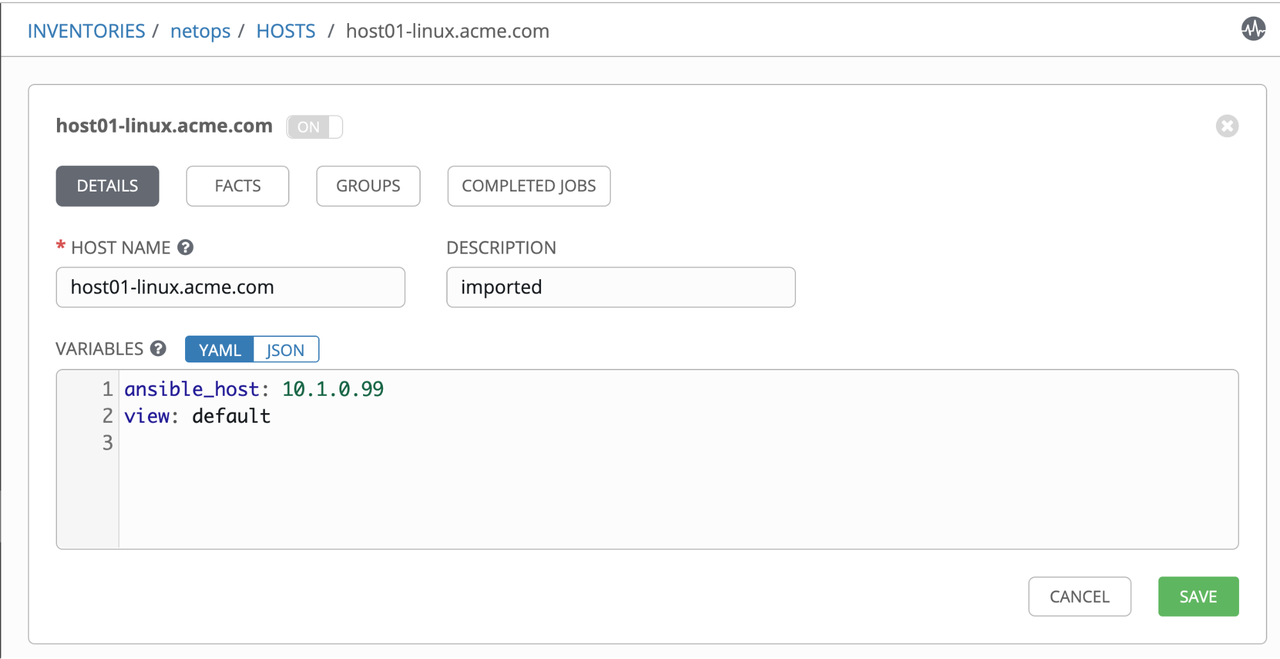
Check variables associate to a host entry: netops -> hosts -> rtr01.acme.com

check variables

host details

check inventories

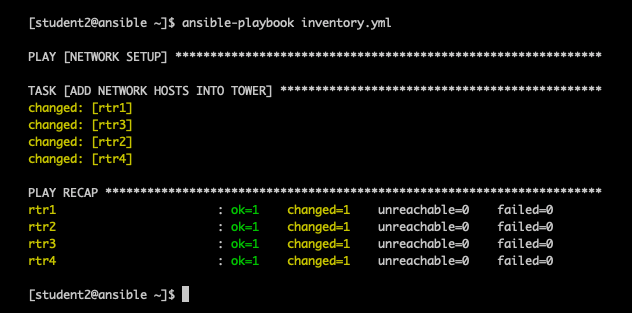
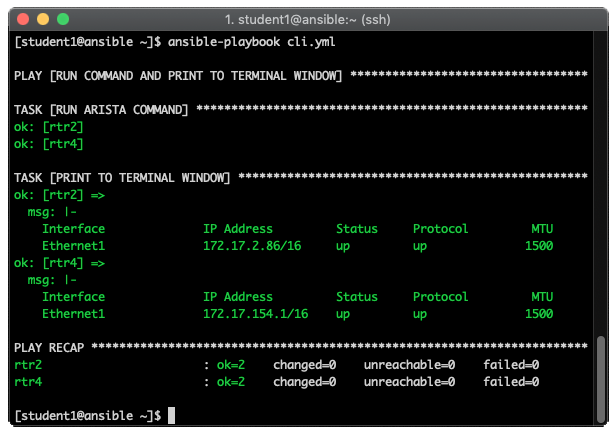
At this point we have servers and routers in our dynamic inventory, therefore from now on we can execute any Ansible Playbooks against them.  In the next section we'll cover how the configurations looks like in the infoblox side.

Infoblox

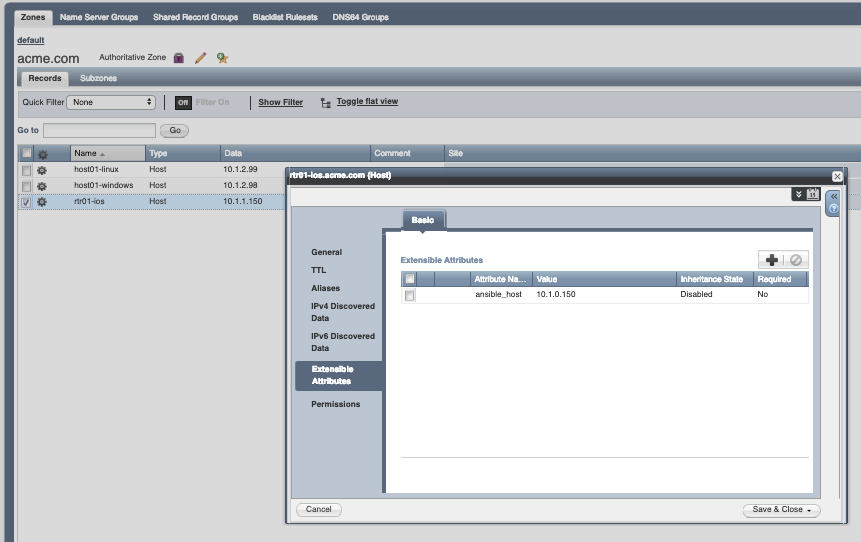
At this point you may be wondering: How are these variables in Ansible Tower's Inventory specified in my Infoblox Appliance? The answer is that we are using Extensible Attributes in Infoblox to fulfill ansible_* variables, so they are automatically populated in Ansible Tower's inventory. Follow below some screenshots taken from Infoblox's WEBUI:

Extensible Attributes Configuration in Infoblox, for the variable "ansible_host":

Extensible Attributes Configuration in Infoblox

Why are we using Extensible Attributes?

The answer is simple. It is common to have entries in the DNS that refers to the production interface of the server or the service being provided, meanwhile the management access is only available via a dedicated out-of-band management interface. The ansible_host extra attribute defines that for this particular entry, Ansible shall use its value to establish communication with the server, via the management interface.

Additionally, we could rely on Extensible Attributes variable to specify if an entry is managed by Ansible Tower or not (Ex: ansible_managed: true/false), and update our "Dynamic Inventory Configuration File" accordingly, to use this particular attribute as a filter. The result is that Ansible Tower's inventory will only populate with entries that we want to automate (ansible_managed: true).


Summary of Authentication Methods For Red Hat Ansible Tower

Summary of Authentication Methods For Red Hat Ansible Tower

Red Hat Ansible Tower 3.4.0 has added token authentication as a new method for authentication so I wanted to use this post to summarize the numerous enterprise authentication methods and the best use case for each. Ansible Tower is designed for organizations to centralize and control their automation with a visual dashboard for out-of-the box control while providing a REST API to integrate with your other tooling on a deeper level. We support a number of authentication methods to make it easy to embed Ansible Tower into existing tools and processes to help ensure the right people can access Ansible Tower resources. For this blog post I will go over four of Ansible Tower's authentication methods: Session, Basic, OAuth2 Token, and Single Sign-on (SSO). For each method I will provide some quick examples and links to the relevant supporting documentation, so you can easily integrate Ansible Tower into your environment.

Session Authentication

Session authentication is what's used when logging in directly to Ansible Tower's API or UI. It is used when a user wants to remain logged in for a prolonged period of time, not just for that HTTP request, i.e. when browsing the UI or API in a browser like Chrome or Firefox. When a user logs in, a session cookie is created, which enables the user to remain logged in when navigating to different pages within Ansible Tower.

Blog-TAO-Login

How does it work?

Blog-TAO-API

Using the Curl tool, let's take a deeper look at what happens when you log in to Ansible Tower.

  1. GET to /api/login/ endpoint to grab the csrftoken cookie

    ```bash curl -k -c - https:///api/login/

    localhost FALSE / FALSE 0 csrftoken AswSFn5p1qQvaX4KoRZN6A5yer0Pq0VG2cXMTzZnzuhaY0L4tiidYqwf5PXZckuj ```

  2. POST to the /api/login/ endpoint with username, password, and X-CSRFToken=<token-value>

    bash curl -X POST -H 'Content-Type: application/x-www-form-urlencoded' \ --referer https://<tower-host>/api/login/ \ -H 'X-CSRFToken: K580zVVm0rWX8pmNylz5ygTPamgUJxifrdJY0UDtMMoOis5Q1UOxRmV9918BUBIN' \ --data 'username=root&password=reverse' \ --cookie 'csrftoken=K580zVVm0rWX8pmNylz5ygTPamgUJxifrdJY0UDtMMoOis5Q1UOxRmV9918BUBIN' \ https://<tower-host>/api/login/ -k -D - -o /dev/null

All of this is done by Ansible Tower when you log in to the UI or API in the browser, and should only be used when authenticating in the browser. For programmatic integration with Ansible Tower, you should use OAuth 2 tokens, not the process described above.

Note: The session expiration time can be changed by setting the SESSION_COOKIE_AGE setting.

Example with browsable API:

Blog-TAO-Cred-List

Basic Authentication

Basic Authentication is stateless, thus the base64 encoded `username` and password must be sent along with each request via the Authorization header.

Use Case: For API calls from curls, python scripts, or individual requests to the API.  OAuth2 Authentication is recommended for accessing the API when at all possible.  

Example with curl:

curl -X GET -H 'Authorization: Basic dXNlcjpwYXNzd29yZA==’
https://<tower-host>/api/v2/credentials -k -L

# the --user flag adds this Authorization header for us
curl -X GET --user 'user:password' https://<tower-host>/api/v2/credentials -k -L

For more information about the Basic HTTP Authentication scheme, see RFC 7617.

Note: Basic Auth can be disabled for security purposes, see the docs for more info.

OAuth 2 Token Authentication

OAuth (Open Authorization) is an open standard for token-based authentication and authorization. OAuth 2 authentication is commonly used when interacting with the Ansible Tower API programmatically. Like Basic Auth, an OAuth 2 token is supplied with each API request via the Authorization header. Unlike Basic Auth, OAuth 2 tokens have a configurable timeout and are scopable. Tokens have a configurable expiration time and can be easily revoked for one user or for the entire Ansible Tower system by an admin if needed. This can be done with the tower-manage revoke_oauth2_tokens management command. Here is more information on doing that. Additionally, the type of users able to create tokens can be limited to users created in Ansible Tower, as opposed to external users created from an SSO (see SSO section below). For more on how to do this see the note in these docs.

Different methods for obtaining OAuth 2 Access Tokens in Ansible Tower:

  • Personal access tokens (PAT)
  • Application Token: Password grant type
  • Application Token: Implicit grant type
  • Application Token: Authorization Code grant type

First, a user needs to create an OAuth 2 Access Token in the API, or in their User's Token tab in the UI. For the purposes of this article, we will use the personal access token method (PAT) for creating a token. Upon token creation, the user can set the scope. The expiration time of the token can be configured system-wide as well.

Below is an example of creating a PAT in the UI:\  Blog-TAO-Token

Token authentication is best used for any programmatic use of Ansible Tower's API, such as Python scripts or tools like curl. See the example for a personal access token (PAT) below:

Curl Example

First, create an OAuth 2 token without an associated Application; in other words, a personal access token. In this example, we will do so through the API with curl.

curl -u user:password -k -X POST https://<tower-host>/api/v2/tokens/

You can now use that token to perform a GET request for an Ansible Tower resource, e.g., Hosts.

curl -k -X POST \
    -H “Content-Type: application/json”
    -H “Authorization: Bearer <oauth2-token-value>” \
    https://<tower-host>/api/v2/hosts/

Similarly, a job can be launched by making a POST to the job template that you want to launch.

curl -k -X POST \
    -H "Authorization: Bearer <oauth2-token-value>" \
    -H "Content-Type: application/json" \
    --data '{"limit" : "ansible"}' \
    https://<tower>/api/v2/job_templates/14/launch/

Python Example

Tower-CLI is an open source tool that makes it easy to use HTTP requests to access Ansible Tower's API. You can have Tower-CLI authenticate to Tower using your OAuth 2 token by setting it in tower-cli config, or have it acquire a PAT on your behalf by using the tower-cli login command. It is easy to use and I would recommend checking it out:

pip install ansible-tower-cli

tower-cli config tower
tower-cli login

For more information on how to use OAuth 2 in Ansible Tower in the context of integrating external applications, check out these docs.

If you need to write custom requests, you can write a Python script using the Python library requests. Here is an example.

import requests

oauth2_token_value = 'y1Q8ye4hPvT61aQq63Da6N1C25jiA'   # your token value from Tower
url = 'https://<tower-host>/api/v2/users/'
payload = {}
headers = {'Authorization': 'Bearer ' + oauth2_token_value,}

# makes request to Tower user endpoint
response = requests.request('GET', url, headers=headers, data=payload,
allow_redirects=False, verify=False)

# prints json returned from Tower with formatting
print(json.dumps(response.json(), indent=4, sort_keys=True))

SSO Authentication

Single sign-on (SSO) authentication methods are fundamentally different because the authentication of the user happens external to Ansible Tower. For example, with GitHub SSO GitHub is the single source of truth, which verifies your identity based on the username and password you gave Tower.

Once you have configured an SSO method in Ansible Tower, a button for that SSO will be present on the login screen. If you click that button, it will redirect you to the Identity Provider, in this case GitHub, where you will present your credentials. If the Identity Provider verifies you successfully, then Ansible Tower will make a user linked to your GitHub user (if this is your first time logging in via this SSO method), and log you in.

  • LDAP - a directory of identities external to Ansible Tower that can be used to check authentication credentials against. Active Directory can be configured via the LDAP SSO in Ansible Tower.
  • SAML - allows Ansible Tower users to authenticate via a single sign-on authentication service, so that authentication is consistent for the user across multiple services used by their team. SAML is particularly useful for maintaining permission groups across services.
  • GitHub - allows Ansible Tower users to authenticate with their GitHub credentials if they are in the Github Organization, Team or User that the system admin specified in `/api/v2/settings/authentication/`. Ansible Tower uses OAuth 2 to verify the user's credentials with GitHub.
  • Azure Active Directory - allows Ansible Tower users to authenticate with the Azure credentials. Ansible Tower uses OAuth 2 to authenticate to Azure to verify your credentials and obtain user group data.
  • RADIUS - is an authentication protocol generally used for network devices. It can minimize network traffic for authentication, as it is lightweight.
  • Google OAuth - allows Ansible Tower users to authenticate with their Google Cloud. Ansible Tower authenticates to Google using the OAuth 2 protocol to check your username and password credentials against the identities in your Google organization.

Which Authentication is right for me?

I've shown you four types of authentication you can use in Ansible Tower. Each method has pros and cons and lends itself to certain use cases.

  • Session Authentication (logging in to the UI or browsable API): I am using Ansible Tower to manually create resources (inventory, project, job template) and launch jobs in the browser.
  • Basic Authentication:  I am troubleshooting Ansible Tower with curl, HTTPie, or another similar tool and have not yet set up an OAuth 2 Token for my user
  • OAuth 2 Token Authentication
    • Authorization Code Flow -I am a user of an application interfacing with Ansible Tower
    • Personal Access Tokens (PAT) - I am automating my usage of Ansible Tower programmatically
  • SSO: I am using Ansible Tower inside a large organization and want to use a central Identity provider or want to allow users to authenticate using external authentication like Google SSO, Azure SSO, LDAP, SAML, or GitHub.

You now have the knowledge needed to choose the most effective authentication methods for your needs! I hope this guide helps to clarify your options for authenticating with Ansible Tower.


Three quick ways to move your Ansible inventory into Red Hat Ansible Tower

Three quick ways to move your Ansible inventory into Red Hat Ansible Tower

If you've been using Ansible at the command line for a while, you probably have a lot of servers, network devices, and other target nodes listed in your inventory. You know that Red Hat Ansible Tower makes it easier for everyone on your team to run your Ansible Playbooks. So you've thought about using Ansible Tower to take your automation to the next level, but you want to retain all the data and variables in your existing inventory file or directory. Are you worried about transferring your inventory from command-line use to Ansible Tower? Let me show you how easy it is to import your existing Ansible inventory into Ansible Tower!

This blog covers three quick and effective ways to connect your existing Ansible inventory into Ansible Tower:

  1. Migrating an inventory file from the Ansible Tower control node (awx-manage)
  2. Migrating an inventory file from anywhere with a playbook
  3. Setting Tower to access a git source-controlled inventory file

If you're using dynamic inventory, you don't need to import your inventory into Ansible Tower. Dynamic inventory retrieves your inventory from an existing source. With dynamic inventory, you don't need to manage an inventory file at all, you just retrieve the latest and most up-to-date listing every time. Ansible Tower seamlessly integrates with popular dynamic inventory sources including Red Hat OpenStack Platform, Red Hat Satellite, public cloud platforms (Amazon Web Services/AWS, Google Compute Engine/GCE, Microsoft Azure), and virtualization solutions like Red Hat Virtualization and VMware vCenter. You can use scripts to integrate Infoblox DDI and ServiceNow CMDB for dynamic inventory in Ansible Tower as well.

NOTE: This blog does not cover the importing of Ansible Playbooks or Ansible Tower workflows into Ansible Tower and is strictly focused on Ansible inventory portability.

Migrating an inventory file from the Ansible Tower control node (awx-manage)

The command line tool awx-manage, which comes with your Ansible Tower installation, is a simple and effective tool to import your inventory. Using awx-manage makes the most sense when your inventory is a flat file in YAML or ini format that already lives on your Ansible control node. You run the command and point to your existing inventory file then Ansible Tower will be loaded with all the hosts.

  1. Using the WebUI login to Ansible Tower and create an empty inventory.

    inventory

  2. Login via SSH to your Ansible Tower control node (This is the Linux machine that has Ansible Tower installed on it).

  3. Locate the flat-file that represents your Ansible inventory.

  4. Run the awx-manage inventory_import command like this

    sudo awx-manage inventory_import --source=/path/to/hosts --inventory-name="My Inventory"
    

    On the terminal window you will receive some output similar to the following:

    1.387 INFO Updating inventory 3: My Inventory
    1.475 INFO Reading Ansible inventory source: /path/to/hosts
    2.119 INFO Processing JSON output...
    2.120 INFO Loaded 6 groups, 6 hosts
    2.329 INFO Inventory import completed for (My Inventory - 9) in 0.9s
    
  5. Now when you login via the WebUI you will see all the hosts under the inventory

    loaded_inventory

The awx-manage command line tool is very simple and fast. It only took me a couple seconds to take my existing inventory and import it into Ansible Tower.

For teams that use Ansible Tower to run playbooks, but manage inventory outside of Ansible Tower, importing with awx-manage is not the best option, since you would need to re-import the flat-file inventory every time a change is made to your inventory file. If your team will continue to manage inventory outside of Ansible Tower, you probably want to use the GitHub option described below.

Migrating an inventory file from anywhere with a playbook

You can use the Ansible Tower modules to automate the transfer of your inventory into Ansible Tower. These modules make it possible to use Ansible Playbooks to automate and manage everything, including inventory, in your Ansible Tower instance. There is a tower_inventory module that will let us create an inventory, and there is a tower_host module that lets us add a host to an existing inventory. Assume that we already created an inventory called "Network Routers" and I will build an Ansible Playbook to add all my routers in the group routers to that inventory using the tower_host module. The Ansible Playbook will look like this:

    - name: NETWORK SETUP
      hosts: routers
      connection: local
      become: yes
      gather_facts: no
      tasks:
        - name: ADD NETWORK HOSTS INTO TOWER
          tower_host:
                name: "{{ inventory_hostname }}"
                inventory: "Network Routers"
                tower_username: admin
                tower_password: ansible
                tower_host: https://localhost
                variables:
                  ansible_network_os: "{{ansible_network_os}}"
                  ansible_host: "{{ansible_host}}"
                  ansible_user: "{{ansible_user}}"
                  ansible_connection: "{{ansible_connection}}"
                  ansible_become: yes
                  ansible_become_method: enable

The Ansible Playbook will add all devices in the group routers simultaneously. The playbook output will look similar to this: 

Ansible-Playbook

The advantage of this method is you don't have to be on the control node, you can run the Ansible Playbook from anywhere. Like the awx-manage option, transferring your inventory to Ansible Tower with an Ansible Playbook works well only if you will manage your inventory in Tower in future. These two methods are migration strategies to Tower. Ansible If you use dynamic inventory or source control to manage inventory, you'd have to re-run the playbook for Ansible Tower every time you changed your inventory.

Setting Tower to access a git source-controlled inventory file

The final method I want to cover in this post is using source control to manage my inventory. I have a flat-file inventory file stored in a Github repo. I made an example repo to illustrate this concept here:

https://github.com/ipvsean/sample_inventory

Unlike the previous two methods, this is not meant as a migration strategy, but a more permanent way to manage your Ansible inventory using git and source control. Inventory can be managed in Github and Ansible Tower can simply reflect those changes. 

First we need to create an Ansible Tower Project. An Ansible Tower Project is how we can sync Ansible Tower to source code management (SCM) system supported by Ansible Tower, including Git, Subversion, and Mercurial. I will add a Project named Sean's Github, set the SCM Type to Git, and put the SCM URL I listed above.

Tower project ui

Now I need to create an Inventory that will use this Ansible Tower project. I will:

  1. Create an inventory called Sean Github Inventory.
  2. Add a Source called Sean Github Source, and choose the Ansible Tower Project previously created (named Sean's Github).
  3. As soon as the Project is selected a drop down menu will appear and allow us to point directly the hosts flat-file.
  4. Once you create the source you can sync it using the circular arrow sync button. The hosts and groups will automatically show up under the hosts button as shown in the animation below.

github_inventory

Using source control for managing inventory is popular with Ansible Tower users and can scale really well.


Deep Dive on cli_command for Network Automation

Deep Dive on cli_command for Network Automation

In October Ansible 2.7 was released and brought us two powerful agnostic network modules, cli_command and cli_config. Do you have two or more network vendors within your environment? The goal of agnostic modules is to simplify Ansible Playbooks for network engineers that deal with a variety of network platforms. Rather than having to deal with platform specific modules (e.g. eos_config, ios_config, junos_config), you can now use cli_command or cli_config to reduce the amount of tasks and conditionals within a playbook, and make the playbook easier to use. This post will demonstrate how to use these modules and contrast them to platform specific modules. I'll show some playbook examples and common use cases to help illustrate how you can use these new platform agnostic modules.

Both the cli_command and cli_config only work with the network_cli connection plugin. The goal of network_cli is to make playbooks look, feel and operate on network devices, the same way Ansible works on Linux hosts.

What can you do with the cli_command?

The cli_command allows you to run arbitrary commands on network devices. Let's show a simple example using the cli_command, on an Arista vEOS device.

---
- name: RUN COMMAND AND PRINT TO TERMINAL WINDOW
  hosts: arista
  gather_facts: false

  tasks:

- name: RUN ARISTA COMMAND
  cli_command:
    command: show ip interface brief
  register: command_output

- name: PRINT TO TERMINAL WINDOW
  debug:
    msg: "{{command_output.stdout}}"

Previously this would require the eos_command module and would look like this:

---
- name: RUN COMMAND AND PRINT TO TERMINAL WINDOW
  hosts: arista
  gather_facts: false

  tasks:

- name: RUN ARISTA COMMAND
  eos_command:
    commands: show ip interface brief
  register: command_output

- name: PRINT TO TERMINAL WINDOW
  debug:
    msg: "{{command_output.stdout}}"

Both Ansible Playbooks are simple and will output identically. This is what it would look like:

screenshot

Now these two playbooks don't look much different yet, but when you add multiple vendors the playbook complexity without these new agnostic network modules can increase quickly. Previously if I had a mixed vendor environment, I would see the playbook evolve a couple different ways. Sometimes they would contain numerous conditionals (the when statement) like this:

- name: RUN ARISTA COMMAND
  eos_command:
    commands: show ip int br
  when: ansible_network_os == 'eos'

- name: RUN CISCO NXOS COMMAND
  nxos_command:
    commands: show ip int br
  when: ansible_network_os == 'nxos'

- name: RUN JUNOS COMMAND
  junos_command:
    commands: show interface terse
  when: ansible_network_os == 'junos'

Or somewhat better, network automation playbooks would evolve like this:

- name: RUN JUNOS COMMAND
  include_tasks: “{{ansible_network_os}}”

This second method is much cleaner. The include_tasks calls an Ansible Playbook named eos.yml, ios.yml, nxos.yml, etc and runs the corresponding command or tasks that were needed. While this is much better because you can separate Ansible Playbooks based on the network platform, it is still not as succinct or easy as agnostic modules. The underlying functionality is the same, but the Ansible Playbooks become much simpler.

The reason I bring up this include_tasks method is that there is still going to be a time and place, even with agnostic modules, to separate out the playbook logic. For example the command shown above for Juniper is different compared to Arista and Cisco (show ip interface brief versus show interface terse).

With the cli_command let's look at how we can make this agnostic playbook for Cisco, Juniper and Arista extremely simple:

---
- name: RUN COMMAND AND PRINT TO TERMINAL WINDOW
  hosts: routers
  gather_facts: false

  tasks:
    - name: RUN SHOW COMMAND
      cli_command:
        command: "{{show_interfaces}}"
      register: command_output

    - name: PRINT TO TERMINAL WINDOW
      debug:
        msg: "{{command_output.stdout}}"

Three *os_command tasks are reduced to one task. The show_interfaces variable is stored as a group variable on a per-platform basis. For a full example look at this GitHub repository.

Backup example

Let's look at another use-case with the cli_command module. Backing up network configurations is a common network operational task. Ansible Network Automation modules have a backup parameter that helps network engineers automate this mundane, yet critical, task. For example with Arista EOS we can do this:

---
- name: BACKUP NETWORK CONFIGURATIONS
  hosts: arista
  gather_facts: false

  tasks:

    - name: BACKUP CONFIG
      eos_config:
        backup: yes

The cli_command module does not have a backup parameter. Why? Because the backup parameter can be quite inflexible and hard to manipulate. One of the most common feature requests from Ansible users is for every config module to be able to set the backup destination. Rather than recreate an incredible amount of logic and code in each config module, we can reuse an existing module. In this case we can leverage the already widely used copy module!

---
- name: RUN COMMAND AND PRINT TO TERMINAL WINDOW
  hosts: arista
  gather_facts: false

  tasks:

- name: RUN ARISTA COMMAND
  cli_command:
    command: show run
  register: backup

- name: PRINT TO TERMINAL WINDOW
  copy:
    content: "{{backup.stdout}}"
    dest: "{{inventory_hostname}}.backup"

This becomes easy to manipulate what command output we want to save. In this case it is the running configuration, but now we can switch to startup-config just as easily. It also gives the user the control to pick the backup destination directory and file name. An example of an agnostic playbook for backups for Arista EOS, Juniper Junos and Cisco IOS can be found here:

https://github.com/network-automation/agnostic_example

There are a lot of incredible things we can do with the agnostic modules that help make our Ansible Network Automation Playbooks much more succinct and simple. The cli_comand and cli_config modules have been in the Ansible project since October 2018. Consider upgrading if you have not already. If you are already using the cli_command or cli_config module, please share! I will be highlighting more examples using agnostic modules in subsequent blog posts so stay tuned.


Ansible Tips and Tricks, Dealing with Unreliable Connections and Services

Ansible Tips and Tricks, Dealing with Unreliable Connections and Services

Red Hat Ansible Automation is widely known to automate and configure Linux and Windows hosts, as well as network automation for routers, switches, firewalls and load balancers. Plus, there are a variety of modules that deal with the cloud and the API around it such as Microsoft Azure, Amazon Web Services (AWS) and Google Compute Engine.  And there are other modules that interact with Software as a Service (SaaS) tools like Slack or ServiceNow. Although the downtime for these APIs is very minimal, it does happen, and it is even more likely that the connection between your Ansible control host (where you are running Ansible from) and the cloud-centric API could be down.

In this blog post, I will cover some tips and tricks for dealing with unreliable connections to cloud-centric APIs and how I build Ansible Playbooks in a reliable manner. As a technical marketing engineer, I consider my customers the Red Hat field teams, and often Solutions Architects are running playbooks from unreliable hotel wireless, coffee shops and sometimes even airplanes! I have to make sure playbooks have some more robustness built in for these odd situations. It is hair-pulling frustrating to get through a 20 task playbook for it to fail on the 19th task because your wireless went out for a couple seconds. This is especially frustrating if you are at the airport just trying to setup a demo or playground to show something to a client.

The Until Loop

Many people that use Ansible are very familiar with the loop construct. A loop (previously known as with_items) is very simple and powerful and allows you to iterate over a list or dictionary in an easy fashion. However, I find that many people are not aware of the until loop. Let us look at how this can work.

The module ec2_vpc_net allows us to create an AWS Virtual Private Cloud.

- name: Create AWS VPC sean-vpc
  ec2_vpc_net:
    name: "sean-vpc”
    cidr_block: "192.168.1.0/16”
    region: "us-east-1”
  register: create_vpc
  until: create_vpc is not failed
  retries: 5

The name, cidr_block and region are module parameters for the ec2_vpc_net module. However the register, until and retries are task level parameters, meaning that you can use these on any module. This task will attempt to create the VPC five times before it gives up and fails.

Let's step back a minute to see how this works. Each time we run a task there are some common variables that the task returns to let us know how the task performed:

- name: test local playbook
  hosts: localhost
  gather_facts: false

  tasks:
      - name: dumb easy command
        shell: ls -la
        register: task_variable

      - name: debug the var
        debug:
          var: task_variable

When we run this playbook with ansible-playbook test_output.yml we get some standard output (via the debug module) printed to the terminal window (or browser window when using Ansible Tower).

TASK [debug the var] **************************************************************
ok: [localhost] =>
 task_variable:
      changed: true
      cmd: ls -la
      delta: '0:00:00.011018'
      end: '2018-12-07 09:53:14.595811'
      failed: false
...

One of the key, value pairs we always get returned from any Ansible task is a failed key. If the task completed successfully the task will return a failed: false. If the task failed, the task will return a failed: true. Looking back at the until loop logic for the AWS VPC task:

register: create_vpc
until: create_vpc is not failed
retries: 5

We are registering the result of the task so we can look at the failed key, value pair. The until value is the conditional we are applying. In this case we keep running the task until the create_vpc does not have failed: true. However we don't want the task to run this for infinity. The default value for "retries" is 3, however I have increased this to 5. The until loop provides significant robustness to the task. There is also a delay parameter that can be combined with the until loop.  The delay is how much time to wait between retries.  The default value for the delay is 5 seconds.  Check out the documentation for more details and examples of the until loop and the delay parameter.

Changing What A Failure Means

By default, if Ansible fails the playbook will end on that task, for the respective host it was running on. If I had a playbook running on 10 hosts, and it failed on 1 host on task three out of ten, the 7 subsequent tasks would not run for that host. The other hosts would remain unaffected.

With unreliable connections to an outside API we need to think about what is required and not required to define success for a playbook to finish. For example if you had a task spin up a DNS record on AWS's Route53 service, the DNS can be nice to have, but isn't required for you to begin using the instance you created. I can use an until loop to make the route53 tasks more reliable, but it might be OK if the Route53 service is down and unusable. I can use the IP address to get some work done done on my instance until I get a more reliable internet connection to re-run the playbook or the Route53 service becomes available again. There are some tasks that are "nice to have" vs. required.

The way to ignore a failed value is to use the ignore_errors parameter which is a task level parameter outlined in the documentation here. I think there is plenty of content in the docs and various blogs about using the ignore_errors so I think it is sufficient to summarize that ignore_errors will show red and report a failed: true key, value pair, but the playbook will continue on.

What happens if we want to combine the until loop with an ignore_errors?

- name: failure test playbook
  hosts: localhost
  gather_facts: false
  tasks:

    - name: purposely fail
      shell: /bin/false
      register: task_register_var
      until: task_register_var is not failed
      retries: 5
      ignore_errors: yes

    - name: debug task_register_var
      debug:
        msg: "{{ task_register_var }}"

We actually get the best of both worlds with an unreliable task. We get robustness with the until loop, combined with an ignore_errors which allows the playbook to complete regardless of that task completing successfully. I find myself using this combination of ignore_errors and until loops in conjunction with services like Let's Encrypt where it's not 100% required for me to have an SSL cert to start using the web app (I can rely on a self-signed cert until I can figure out the problem).

The Ansible Playbook outputs like this:

TASK [purposely fail] *************************************************************
FAILED - RETRYING: purposely fail (5 retries left).
FAILED - RETRYING: purposely fail (4 retries left).
FAILED - RETRYING: purposely fail (3 retries left).
FAILED - RETRYING: purposely fail (2 retries left).
FAILED - RETRYING: purposely fail (1 retries left).
fatal: [localhost]: FAILED! => changed=true
  attempts: 5
  cmd: /bin/false
  delta: '0:00:00.007936'
  end: '2018-12-07 13:23:13.277624'
  msg: non-zero return code
  rc: 127
  start: '2018-12-07 13:23:13.269688'
  stderr: '/bin/sh: /bin/false: No such file or directory'
  stderr_lines:
  - '/bin/sh: /bin/false: No such file or directory'
  stdout: ''
  stdout_lines:
...ignoring

TASK [debug task_register_var] ****************************************************
  msg:
    attempts: 5
    changed: true

In the Ansible workshops I am actually using this combination of error handling for Let's Encrypt to make it easy for Ansible users to troubleshoot the issue.  If there are any tasks that have a failure that can be skipped, I can add it to a variable and print it at the end of the workshop playbook (the playbook responsible for provisioning instances for students to use).

- name: failure test playbook
  hosts: localhost
  gather_facts: false
  vars:
    summary_information: |
      PROVISIONER SUMMARY
      *******************

  tasks:
    - name: ISSUE CERT
      shell: certbot certonly --standalone -d student1.testworkshop.rhdemo.io --email ansible-network@redhat.com --noninteractive --agree-tos
      register: issue_cert
      until: issue_cert is not failed
      retries: 5
      ignore_errors: yes

    - name: set facts for output
      set_fact:
      summary_information: |
        {{summary_information}}
        - The Lets Encrypt certbot failed, please check https://letsencrypt.status.io/ to make sure the service is running
      when: issue_cert is failed

    - name: print out summary information
      debug:
        msg: "{{summary_information}}"

This prints out a very easy to understand message to the terminal window:

Terminal Readout

In conclusion, Ansible is extremely flexible at adding some additional logic when it is necessary. The until loop can add robustness and the ignore_errors allows us to determine success criteria. In combination your Ansible Playbooks can be much more user proof, allowing you to have a proactive vs. a reactive approach to troubleshooting issues. Ansible can't control if an API or service is down, but we can definitely operate more robustly than home made scripts or DIY API implementations. The playbooks provided are extremely human readable and easy for novice users to understand.