Thoughts on Restructuring the Ansible Project

Thoughts on Restructuring the Ansible Project

Ansible became popular largely because we adopted some key principles early, and stuck to them.

The first key principle was simplicity: simple to install, simple to use, simple to find documentation and examples, simple to write playbooks, and simple to make contributions.

The second key principle was modularity: Ansible functionality could be easily extended by writing modules, and anyone could write a module and contribute it back to Ansible.

The third key principle was "batteries included": all of the modules for Ansible would be built-in, so you wouldn't have to figure out where to get them. They'd just be there.

We've come a long way by following these principles, and we intend to stick to them.

Recently though, we've been reevaluating how we might better structure Ansible to support these principles. We now find ourselves dealing with problems of scale that are becoming more challenging to solve. Jan-Piet Mens, who has continued to be a close friend to Ansible since our very earliest days, recently described those problems quite succinctly from his perspective as a long-time contributor -- and I think his analysis of the problems we face is quite accurate. Simply, we've become victims of our own success.

Success means growth, and growth means more users, more customers, more contributors, and more responsibilities -- which  bring increases in complexity. We've continued to build tools like Ansibot to help us manage that complexity, but as we continue towards hyperscale, even as we merge more and more community code, we're seeing more pull requests and issues fall through the cracks.

Consider the following visual representation of the evolution of contributions to the Ansible project:

visual representation of the evolution of contributions to the Ansible project

Most of our current challenges stem from increased complexity that our simple model was not built to handle. If we want to break through our current constraints, we're going to need to build a new organizational model to do it.

That's exactly what we've been working on -- and it's taking some time, because it's a complex set of challenges -- but we're getting there.

So let's discuss some of our key challenges.

First, there's the growing support challenge.

Originally, Ansible had a simple policy: if we shipped it, we supported it. In the very beginning, this policy made perfect sense; we had comparatively few modules, and we also had comparatively few customers. The Ansible support team knew all of the modules well enough to provide support for all of them, to anyone who was willing to pay for that support.

In truth, though, supporting modules ourselves can be a tricky proposition, and the larger we grow, the trickier it becomes. The majority of our modules are community maintained. We obviously know Ansible itself very well, but we don't know the community maintained modules as well as our contributors do. In some cases, we may not even have access to the underlying software or hardware with which the modules interface; in such cases we are completely reliant upon our community to keep the modules working.

Some of our community maintainers are exceptionally responsive. Some are less responsive. That's the nature of community developed software. But because all of the modules live in the same place, and are a part of our "batteries included" model, many people -- including paying customers -- don't realize that such a distinction exists.

It's unfair for us to place an enterprise support burden on volunteer contributors. It's also important that we're as clear as possible with our customers about what is fully supported as part of their subscription, and what is not.

Next, there's the lifecycle challenge.

As Ansible itself becomes more mature and used by more enterprise customers, the lifecycle of Ansible is slowing down. Even until fairly recently, we would cut a major release of Ansible every four months, but our most recent release cycle was eight months, and that slower release cycle will become the rule.

This is a challenge because it means that over time it will take longer for new code to reach users. This will be especially constraining for our partners; under the current structure, they can only update their modules and plug-ins on our schedule. We've already received feedback from many partners that they want the ability to release their own modules and plugins independently of our release cycle, and as our release cycle continues to slow down, we expect these calls to grow louder.

Then, there's the challenge of the rising bar.

Everyone, both partners and community, want modules to be ever better: better written, better tested, more secure. With every release, we try to raise the quality bar.

For the upcoming Ansible 2.9 release, for instance, we expect soon to be asking contributors to provide basic integration tests for every module.

That rising bar comes with its own challenges. How do we handle contributions that have previously been good enough, but no longer meet the new standards? How do we deal with contributors who are not necessarily able or willing to do the work necessary to reach these standards? What do we do about existing modules that don't keep up with our rising quality standard -- do we mark them in some way, or do we kick them out of Ansible entirely, even if they're relatively stable modules that a lot of people depend upon? We continue to grapple with these questions.

Which brings us to the new module contributor challenge.

graph of survival curves for Ansible PRs in the past year

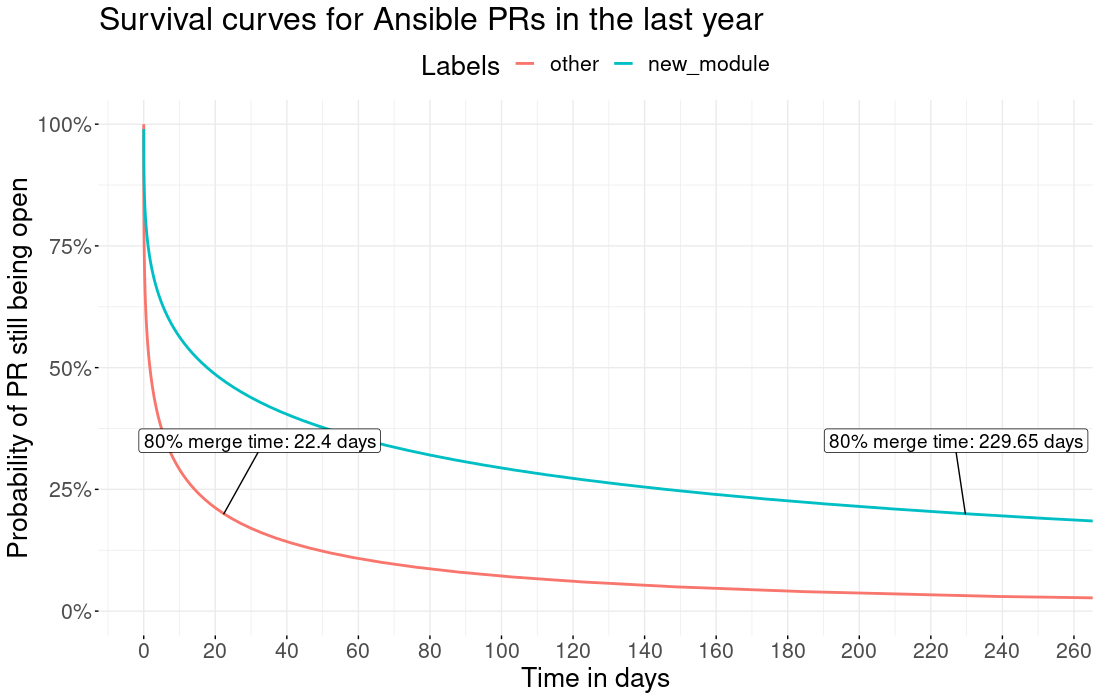
the average merge time for PRs. New Modules (blue) vs everything else (Red). Notice that over the past year, on average 80% of non-new-module PRs are merged within 22.4 days.

As the quality bar goes up, our ability to bring new contributors onboard goes down -- or at least slows down. It just takes contributors more time and effort to get their new modules accepted than it once did.

It's comparatively easy to bring in PRs to extant modules, because those modules generally have maintainers that have earned our collective trust. Our PR merge numbers for extant modules are actually quite good (we can always improve, of course).

But new modules require a higher degree of vetting, because we're not only vetting the code, we're also implicitly vetting the contributors of that code for their interest and ability to maintain that code.

Given our current structure, this is an unfortunate but necessary barrier. Our support challenge makes us more reluctant to merge new modules without strong assurances that the maintainer will be willing and able to maintain those modules to increasingly stringent requirements.

At the heart of all of these challenges is the fact that we've got one code base that's supporting two categories of participants that have different primary interests.

Enterprise users and partners need, more than anything, a stable and well supported platform that they can trust to automate their IT infrastructure.

But our community users and contributors need something else, and that's what Ansible has always delivered in the past: an easy way to install Ansible, and easy ways to contribute to Ansible.

To those of us who lived through the old days at Red Hat, these problems are eerily similar to the problems we experienced around the original Red Hat Linux product -- problems that led to the creation of the Fedora Project and Red Hat Enterprise Linux. Our problems aren't identical, but similar.

Which is why we believe that the solutions should be not identical, but similar.

So let's talk about our proposal to solve some of these challenges.

From a development perspective, Ansible would be broken out into different components:

  • The core engine, which would essentially be the platform to run everything else. Keeping this engine stable, more secure, and well-tested will be critically important for everyone. The Core Team would be responsible for maintaining this engine. Community contribution policies would be the same as present policies.

  • The core modules and plugins, which are the modules and plugins that the Ansible team would support directly. These would be the most used modules and plugins (think template, copy, lineinfile, and so on.) Community contribution policies would be the same as present policies, though no new modules would be introduced.

  • The community modules and plugins, which would be where most non-core modules and plugins would live. Community contribution policies would be relaxed to some degree, to help onboard new content and new contributors, but we would still maintain a bar of quality to help ensure that community content would be functional, documented, and usable. The separate structure would allow the community to be much more effectively involved in the curation process.

  • Various supported partner modules and plugins, which would be broken out and managed more directly by partners. Community contribution policies would be up to the discretion of the individual partners.

All of these different components would be built in the form of Ansible Content Collections, which we first introduced in Ansible 2.8.

From a deployment perspective, Ansible would be delivered in one of two fundamental ways:

  • A batteries-included method, which would be very similar to how Ansible is delivered currently: a bundling of the core engine, all of the core modules and plugins, all of the community modules and plugins, and select partner modules and plugins, all via collections. There would be no official Red Hat support offered for this method.

  • A supported enterprise method, which would be only the fully supported subset of that content: the core modules and plugins, and select partner modules and plugins, all via collections. This would be the method that would be supported by Red Hat as part of the Red Hat Ansible Automation product. Customers would retain the ability to install and use any additional content at their discretion, but the separation between Red Hat supported content and non-Red Hat supported content would be much more explicit.

Both of these methods would depend heavily on Ansible Galaxy as the de facto delivery mechanism, which we would plan to improve substantially to handle the increased traffic load.

Some may note that there are similarities between this new proposed structure and the Ansible Extras structure that we moved to, and then moved away from, a few years back. It's true; there are definite similarities, and many of the advantages and potential disadvantages are the same. It's our hope, and intention, to learn the lessons from that previous attempt to gain the advantages while also mitigating the potential disadvantages.

We believe that these structural changes will help Ansible keep our strong community focus, while also providing the structure necessary to support our growing base of partners and customers. We recognize that these are significant changes, which is why we plan to move very carefully towards them. We want to make sure that we understand the implications of these changes before we make them. None of these changes are imminent, but we believe that we've come to a point at which we are prepared to discuss the possibilities.

There are many questions yet to be answered: infrastructure questions, licensing questions, release policy questions, and others. We will be discussing some of those questions in an upcoming webinar. 

We will also be digging deeply into these questions at our community contributor conference at AnsibleFest Atlanta in September. We hope to see our contributors there in person, but we strive for full remote participation as well, as always. Please join us however you can.

In the early days of Ansible, we could only have dreamt of this kind of success. In our seven years of existence, we have built one of the top open source projects in the world, with a dedicated community pushing us and supporting us from the very beginning. Had we imagined the kinds of challenges we face today, we would surely have put them in the category of "good problems to have."

But "good problems" are still problems, and if we fail to solve them, they won't stay "good problems" for long. It's time for us to take the next step, so that we can continue to be a reliable partner for all of our users, customers, and contributors. Without all of you, we would never have made it nearly so far.


Ansible and ServiceNow Part 2

Parsing facts from network devices using PyATS/Genie

This blog is part two in a series covering how Red Hat Ansible Automation can integrate with ticket automation. This time we'll cover dynamically adding a set of network facts from your switches and routers and into your ServiceNow tickets.

Suppose there was a certain network operating system software version that contained an issue you knew was always causing problems and making your uptime SLA suffer. How could you convince your management to finance an upgrade project? How could you justify to them that the fix would be well worth the cost? Better yet, how would you even know?

A great start would be having metrics that you could track. The ability to data mine against your tickets would prove just how many tickets were involved with hardware running that buggy software version. In this blog, I'll show you how to automate adding a set of facts to all of your tickets going forward. Indisputable facts can then be pulled directly from the device with no chance of mistakes or accidentally being overlooked and not created.

This blog post will demonstrate returning structured data in JSON using Ansible in conjunction with Cisco pyATS and Cisco Genie. This allows us to retrieve the output from operational show commands and convert them in any format we want, in this case pushing them into ServiceNow.

There are many ways to parse facts from network devices with Ansible. The following blog example could also all be done via the open source Network Engine Ansible Role, but for this example we are using Cisco's sponsored pyATS/Genie implementation to parse the following show version command. As you can see this is not very friendly to programmatically interact with:

image7

Step 1: Create a Python3 virtual environment in Red Hat Ansible Tower

With the release of Ansible Tower 3.5, we can now use Python 3 virtual environments (virtualenv) for added playbook flexibility and compatibility across Python versions. This is great news because Python3 is required to use the pyATS and Genie packages. We need to create a new (virtualenv) that is running Python3 and install all of the dependencies.

su -
yum -y install rh-python36
yum -y install python36-devel gcc
scl enable rh-python36 bash
python3.6 -m venv /var/lib/awx/venv/pyats-sandbox
source /var/lib/awx/venv/pyats-sandbox/bin/activate
umask 0022
pip install pyats genie python-memcached psutil pysnow paramiko
pip install -U "ansible == 2.8

Once a custom virtualenv is created a new field appears in the Job Templates section in Ansible Tower. You can select your newly created venv from the following dropdown menu:image1-6

Cisco has released two Python3 packages that are very useful for network automation - pyATS, and Genie. The first one, pyATS, functions as a python framework while Genie builds on top of it. Genie can be used to parse, learn, and diff. Implementing Genie is accomplished by installing and calling the Galaxy role in our playbook named parse_genie.

Step 2: Create a requirements.yml file in your roles directory

roles/requirements.yml

---
- name: parse_genie
  src: https://github.com/clay584/parse_genie
  scm: git
  version: master

By default, Ansible Tower has a system-wide setting that allows roles to be dynamically downloaded via a requirements.yml file in your Git repo. So there is no need to run the ansible-galaxy install -r roles/requirements.yml command like you might do if using Ansible Engine on the CLI.

For more information about Projects in Ansible Tower, refer to the documentation.

Step 3: Call the parse_genie Ansible Role

Now that you have a Python 3 virtualenv in Tower and a roles/requirements.yml file, you can write and test a playbook. In the first play of the playbook, define the name, hosts identified for Ansible to run against, the connection plugin and disabling gather_facts for network devices. Next, create a roles: section and invoke the parse_genie role:

---
- name: parser example
  hosts: ios
  gather_facts: no
  connection: network_cli
  roles:
    - parse_genie

Then create the tasks: section and add a show version task. This will execute the show version command via the ios_command module, then store the output to a variable named version.

tasks:
- name: show version
  ios_command:
    commands:
      - show version
    register: version

The next tasks will apply the parse_genie filter plugin to create structured data out of the show version command we executed. As well as set the structured data as a fact and debug it.

- name: Set Fact Genie Filter
  set_fact:
    pyats_version: "{{ version['stdout'][0] | parse_genie(command='show version', os='ios') }}"

- name: Debug Genie Filter
  debug:
    var: pyats_version

Step 4: Run the Ansible Playbook

At this point the playbook is largely complete and you can execute and then test it.

---
- name: parser example
  hosts: ios
  gather_facts: no
  connection: network_cli
  roles:
    - parse_genie

tasks:
- name: show version
  ios_command:
    commands:
      - show version
  register: version

- name: Set Fact Genie Filter
  set_fact:
    pyats_version: "{{ version['stdout'][0] | parse_genie(command='show version', os='ios') }}"

- name: Debug Genie Filter
  debug:
    var: pyats_version

The parser takes the command output and creates a structured data in JSON format. The facts that you want to use later in your playbook, are now easily accessible.

Step 5: Validate the Ansible Playbook run

After running the playbook (we did it via Ansible Tower), the following is the debug Genie Filter Task from playbook run:

image6-2

The full output:

TASK [Debug Genie Filter] ******************************************************

ok: [192.168.161.9] => {
    "msg": {
        "version": {
            "chassis": "WS-C3550-24",
            "chassis_sn": "CAT0651Z1E8",
            "curr_config_register": "0x10F",
            "hostname": "nco-rtr-9",
            "image_id": "C3550-IPSERVICESK9-M",
            "image_type": "developer image",
            "last_reload_reason": "warm-reset",
            "main_mem": "65526",
            "number_of_intfs": {
                "FastEthernet": "24",
                "Gigabit Ethernet": "2"
            },
            "os": "C3550 boot loader",
            "platform": "C3550",
            "processor_type": "PowerPC",
            "rom": "Bootstrap program is C3550 boot loader",
            "rtr_type": "WS-C3550-24",
            "system_image": "flash:c3550-ipservicesk9-mz.122-44.SE3/c3550-ipservicesk9-mz.122-44.SE3.bin",
            "uptime": "44 minutes",
            "version": "12.2(44)SE3",
            "version_short": "12.2"
        }
       }
}

Step 6: Integrate parsed content into ServiceNow tickets

What I would like to do now is add some new fields in the ServiceNow incident layout. Let's add the version, uptime, hostname, platform, device type, serial number, and last reload reason facts to every incident ticket Ansible creates.

In the ServiceNow Web dashboard, add these new fields in Configure > Form Layout.

image2-6

Now when you run your playbook from part one of this blog with the table parameter set as incident. When you debug the incident.record dictionary it should now have the new fields you just created, such as u_device_up_time, u_ios_version, etc.

Snippet of the record dictionary the ServiceNow API sends back:

image4-3

We can use these new fields in the data section of our Ansible Playbook that uses the snow_record module. The following is the complete playbook that runs the show version command, parses the output and adds the parameters into the new fields:

---
- name: create ticket with notes
  hosts: ios
  gather_facts: no
  connection: network_cli
  roles:
    - parse_genie

  tasks:
  - name: include vars
    include_vars: incident_vars.yml

  - name: show version
    ios_command:
      commands:
        - show version
    register: version

  - name: Set Fact Genie Filter
    set_fact:
      pyats_version: "{{ version['stdout'][0] | parse_genie(command='show version', os='ios') }}"

# Example 1 showing version information
  - name: Debug Pyats facts
    debug:
      var: pyats_version.version.version

# Example 2 showing uptime
  - name: Debug Pyats facts
    debug:
      var: pyats_version.version.uptime

  - name: Create an incident
    snow_record:
      state: present
      table: incident
      username: "{{ sn_username }}"
      password: "{{ sn_password }}"
      instance: "{{ sn_instance }}"
      data:
        priority: "{{ sn_priority}}"
        u_device_up_time: "{{ pyats_version.version.uptime }}"
        u_ios_version: "{{ pyats_version.version.version }}"
        u_hostname: "{{ pyats_version.version.hostname }}"
        u_platform: "{{ pyats_version.version.platform }}"
        u_device_type: "{{ pyats_version.version.rtr_type }}"
        u_serial_number: "{{ pyats_version.version.chassis_sn }}"
        u_last_reload_reason: "{{ pyats_version.version.last_reload_reason }}"
        short_description: "This ticket was created by Ansible"

  - debug: var=new_incident.record.number

Two additional debug examples are provided above to show how to work with the pyATS dictionary that was returned. With structured output it is much easier to grab the specific information you want using the key (e.g. pyats_version.version.uptime is the key that returns the value for the uptime of the system). The full dictionary is provided above in step 5.

The following screenshot is the output of the playbook shown from Red Hat Ansible Tower:

image3-3

The new fields are now populated in our ServiceNow incident ticket:

image5 copy

During an outage things can become chaotic. We have all seen how on certain days in the network field, tickets can become a very low priority. Automating the creation and dynamic facts solves this and allows engineers to remain focused on the outage.

Final thoughts

Something like this may help your organization adopt automation in steps. These Ansible Playbooks are low risk because they do not modify any configurations, they are read-only. This might be a great first step for network engineers, without having to be doing holistic automation or even config management. You may consider replacing the ios entry in the filter plugin to use ansible_network_os variable that was introduced with the network_cli connection plugin. That way you could run against nxos, ios, junos, etc. all in the same inventory and playbook run. In this blog we left it as ios so it could be easier to grasp if this is your first time seeing it.

Stay tuned for part 3 of this series - we will cover integration from ServiceNow to Ansible Tower's API. Where you can automatically have ServiceNow execute Ansible Playbooks.


The Song Remains The Same

The Song Remains The Same

Now that Red Hat is a part of IBM, some people may wonder about the future of the Ansible project.

Here is the good news: the Ansible community strategy has not changed.

As always, we want to make it as easy as possible to work with any projects and communities who want to work with Ansible. With the resources of IBM behind us, we plan to accelerate these efforts. We want to do more integrations with more open source communities and more technologies.

One of the reasons we are excited for the merger is that IBM understands the importance of a broad and diverse community. Search for "Ansible plus open source project" and you can find Ansible information, such as playbooks and modules and blog posts and videos and slide decks, intended to make working with that project easier. We have thousands of people attending Ansible meetups and events all over the world. We have millions of downloads. We have had this momentum because we provide users flexibility and freedom. IBM is committed to our independence as a community so that we can continue this work.

We've worked hard to be good open source citizens. We value the trust that we've built with our users and our contributors, and we intend to continue to live up to the trust that our community has placed in us. IBM is committed to the same ideals and will be supportive of our ongoing efforts to build a strong, diverse community. The song remains the same.

If you have questions or would like to learn more about the IBM acquisition, we encourage you to review the list of materials below. Red Hat CTO Chris Wright will host an online Q&A session July 23 in the coming days where you can ask questions you may have about what the acquisition means for Red Hat and our involvement in open source communities. Details will be announced on the Red Hat blog.

Additional resources:


Configure Network Cards by PCI Address with Ansible Facts

Configure Network Cards by PCI Address with Ansible Facts

In this post, you will learn advanced applications of Ansible facts to configure Linux networking. Instead of hard-coding device names, you will find out how to specify network devices by PCI addresses. This prepares your configuration to work on different Red Hat Enterprise Linux releases with different network naming schemes.

Red Hat Enterprise Linux System Roles

The RHEL System Roles provide a uniform configuration interface across multiple RHEL releases. However, the names of network devices in modern Linux distributions can often not be stable for various releases. In the past, the kernel named the devices after their order of appearance. The first device got the name eth0, the next eth1, and so on.

To make the device names more reliable, developers introduced other methods. This interferes with creating a release-independent network configuration based on interface names. An initial solution to this problem is to address network cards by MAC address. But this will require an up-to-date inventory with MAC addresses of all network cards. Also, it requires updating the inventory after replacing broken hardware. This results in extra work. To avoid this effort, it would be great to be able to specify network cards by their PCI address. With a uniform hardware setup (same model, same slot, same motherboard), the PCI address should be stable. This is because it defines the PCI bus, device and function.

Ansible facts

Ansible facts already expose the PCI address for network cards as pciid. The following playbook shows how to obtain the PCI address for the network card enp0s31f6:

---
- hosts: localhost
  vars:
    nic: enp0s31f6
  tasks:
    - name: Show PCI address (pciid) for a network card
      debug:
        msg: "The PCI address for {{ nic }} is {{ ansible_facts[nic]['pciid'] }}."

When running the playbook, it shows that the PCI address in this case is 0000:00:1f.6:

ansible-playbook show_pciid.yml
[...]

TASK [Show PCI address (pciid) for a network card] **************************
ok: [localhost] => {
    "msg": "The PCI address for enp0s31f6 is 0000:00:1f.6."
}

[...]

Transforming the facts

Selecting a network card by PCI address is not always straightforward. Ansible facts can't query devices by their attributes directly. Luckily, there are filters in Ansible that make it possible to reorganize the facts. From them, the json_query filter allows users to reorganize and filter data using the JMESPath query language for JSON. To be able to use it, you might need to install the python2-jmespath or python3-jmespath package. Ansible uses a dictionary with the device names as keys to organize the network facts. But we need the key to be the PCI address. To do this, we will use a JMESPath expression that extracts all values of the Ansible facts dictionary (@.*) and then selects only the values that contain a pciid key ([?pciid]). Then we will use the expression {key: pciid, value: device} to create a new dictionary with an item named key for the PCI ID and one named value for the interface name. This structure allows us to use the items2dict filter (introduced in Ansible 2.7) to build the final dictionary.

Example

The following playbook shows how to create the dictionary device_by_pci_address this way. It will contain a mapping from PCI address to device name:

---
- hosts: localhost
  vars:
    pci_address: "0000:00:1f.6"
    device_by_pci_address: "{{
        ansible_facts | json_query('@.* | [?pciid].{key: pciid, value: device}') | items2dict
    }}"

The following tasks shows the structure of this dictionary and how to use it:

tasks:
  - name: Show devices by PCI address
    debug:
      var: device_by_pci_address
  - name: "Show device with PCI address {{ pci_address }}"
    debug:
      msg: "The device {{ device_by_pci_address[pci_address] }} is at the
         PCI address {{ pci_address }}"

When running these tasks, Ansible outputs the following:

TASK [Show devices by PCI address] *****************************************
ok: [localhost] => {
    "device_by_pci_address": {
        "0000:00:1f.6": "enp0s31f6",
        "0000:3a:00.0": "wlp58s0",
        "6-1:1.0": "enp8s0u1"
    }
}

TASK [Show device with PCI address 0000:00:1f.6] ***************************
ok: [localhost] => {
    "msg": "The device enp0s31f6 is at the PCI address 0000:00:1f.6"
}

If you look carefully, you will notice one device has a different PCI address format (6-1:1.0). This is actually a USB device. On virtual machines you might encounter other types of addresses. Virtio devices have addresses like virtio0, virtio1 and so on. Using the device name in the configuration makes it still specific for certain releases. With a small change it is also possible to look up MAC addresses:

---
- hosts: localhost
  vars:
    pci_address: "0000:00:1f.6"
    macaddress_by_pci_address: "{{
        ansible_facts | json_query('@.* | [?pciid].{key: pciid, value: macaddress}') | items2dict
    }}"

[...]

Note that we changed value: device to value: macaddress here.

Combining with the network role

To put this all together, here is an example about how to use these variables with the Network RHEL System Role:

---
- hosts: localhost
  vars:
    pciid: "0000:00:1f.6"
    macaddress_by_pci_address: "{{
        ansible_facts | json_query('@.* | [?pciid].{key: pciid, value: macaddress}') | items2dict
    }}"
    network_connections:
      - name: internal_network
        mac: "{{ macaddress_by_pci_address[pciid] }}"
        type: ethernet
        state: up
        ip:
          address:
            - 192.0.2.73/31

  tasks:
    - name: Import network role
      import_role:
        name: rhel-system-roles.network

This will configure the connection profile internal_network. It limits the profile to the device at the PCI address 0000:00:1f.6 using the device's MAC address.

Outlook

Since the on-disk configuration still uses the MAC address, changing a network card will require to run the playbook again. To avoid this, NetworkManager would need to allow specifying the PCI address in the configuration directly. I filed an RFE proposal for NetworkManager to support this in the future. Depending on the installed version of the Jinja2 templating engine, the dict() constructor allows to create the dictionary without items2dict:

vars:
  macaddress_by_pci_addresss: "{{
      dict(ansible_facts | json_query('@.* | [?pciid].[pciid, macaddress]'))
  }}"

This works on RHEL 8 and recent versions of Fedora now. But, RHEL 7 does not support it, yet.

Conclusion

In this post, we've learned about network interface naming in modern versions of Linux. The ability to identify the PCI address for network cards becomes useful in larger environments to maintain consistency. Being able to transform facts in Ansible Automation allows for many possibilities, including using facts to identify which device to configure when used with RHEL System Roles or any other role for that matter.

If you are interested in learning more about certified networking modules approved by the Ansible community and Red Hat, check out [nsible Automation Certified Content today! Or, you can learn more about Ansible network automation solutions. 


Ansible and ServiceNow Part 1, Opening and Closing Tickets

Ansible and ServiceNow Part 1, Opening and Closing Tickets

As a Network Engineer, I hated filling out tickets. Anytime a router would reboot or a power outage took place at a remote site, the resulting ticket generation took up about 50% of my day. If there had been a way to automate ticket creation, I would have saved a lot of time. The only thing unique to provide would have been case-specific comment sections needing additional information about the issue.

While ticket creation was a vital activity, automating this was not an option at the time. This is surprising because my management was always asking me to include more information in my tickets. Tickets were often reviewed months later and sometimes never got created or did not have much relevant information included.

Fast forward to today, companies are now data mining from tickets with a standard set of facts that are pulled directly from the device during ticket creation, such as network platform, software version, uptime, etc.  Network operations (NetOps) teams now use massive amounts of ticket data to make budget decisions.

For example, if there were 400 network outages due to power issues, NetOps could then make a case to spend \$40,000 on battery backups, having proved that it would prevent around 400 outages a year. Having access to these metrics is extremely valuable for making informed business decisions.

This first blog in the series covers how Ansible automates change requests from ServiceNow, a popular cloud-based SaaS provider. For convenience, ServiceNow provides developers a test instance to use Ansible Playbooks, which is utilized for this and future blog posts. You can sign up for your own free developers instance at the ServiceNow Developer portal.

Creating a ServiceNow ticket

The Ansible distribution includes the snow_record module that makes it easy to open and close ServiceNow tickets. The pysnow Python library will first need to be installed to use this module.

The next requirement is getting the username, password and instance for authentication to your recently created developer cloud based ServiceNow instance.

NOTE: the instance should look something like this instance: dev99999 not the full URL

instance:_http://dev99999.service-now.com as shown below in change_request_vars.yml:

---
#snow_record variables

sn_username: admin
sn_password: my_password
sn_instance: dev99999

#data variables

sn_severity: 2
sn_priority: 2

The following is the Ansible Playbook to create a ServiceNow ticket:

---
- name: Create ticket with notes
  hosts: localhost
  gather_facts: no
  connection: local

  tasks:
  - name: include vars
    include_vars: change_request_vars.yml

  - name: Create a change request
    snow_record:
      state: present
      table: change_request
      username: "{{ sn_username }}"
      password: "{{ sn_password }}"
      instance: "{{ sn_instance }}"
      data:
        severity: "{{ sn_severity }}"
        priority: "{{ sn_priority }}"
        short_description: "This is a test opened by Ansible"
    register: new_incident

  - debug:
      var: new_incident.record

Leveraging the ServiceNow API

The table parameter determines what type of ticket will be opened. A great way to determine the other parameters available is to view the JSON dictionary the ServiceNow API sends back after you have created your ticket. I am using register to give a variable name to that dictionary and then using debug to view it in the terminal. The following is just a portion of the full dictionary for the sake of brevity:

blog_leverage-servicenow-api

This is very handy in spelling out the parameters you can add under the data section of your task. If you want to see just one parameter of the dictionary, for example the ticket number, you can simply modify your debug to look like the following:

- debug: var=new_incident.record.number

This variable (var) is defined as pulling from the stored register new_change_request to then show the dictionary named record and the parameter of that dictionary called number.

blog_leverage-servicenow-api-2

You could do the same thing with any parameter of the record dictionary such as close_code, state, comments, and many others.

Validating changes in ServiceNow web portal

Next, log into your developers instance of ServiceNow and view the Change->all section in the left menu bar. You should see your change request in the list.

blog_servicenow-screen

Notice that the short description has been filled out by our Ansible Playbook task: This is a test opened by Ansible as well as the priority 2 - High.

blog_servicenow-screen-2

Closing a ServiceNow ticket

Now that we've demonstrated the opening of ServiceNow tickets, we should demonstrate closing or resolving the ticket as well. This is done by specifying the state parameter in another Ansible task. This is where it can get tricky because state is a parameter of the record dictionary as well as a parameter of the snow_record module. Please be mindful of this multi-purpose parameter used in Ansible.

The following is a snippet from the record dictionary when we created our ticket:

blog_closing-servicenow-ticket

Notice the original state was -5. The Ansible task below will change it to -3, which results in a ticket state changing from New to Authorize.

---
  - name: Modify a change request
    snow_record:
      state: present
      table: change_request
      username: "{{ sn_username }}"
      password: "{{ sn_password }}"
      instance: "{{ sn_instance }}"
      number: CHG0030002
      data:
        state: -3
    register: incident

  - debug: 
      var: incident.record.state

In ServiceNow a change_request needs to be walked through a few different states before it can be closed. The numeric values for the different states can be found in the ServiceNow documentation. I recommend you have five separate Ansible tasks that each change the state in this order: -3, -2, -1, 0, 3. Please note that these values are for the ServiceNow Kingston release and that other releases may use different state numbers. Your organization may have other steps required along the way, but hopefully this article was enough to get you started. At this point you've learned how to open tickets, and close tickets with specific labels via Ansible Playbooks.

Stay tuned for part 2 - I'll describe adding a set of parsed facts to your tickets.