Introduction to Ansible Builder
Introduction to Ansible Builder
Hello and welcome to another introductory Ansible blog post, where we'll be covering a new command-line interface (CLI) tool, Ansible Builder. Please note that this article will cover some intermediate-level topics such as containers (Ansible Builder uses Podman by default), virtual environments, and Ansible Content Collections. If you have some familiarity with those topics, then read on to find out what Ansible Builder is, why it was developed, and how to use it.
This project is currently in development upstream on GitHub and is not yet part of the Red Hat Ansible Automation Platform product. As with all Red Hat software, our code is open and we have an open source development model for our enterprise software. The goal of this blog post is to show the current status of this initiative, and start getting the community and customers comfortable with our methodologies, thought process, and concept of Execution Environments. Feedback on this upstream project can be provided on GitHub via comments and issues, or provided via the various methods listed on our website.
What is Ansible Builder?
In a nutshell, Ansible Builder is a tool that aids in the creation of Ansible Execution Environments. To fully understand this, let's step back and discuss what exactly execution environments are.
A Primer on Execution Environments
Before the concept of Execution Environments came about, the Ansible Automation Platform execution system was limited to executing jobs under bubblewrap in order to isolate processes. There were several problems related to this, including the fact that in the cases of Red Hat OpenShift and Kubernetes-based deployments, any container running jobs had to run in privileged mode. In addition to this issue, consuming Ansible Content Collections was very labor-intensive and users faced a lot of challenges managing custom Python virtual environments and Ansible module dependencies. The concept of Execution Environments is the solution to these problems; simply put, they are container images that can be utilized as Ansible control nodes. These container images enable the simplification and automation of outdated processes.
As an example of how useful Execution Environments can be, let's say a developer writes content for Ansible locally by using container technology so that they can create portable automation runtimes; these container images will allow that developer to share pre-packaged Execution Environment, which can be tested and promoted to production. This eliminates a lot of manual steps (e.g. creating a Dockerfile from scratch) and accelerates operations by streamlining development and deployment.
Ansible Builder is a Tool for Building Execution Environments
To enable developers, contributors, and users to take advantage of this
new concept, Ansible Builder was developed to automate the process of
building Execution Environments. It does this by using the dependency
information defined in various Ansible Content Collections, as well as
by the user. Ansible Builder will produce a directory that acts as the
build context for the container image build, which will contain the
Containerfile, along with any other files that need to be added to the image.
Getting Started
Installing
You can install Ansible Builder from the Python Package Index (PyPI) or from the main ansible-builder development branch of the codebase hosted on GitHub. In your terminal, simply run:
$ pip install ansible-builder
Note: Podman is used by default to build images. To use Docker, use
ansible-builder build --container-runtime docker.
Writing a Definition
In the world of Ansible Builder, the "definition" is a YAML file that
outlines the Execution Environment's Collection-level dependencies, base
image source, and overrides for specific items within the Execution
Environment. The ansible-builder build command, which we
will discuss in further detail later, takes the definition file as an
input and then outputs the build context necessary for creating an
Execution Environment image, which it then uses to actually build that
image. That same build context can consistently rebuild the Execution
Environment image elsewhere, which enables users to create distributable
working environments for any Collections.
Below is an example of the content that would be in a definition file:
---
version: 1
dependencies:
  galaxy: requirements.yml
  python: requirements.txt
  system: bindep.txt

additional_build_steps:
  prepend: |
    RUN pip3 install --upgrade pip setuptools
  append:
    - RUN ls -la /etc
Note: The build command will default to using a definition file
named execution-environment.yml.
If you want to use a different file, you will need to specify the file
name with the -f (or --file) flag. This file must be a .yml
formatted file.
In the dependencies section of
the definition file above, the entries that would be listed there may be
a relative path from the directory of the Execution Environment
definition's folder, or an absolute path. Below is an example of what
might be contained in a requirements.yml file,
which points to a valid requirements file for the
ansible-galaxy collection install -r... command:
NOTE: The following collection example is sourced from Automation Hub on cloud.redhat.com and requires a valid Ansible Automation Platform subscription and an upcoming feature to ansible-builder to access.
- For more information on using Automation Hub, refer to the user guide
- For instructions on how to use an ansible.cfg file with Ansible Builder, see the documentation here
---
collections:
  - redhat.openshift
The python entry points to a Python requirements file for pip install -r.
For example, the requirements.txt file might contain the following:
awxkit>=13.0.0
boto>=2.49.0
botocore>=1.12.249
boto3>=1.9.249
openshift>=0.6.2
requests-oauthlib
The bindep
requirements file specifies cross-platform requirements, if there are
any. These get processed by bindep and then passed to dnf (other
platforms are not yet supported as of the publication of this blog
post). An example of the content of a
bindep.txt file is below:
subversion [platform:rpm]
subversion [platform:dpkg]
Additional commands may be specified in the additional_build_steps section, to be executed before the main build steps (prepend) or after (append).
The syntax needs to be either a multi-line string (as shown in the prepend section of the example definition file) or a list (as shown via the example's append section).
Customizable Options
Before we run the build command, let's discuss the customizable options you can use alongside
it.
'-f', '--file'
This flag points to the specific definition file of the Execution Environment; it will default to execution-environment.yml if a different file name is not specified.
'-b', '--base-image'
The parent image for the Execution Environment; when not mentioned, it defaults to quay.io/ansible/ansible-runner:devel.
'-c', '--context'
The directory to use for the build context, if it should be generated in a specific place. The default location is $PWD/context.
'--container-runtime'
Specifies which container runtime to use; the choices are podman (default option) or docker.
'--tag'
The name for the container image being built; when nothing is specified with this flag, the image will be named ansible-execution-env.
As with most CLIs, adding --help at the end of
any Ansible Builder command will provide output in the form of help text
that will display and explain the options available under any particular
command. Below is an example of a command for looking up help text,
along with its corresponding output:
$ ansible-builder --help
usage: ansible-builder [-h] [--version] {build,introspect} ...

Tooling to help build container images for running Ansible content. Get
started by looking at the help for one of the subcommands.

positional arguments:
  {build,introspect}  The command to invoke.
    build             Builds a container image.
    introspect        Introspects collections in folder.

optional arguments:
  -h, --help          show this help message and exit
  --version           Print ansible-builder version and exit.
Start the Build
Let's see what happens when we run the build command!
The build definition will be gathered from the default execution-environment.yml file as shown below:
---
version: 1
dependencies:
  galaxy: requirements.yml

additional_build_steps:
  prepend: |
    RUN pip3 install --upgrade pip setuptools
  append:
    - RUN ls -la /etc
We will be building an image named my_first_ee_image using Docker by running the command below:
$ ansible-builder build --tag my_first_ee_image --container-runtime docker
Using python3 (3.7.7)
File context/introspect.py is already up-to-date.
Writing partial Containerfile without collection requirements
Running command:
  docker build -f context/Dockerfile -t my_first_ee_image context
Sending build context to Docker daemon  14.34kB
Step 1/3 : FROM quay.io/ansible/ansible-runner:devel
devel: Pulling from ansible/ansible-runner
85a0beca2b15: Pulling fs layer
...
e21f0ff5ad71: Pull complete
Digest: sha256:e2b84...
Status: Downloaded newer image for quay.io/ansible/ansible-runner:devel
 ---> 6b886a75333f
Step 2/3 : RUN echo this is a command
 ---> Running in e9cea402bd67
this is a command
Removing intermediate container e9cea402bd67
 ---> 5d253a1fbd54
Step 3/3 : RUN cat /etc/os-release
 ---> Running in 788173de3929
NAME=Fedora
VERSION="32 (Container Image)"
...
VARIANT="Container Image"
VARIANT_ID=container
Removing intermediate container 788173de3929
 ---> df802929c259
Successfully built df802929c259
Successfully tagged my_first_ee_image:latest
Running command:
  docker run --rm -v /Users/bhenderson/Documents/GitHub/ansible-builder/context:/context:Z my_first_ee_image /bin/bash -c python3 /context/introspect.py
python: {}
system: {}

Rewriting Containerfile to capture collection requirements
Running command:
  docker build -f context/Dockerfile -t my_first_ee_image context
Sending build context to Docker daemon  14.34kB
Step 1/4 : FROM quay.io/ansible/ansible-runner:devel
 ---> 6b886a75333f
Step 2/4 : RUN echo this is a command
 ---> Using cache
 ---> 5d253a1fbd54
Step 3/4 : RUN cat /etc/os-release
 ---> Using cache
 ---> df802929c259
Removing intermediate container 6bd2a824fe4f
 ---> ba254aa08b88
Step 4/4 : RUN ls -la /etc
 ---> Running in aa3d855d3ae7
total 1072
drwxr-xr-x 1 root root   4096 Sep 28 13:25 .
...
drwxr-xr-x 2 root root   4096 Jul  9 06:48 yum.repos.d
Removing intermediate container aa3d855d3ae7
 ---> 0b386b132825
Successfully built 0b386b132825
Successfully tagged my_first_ee_image:latest
Complete! The build context can be found at: context
As you can see from the output above, the definition file points to the specific Collection(s) listed, then builds a container image with all of the dependencies specified in the metadata. Output such as:
Step 2/3 : RUN echo this is a command
 ---> Running in e9cea402bd67
this is a command
and
Step 4/4 : RUN ls -la /etc
 ---> Running in aa3d855d3ae7
total 1072
drwxr-xr-x 1 root root   4096 Sep 28 13:25 .
shows that the prepend and append steps are also being run correctly.
The following output shows that we indeed did not list any Python or system requirements:
python: {}
system: {}
Validating with Ansible Runner
Due to this new tool still being in development, we are taking a
shortcut with our current available set of tools to help us validate
against this. That being said, as of now, ansible-runner is a
command-line utility that has the ability to interact with playbooks.
Also, since it is a key part of Execution Environments, our validation
for now will be that the content runs as expected. This will change in
the future; we'll definitely come up with something bigger and better!
So stay tuned.
Now without further ado, let's dive into this...
If you do not have Ansible Runner already installed, you can refer to
its
documentation
for guidance. Below is an example playbook (we'll call it
test.yml) that can be
run via Ansible Runner to ensure that the Execution Environment is
working:
---
- hosts: localhost
  connection: local

  tasks:
    - name: Ensure the myapp Namespace exists.
      redhat.openshift.k8s:
        api_version: v1
        kind: Namespace
        name: myapp
        state: present
To confirm that the my_first_ee_image
Execution Environment image did indeed get built correctly and will work
with the redhat.openshift Collection, run the command below to execute our
test.yml playbook:
$ ansible-runner playbook --container-image=my_first_ee_image test.yml
PLAY [localhost] *************************************************************

TASK [Gathering Facts] *******************************************************
ok: [localhost]

TASK [Ensure the myapp Namespace exists.] ************************************
changed: [localhost]

PLAY RECAP *******************************************************************
Localhost: ok=2 changed=1 unreachable=0 failed=0 skipped=0 rescued=0  ignored=0
Running the command ansible-runner playbook will indicate to Ansible Runner that we want it to execute a playbook
that's similar to running the command ansible-playbook itself.
However, Ansible Runner has additional advantages over a traditional
ansible-playbook command, one of which is to let us take advantage of the Execution
Environment image and its dependencies, which ultimately allows the
playbook to run. For this specific example, note that we also inherited
the kubeconfig set per the redhat.openshift.k8s module; this kubeconfig
is automatically detected and mounted into the Execution Environment
container runtime (just as many other cloud provider modules and SSH
credentials are) without any additional input needed from the user.
Distributing
Execution Environment build contexts (as well as the containers built
from them) can be easily shared via public or private registries. This
new workflow process allows users to automate tasks that were once more
manual (e.g. container images can be scanned and rebuilt automatically
when vulnerabilities are discovered inside). The build context,
generated when we ran the ansible-builder command,
can be committed to source control and utilized later without the need
for Ansible Builder, either locally or on another system.
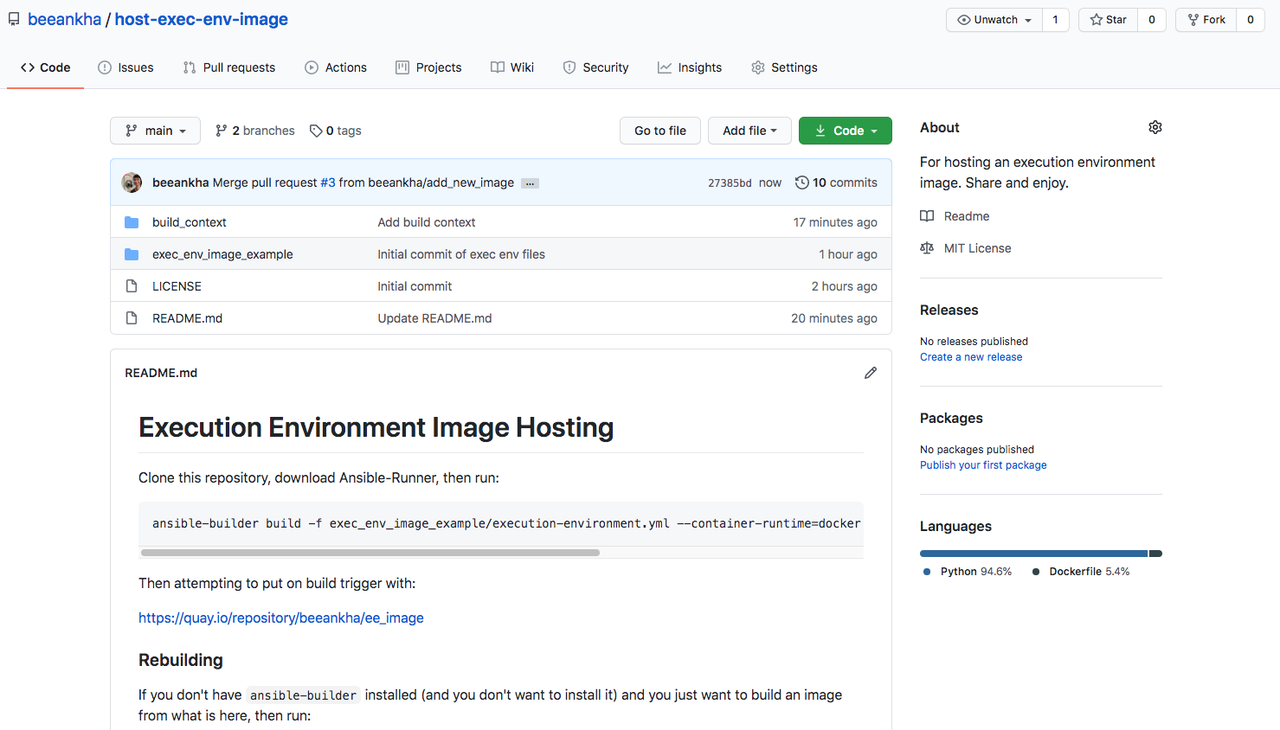
Push to GitHub
After an Execution Environment image has been built using Ansible Builder, all of the build context files can be pushed to GitHub (or any other version control system) for distribution. See below for an example of a repository that hosts everything necessary for re-building a specific image:
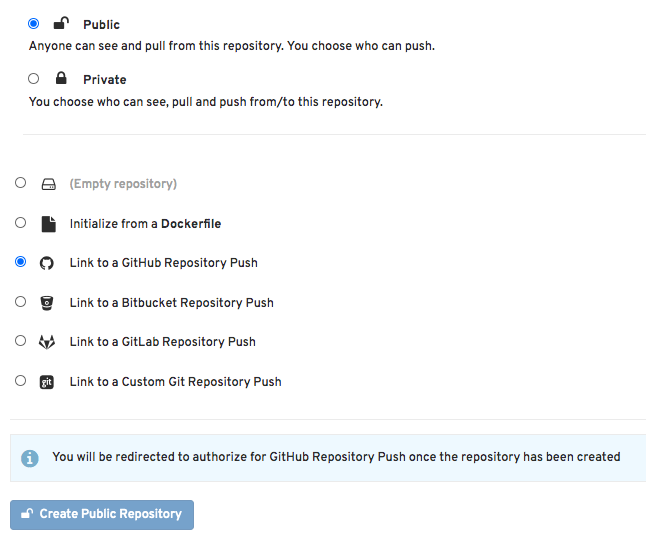
Red Hat Quay is a container image registry that provides storage and enables the building, distribution, and deployment of containers. Set up an account in quay.io and select "Create New Repository". A series of choices will be displayed, starting with what's shown below:
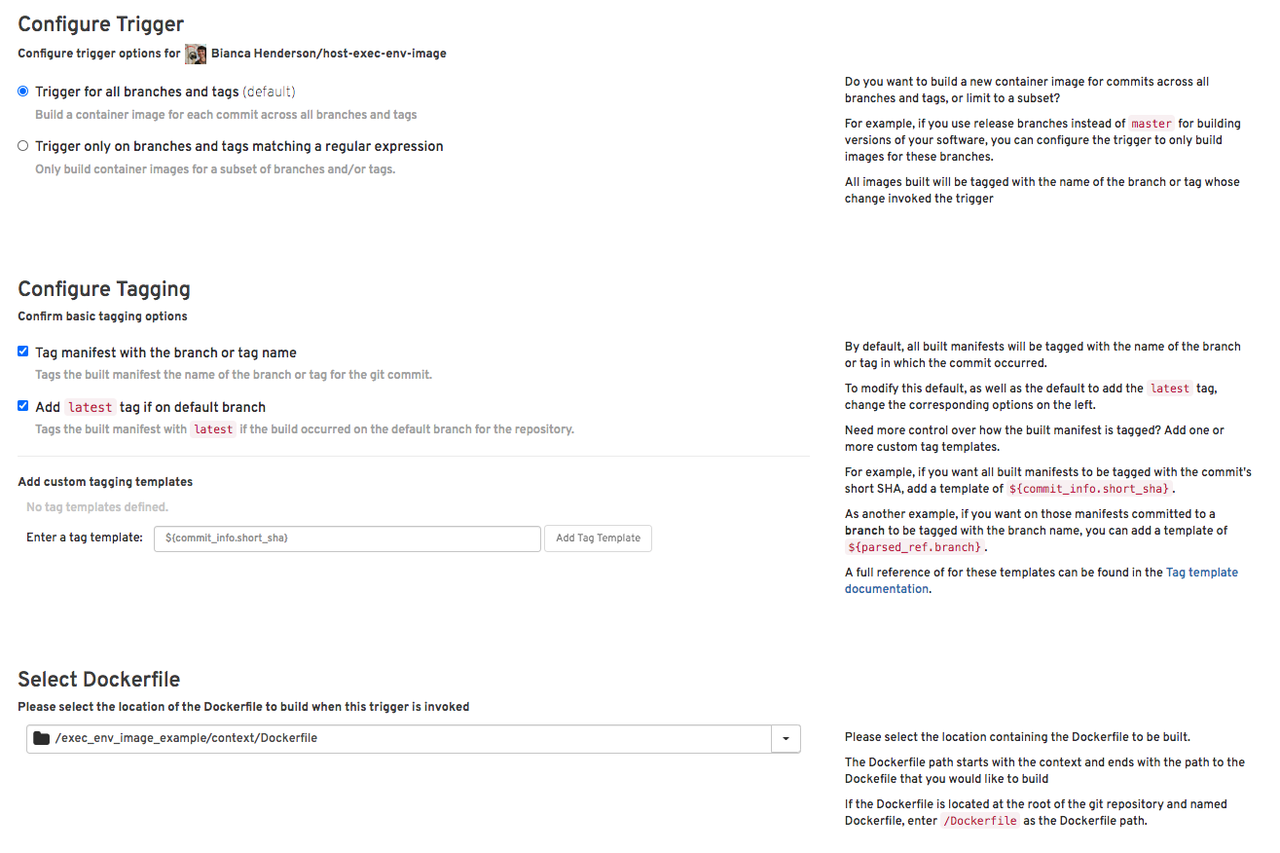
From here, you can select your specific GitHub repository (or wherever you are hosting your image files), then navigate through other settings such as configuring the build triggers, as well as the specific Containerfile/Dockerfile and context, amongst other things:
There are other ways you can also share your Execution Environment images; the above is just a single example of a streamlined and easy-to-integrate method.
Conclusion
We hope you enjoyed learning about Execution Environments and how to build them using the new Ansible Builder CLI tool! In a future version of Red Hat Ansible Automation Platform, Execution Environments will be able to be used to run jobs in Ansible Automation Platform, so keep an eye out for details regarding the next release. For further reading, please refer to the Ansible Builder documentation, Ansible Runner documentation, and be sure to take a look at the Ansible Builder repo on GitHub.