Using Ansible Automation Platform, GitLab CE and webhooks to deploy IIS website

Using Ansible Automation Platform, GitLab CE and webhooks to deploy IIS website

Inside Red Hat Ansible Automation Platform, the Ansible Tower REST API is the key mechanism that helps enable automation to be integrated into processes or tools that exist in an environment. With Ansible Tower 3.6 we have brought direct integration with webhooks from GitHub and GitLab, including the enterprise on-premises versions. This means that changes in source control can trigger automation to apply changes to infrastructure configuration, deploy new services, reconfigure existing applications, and more. In this blog, I'll run through a simple scenario and apply the new integrated webhook feature.

Environment

My environment consists of Ansible Tower (one component of Red Hat Ansible Automation Platform), GitLab CE with a project already created, and a code server running an IDE with the same git repository cloned. A single inventory exists on Ansible Tower with just one host, an instance of Windows 2019 Server running on a certified cloud. For this example, I'm going to deploy IIS on top of this Windows server and make some modifications to the html file that I'd like to serve from this site. 

My playbook to deploy IIS is very simple:

 ---
- name: Configure IIS
  hosts: windows

  tasks:
  - name: Install IIS
    win_feature:
      name: Web-Server
      state: present

  - name: Start IIS service
    win_service:
      name: W3Svc
      state: started

  - name: Create website index.html
    win_copy:
      src: files/web.html
      dest: C:\Inetpub\wwwroot\index.html

All that I am doing here is adding the Web-Server feature, starting IIS and copying my site's html file to the default location for web content being served by IIS. 

My html file is just as basic:

<html>
<title></title>
<body>

</body>
</html>

Objective and setup

What I would like to happen is that, for each merge request that makes changes to this one IIS site, the site should be redeployed with this basic html file.

Colin blog new one

GitLab Access Token

As my webhook is triggered, I would like to update the merge request created in GitLab with the status of my Ansible Tower job. 

To accomplish this, I first have to create a personal access token for my GitLab account so that Ansible Tower can access the GitLab API. This is pretty painless. All I have to do is navigate to my user settings and select "Access Tokens" from the left side navigation panel:

Colin blog two

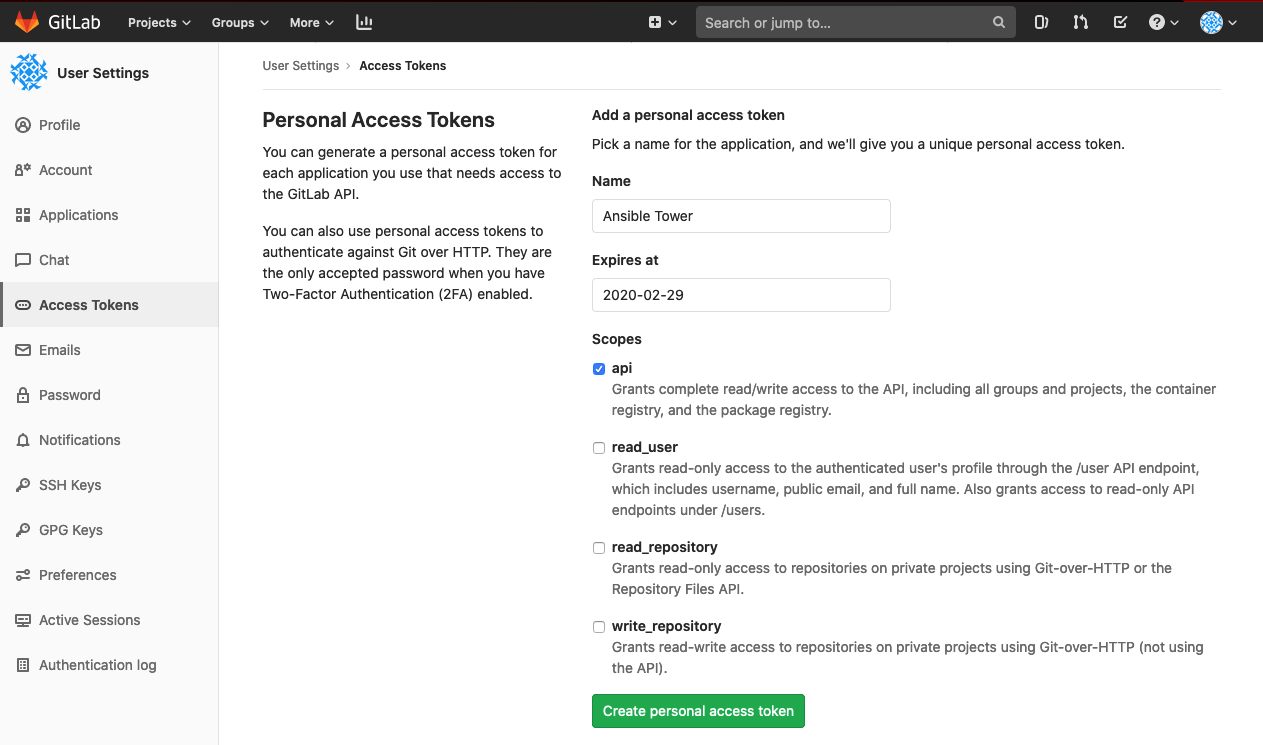
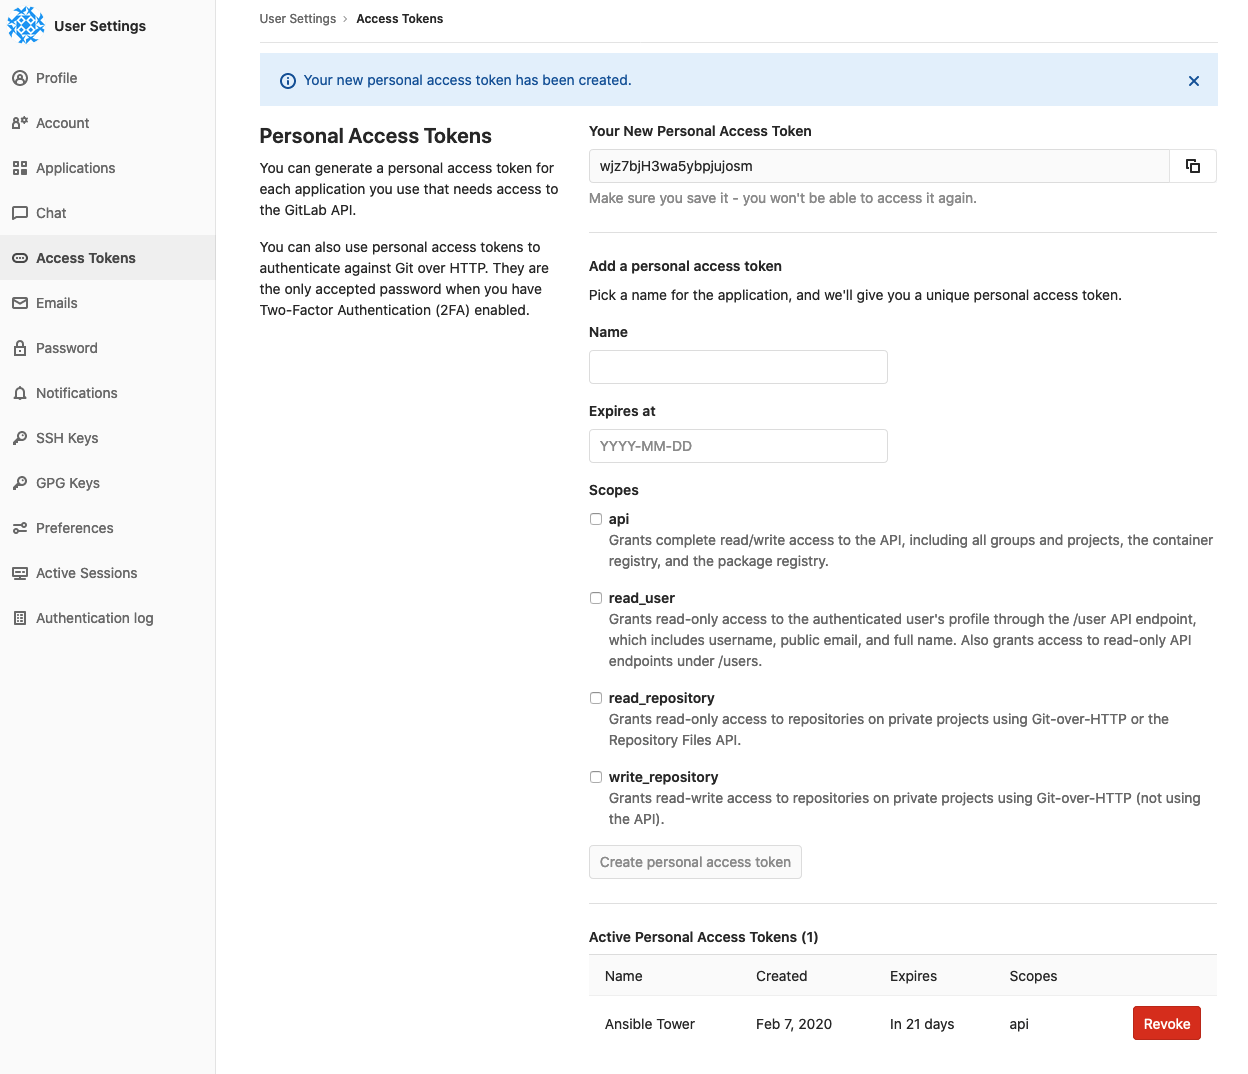
I give my access token an easily recognizable name of "Ansible Tower," set the expiration date to the end of the month, and scope this access token to just the API. Upon clicking "Create personal access token," the token itself becomes visible and a new entry is shown at the bottom of this page:

Colin blog three

Next, I will use this token to create a new credential in Ansible Tower of type "GitLab Personal Access Token":

Colin blog four

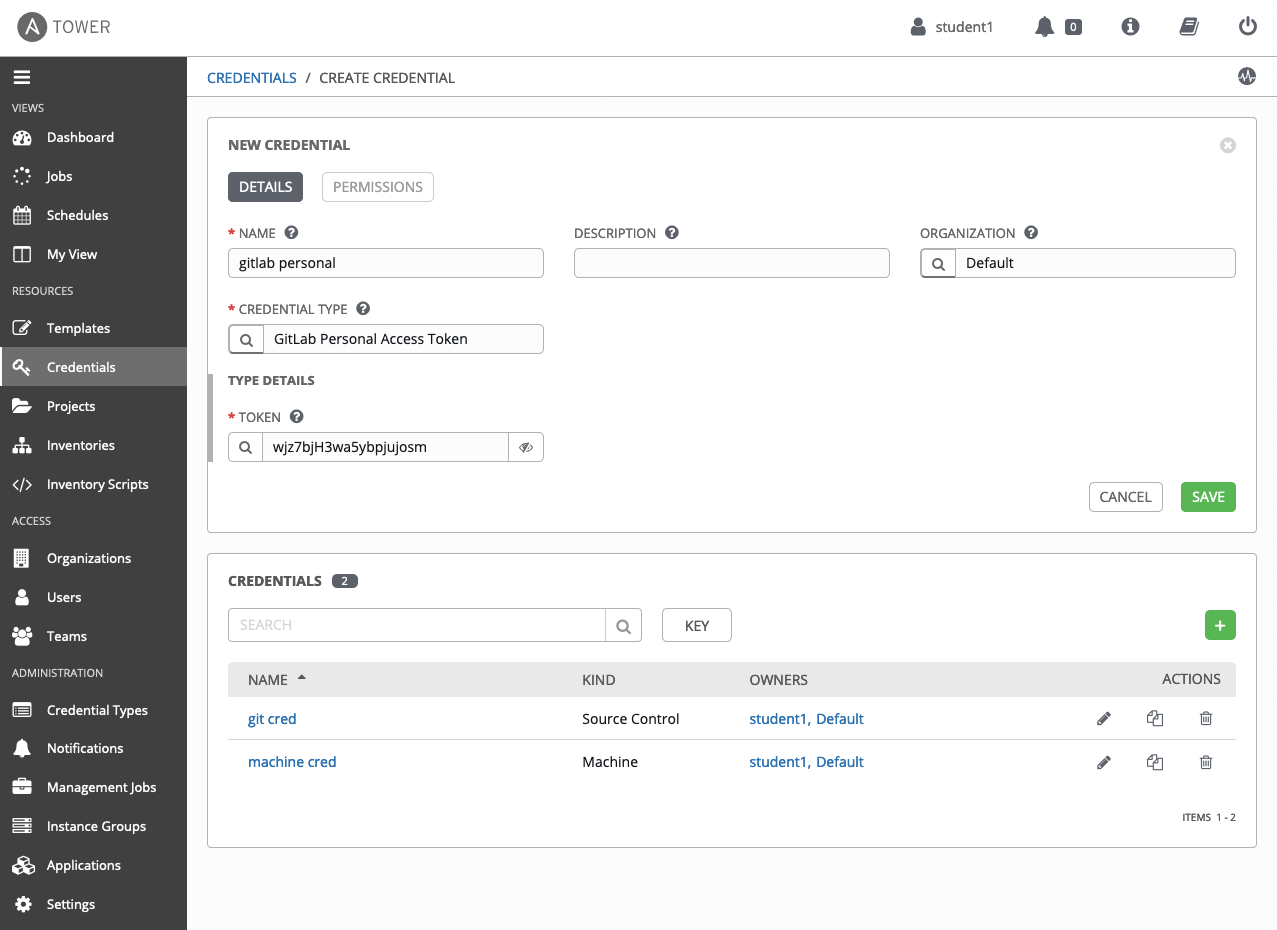
Upon saving, Ansible Tower now has API access to my GitLab account. 

Ansible Tower Job Template

Now that Ansible Tower has the ability to update my merge requests, I need to configure webhook access to my job template that is configured to run my simple IIS playbook. Since the Ansible Tower 3.6 release, there is now a checkbox on each job template called ENABLE WEBHOOK.

coling blog new three

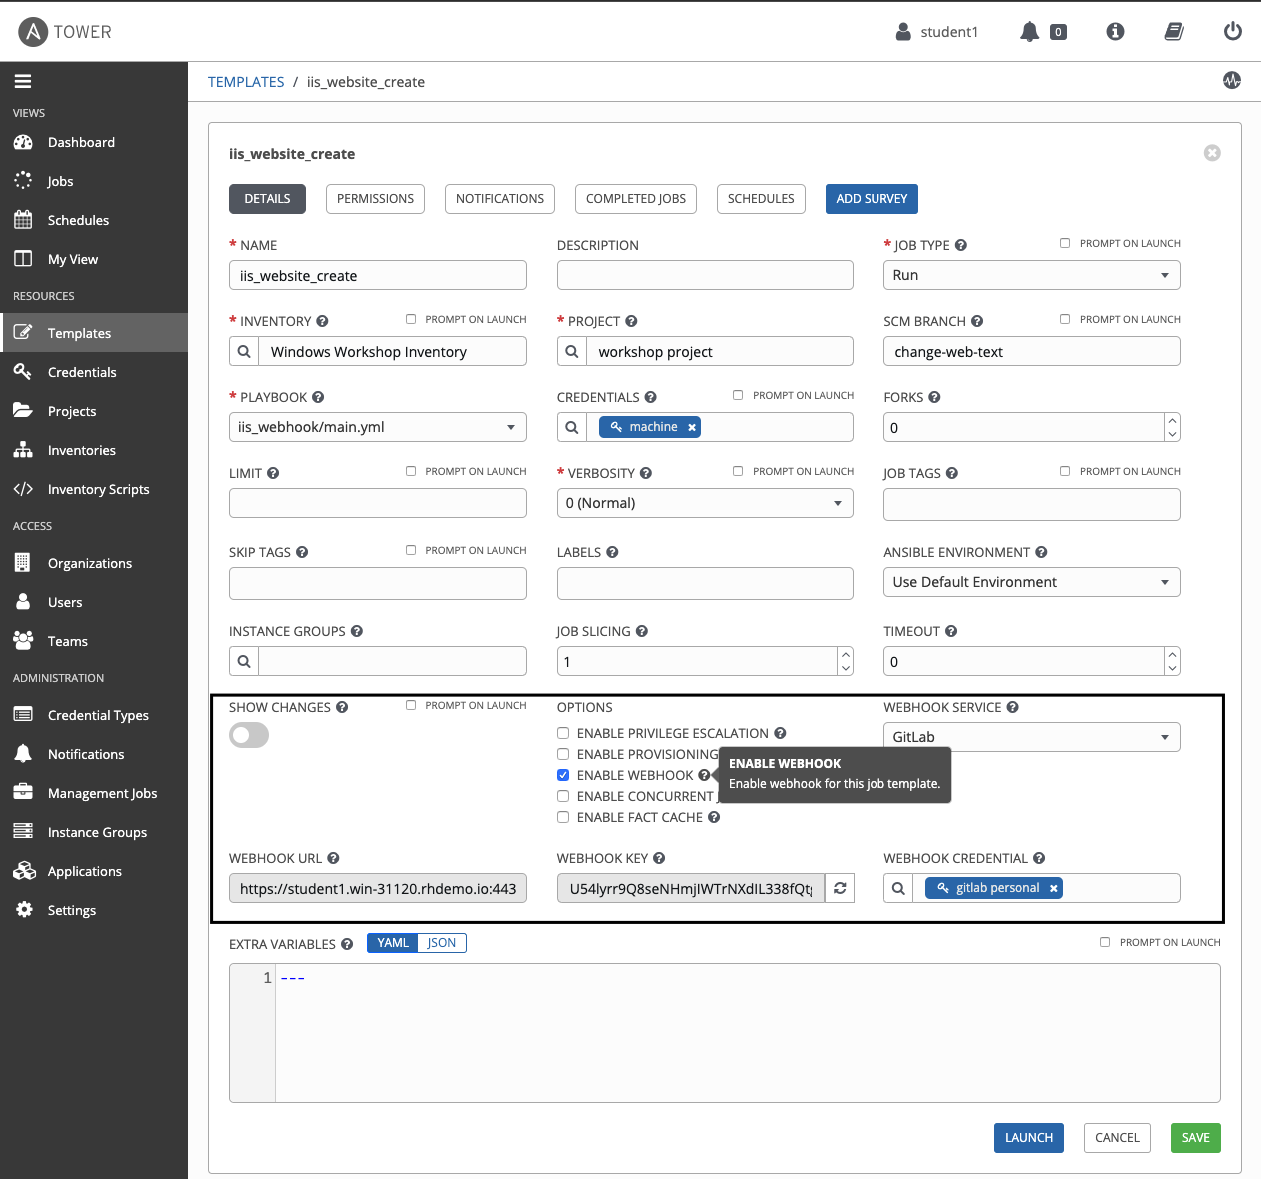
Once I select the option to ENABLE WEBHOOK I am presented with a few new fields. I select GitLab as my WEBHOOK SERVICE, supply the credential I created using my GitLab personal access token, WEBHOOK URL is prepopulated with the path to this job template and, upon saving my modifications, a WEBHOOK KEY is generated which I will use to configure the project hook in GitLab. Also, note that my project allows me to override the SCM branch. This means that the project will pull updates from the "change-web-text" branch instead of Master. 

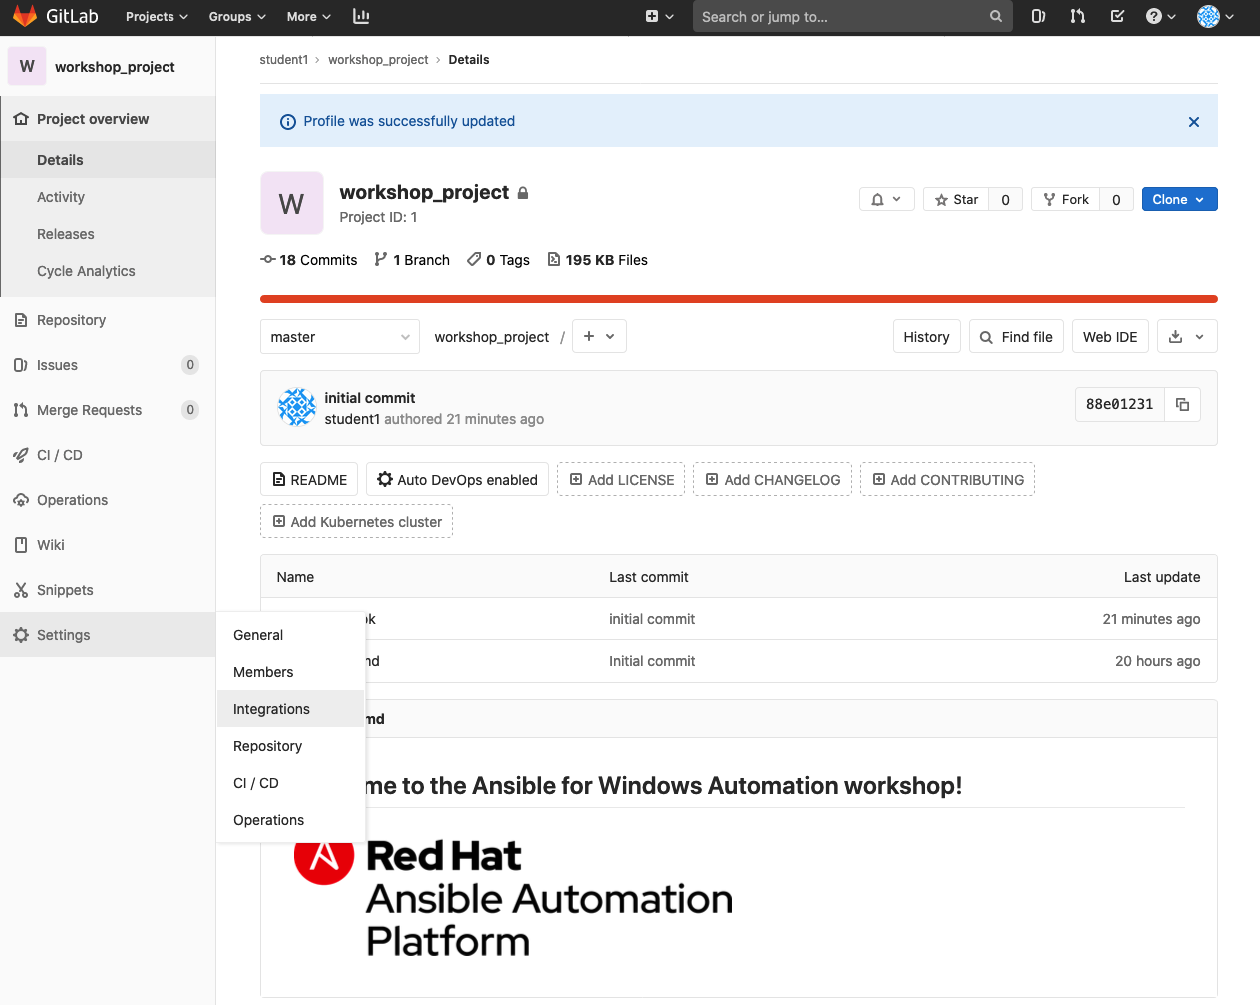
GitLab Project Hook integration

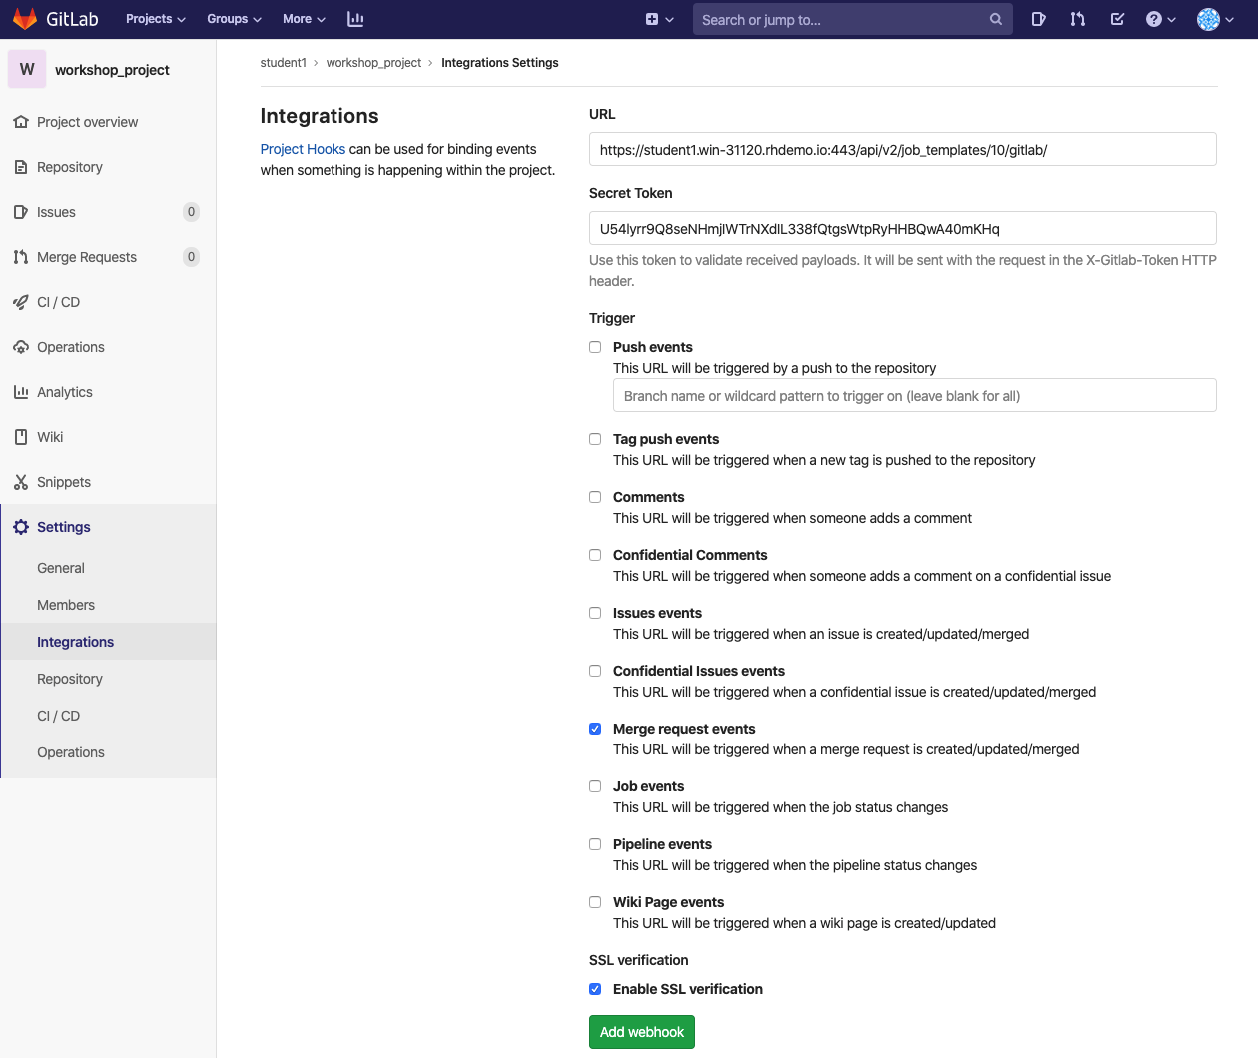
The next step takes me back to GitLab, this time navigating to the integrations page of the project I would like to execute the webhook.

Colin blog six

On the integrations page, I supply the URL (WEBHOOK URL from my job template in Ansible Tower) and Secret Token (WEBHOOK KEY from my job template in Ansible Tower). I also specify the Trigger as "Merge request events" which means that the URL I specified will be launched anytime a merge request is opened.

colin blog new two

In action: Updating my website text

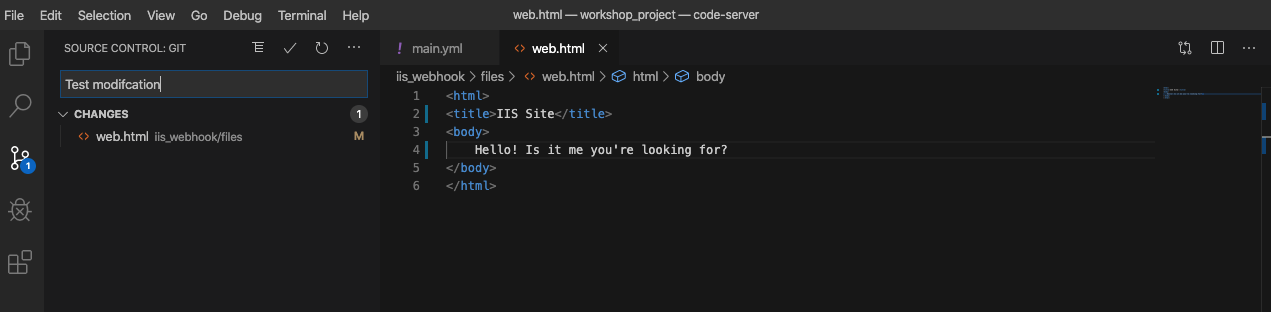
Now that I've given Ansible Tower access to my projects using a personal access token as a new credential type, configured my job template to enable webhooks, and configured a Project Hook on GitLab to respond to merge request events on my project, I'm ready to make a test commit of my html file.

Here, I add text to the <title> and <body> tags of my html document and save the file:

Colin blog eight

Once I've committed my change on my "change-web-text" branch, I will push my code, go back to GitLab and open a merge request to merge changes back into master.

colin new blog

Opening this merge request will now trigger my webhook which will deploy my web page changes to my IIS site. Because I have configured Ansible Tower with my personal access token, Ansible Tower will post a link to the job executed as a result of the webhook trigger on the merge request.

If all has been configured correctly, I should see a new job being executed that corresponds to the job template with the configured webhook. I should also see a job that has been kicked off, updating my project which will pull in the latest changes from my GitLab project.

Colin blog nine

Selecting the job for "iis website create", which is the job template I configured for webhook execution, shows that the job was LAUNCHED BY webhook. EXTRA VARIABLES will show a lot of project specific configuration facts, and more importantly the job output should show that the job is executing what it's supposed to.

Colin blog ten

Upon completion, I should be able to pull up the IP of my IIS server and see the changes to my incredible html page:

Colin blog eleven

Takeaways

Webhooks introduced in Ansible Tower 3.6 are an incredibly powerful way to launch automation in response to events in source control. While this basic website is just a very quick and simple example, applying this functionality to infrastructure as code where all service configurations are defined in Ansible Playbooks greatly emphasizes this robust feature.


Deep dive on VLANS resource modules for network automation

Deep dive on VLANS resource modules for network automation

In October of 2019, as part of Red Hat Ansible Engine 2.9, the Ansible Network Automation team introduced the concept of resource modules.  These opinionated network modules make network automation easier and more consistent for those automating various network platforms in production.  The goal for resource modules was to avoid creating overly complex jinja2 templates for rendering network configuration. This blog post goes through the eos_vlans module for the Arista EOS network platform.  I walk through several examples and describe the use cases for each state parameter and how we envision these being used in real world scenarios.

Before starting let's quickly explain the rationale behind naming of the network resource modules. Notice for resource modules that configure VLANs there is a singular form (eos_vlan, ios_vlan, junos_vlan, etc) and a plural form (eos_vlans, ios_vlans, junos_vlans).  The new resource modules are the plural form that we are covering today. We have deprecated the singular form. This was done so that those using existing network modules would not have their Ansible Playbooks stop working and have sufficient time to migrate to the new network automation modules.

VLAN Example

Let's start with an example of the eos_vlans resource module:

---
- name: add vlans
  hosts: arista
  gather_facts: false
  tasks:
    - name: add VLAN configuration
      eos_vlans:
        config:
          - name: desktops
            vlan_id: 20
          - name: servers
            vlan_id: 30
          - name: printers
            vlan_id: 40
          - name: DMZ
            vlan_id: 50

There is an implicit state parameter which defaults to merged (i.e. state: merged).  If we run this Ansible Playbook VLANs 20,30,40 and 50 will be merged into the running configuration of any device in the arista group.  The show vlan output on a new Arista switch will look like the following:

rtr2#show vlan
VLAN  Name                             Status    Ports
----- -------------------------------- --------- -------------------------------
1     default                          active
20    desktops                         active
30    servers                          active
40    printers                         active
50    DMZ                              active

while the running configuration will look like the following:

rtr2#show running-config | s vlan
vlan 20
   name desktops
!
vlan 30
   name servers
!
vlan 40
   name printers
!
vlan 50
   name DMZ

Now let's make a change manually to the network configuration:

rtr2(config)#vlan 100
rtr2(config-vlan-100)#name artisanal_vlan
rtr2(config-vlan-100)#end
rtr2#wr
Copy completed successfully.

If I re-run the Ansible Playbook it returns with changed=0 because it only cares about the VLANs 20, 30, 40 and 50. It won't remove VLAN 100 because we have the state parameter set to merged by default, so it only will merged the data model it knows about. It is just enforcing configuration policy of the VLANs I am sending.

Using the 'state' parameter

What happens if I change the state parameter to replaced?  Just change the previous example to the following:

---
- name: add vlans
  hosts: arista
  gather_facts: false
  tasks:
    - name: add VLAN configuration
      eos_vlans:
        state: replaced
        config:
          - name: desktops
            vlan_id: 20
          - name: servers
            vlan_id: 30
          - name: printers
            vlan_id: 40
          - name: DMZ
            vlan_id: 50

The Ansible Playbook ran just like before with changed=0. Can we tell if it removed the artisanal_vlan 100?

rtr2#show vlan
VLAN  Name                             Status    Ports
----- -------------------------------- --------- -------------------------------
1     default                          active
20    desktops                         active
30    servers                          active
40    printers                         active
50    DMZ                              active
100   artisanal_vlan                   active

Nope! The goal of resource modules is to update existing resources to match the existing data model. Since our data model (the key, value pairs that represent the VLANs, which are passed under the config parameter in the playbook) only includes VLANs 20, 30, 40 and 50 the eos_vlans module only updates parameters relevant to those particular VLANs.

Why would I use this versus a merged? The major difference between a merged and a replaced is that a merged just makes sure the commands are present that are represented within the data model, whereas the replaced parameter makes your resource match the data model. Let\'s look at the eos_vlans module to see what it considers as part of the vlans resource.

There are three parameters currently used for the vlans resource:

  • name
  • state (active or suspend)
  • vlan_id (range between 1-4094)

Let's look at the following example:

Data Model Sent

- name: desktops
  vlan_id: 20

Existing Arista Config

vlan 200
   state suspend
!

This is how merged compares to replaced:

merged

vlan 200
  name desktops
  state suspend
!

replaced

vlan 200
   name desktops
!

The replaced parameter enforces the data model on the network device for each configured VLAN.  In the example above it will remove the state suspend because it is not within the data model.  To think of this another way, the replaced parameter is aware of commands that shouldn't be there as well as what should.

Using the overridden state parameter

What happens if I change the state parameter to overridden?  Just change the original example to the following:

---
- name: add vlans
  hosts: arista
  gather_facts: false
  tasks:
    - name: add VLAN configuration
      eos_vlans:
        state: overridden
        config:
          - name: desktops
            vlan_id: 20
          - name: servers
            vlan_id: 30
          - name: printers
            vlan_id: 40
          - name: DMZ
            vlan_id: 50

Now run the Ansible Playbook:

screenshot

The Ansible Playbook now has changed=1.  But did it remove the artisanal_vlan 100?

Logging into one of the Arista devices confirms it did!

rtr2#show vlan
VLAN  Name                             Status    Ports
----- -------------------------------- --------- -------------------------------
1     default                          active
20    desktops                         active
30    servers                          active
40    printers                         active
50    DMZ                              active

The overridden parameter will enforce all vlans resources to the data model.  This means it removes VLANs that are not defined in the data model being sent.

Takeaways

There are currently three ways to push configuration using resource modules.  These are the merged, replaced and overridden parameters. These allow much more flexibility for network engineers to adopt automation in incremental steps.  We realize that most folks will start with the merged parameter as they gain familiarity with the new resource module concepts. Over time organizations will move towards the overridden parameter as they adopt a standard SoT (source of truth) for their data models, wherever they reside.


Agnostic network automation examples with Ansible and NRE Labs

Agnostic network automation examples with Ansible and NRE Labs

On February 10th, The NRE Labs project launched four Ansible Network Automation exercises, made possible by Red Hat and Juniper Networks.  This blog post covers job responsibilities of an NRE, the goal of NRE Labs, and a quick overview of new exercises and the concepts Red Hat and Juniper are jointly demonstrating.  The intended audience for these initial exercises is someone new to Ansible Network Automation with limited experience with Ansible and network automation. The initial network topology for these exercises covers Ansible automating Juniper Junos OS and Cumulus VX virtual network instances.

About NRE Labs

Juniper has defined an NRE or network reliability engineer, as someone that can help an organization with modern network automation.  This concept has many different names including DevOps for networks, NetDevOps, or simply just network automation.  Juniper and Red Hat realized that this skill set is new to many traditional network engineers and worked together to create online exercises to help folks get started with Ansible Network Automation.  Specifically, Juniper worked with us through NRE Labs, a project they started and co-sponsor that offers a no-strings-attached, community-centered initiative to bring the skills of automation within reach for everyone. This works through short, simple exercises within your browser.  You can find NRE Labs at the following location: https://nrelabs.io

With Red Hat Ansible Engine 2.9 we introduced the concept of resource modules and native fact gathering, so I wanted to make sure that these exercises covered the latest and greatest aspects of Ansible Network Automation to make this turn key for network engineers.  If you are new to resource modules, native fact gathering or even just the Juniper network platform I think it is worth skimming through these exercises!

Lets begin with a network diagram:

NRE diagram

Each of the four exercises has a different set of objectives outlined, step-by-step instructions and takeaways for your Ansible knowledge.

Exercise 1

This exercise covers what an Ansible INI-based inventory looks like, the Ansible configuration file (ansible.cfg) and running an Ansible Playbook for enabling NETCONF on Juniper Junos.  This exercise also illustrates the concept of idempotency and why it is important for network automation.

Exercise 2 - Facts

This exercise covers native fact gathering (using gather_facts: True) and using the debug module.  We show how to quickly print serial numbers and version numbers to the terminal window using just three tasks.

Exercise 3 - Resource Facts

This exercise covers more in depth fact gathering using the junos_facts module in conjunction with the new gather_network_resources parameter.  This allows the junos_facts module to gather facts from any resource module to read in network configurations and store them as YAML/JSON.  This exercise also covers converting these facts into a structured YAML file.

Exercise 4 - Network Configuration Templates

This exercise covers using and understanding host variables, using simple Jinja2 templating, using the junos_config module for Juniper Junos and the template module for Cumulus Linux.  The overarching goal of this exercise is using Ansible Network Automation to create an OSPF adjacency between the Cumulus VX device cvx11 and the Juniper Junos device vqfx1.


How useful is Ansible in a Cloud-Native Kubernetes Environment?

How useful is Ansible in a Cloud-Native Kubernetes Environment?

A question I've been hearing a lot lately is "why are you still using Ansible in your Kubernetes projects?" Followed often by "what's the point of writing your book Ansible for Kubernetes when Ansible isn't really necessary once you start using Kubernetes?"

I spent a little time thinking about these questions, and the motivation behind them, and wanted to write a blog post addressing them, because it seems a lot of people may be confused about what Kubernetes does, what Ansible does, and why both are necessary technologies in a modern business migrating to a cloud-native technology stack (or even a fully cloud-native business).

One important caveat to mention upfront, and I quote directly from my book:

While Ansible can do almost everything for you, it may not be the right tool for every aspect of your infrastructure automation. Sometimes there are other tools which may more cleanly integrate with your application developers' workflows, or have better support from app vendors.

We should always guard against the golden hammer fallacy. No single infrastructure tool---not even the best Kubernetes-as-a-service platform---can fill the needs of an entire business's IT operation. If anything, we have seen an explosion of specialist tools as is evidenced by the CNCF landscape.

Ansible fits into multiple areas of cloud-native infrastructure management, but I would like to specifically highlight three areas in this post:

Ansible_cloud-native-venn-diagram

Namely, how Ansible fits into the processes for Container Builds, Cluster Management, and Application Lifecycles.

I'd especially caution against teams diving into Kubernetes head first without a broader automation strategy. Kubernetes can't manage your entire application lifecycle, nor can it bootstrap itself; you should not settle for automating the inside of a Kubernetes cluster while using manual processes to build and manage your cluster; this becomes especially dangerous if you manage more than one cluster, as is best practice for most environments (at least having a staging and production cluster, or a private internal cluster and a public facing cluster).

Container Build

In the past decade, server management and application deployment became more and more automated. Usually, automation became more intuitive and maintainable, especially after the introduction of configuration management and orchestration tools like CFEngine, Puppet, Chef, and Ansible.

There's no great solution for all application deployments, though, even with modern automation tools. Java has WAR files and the VM. Python has virtual environments. PHP has scripts and multiple execution engines. Ruby has ruby environments. Running operations teams who can efficiently manage servers and deployments for five, ten, or more development stacks (and sometimes multiple versions of each, like Java 7, Java 8, and Java 11) is a failing proposition.

Luckily, containerization started to solve that issue. Instead of developers handing off source code and expecting operations to be able to handle the intricacies of multiple environments, developers hand off containers, which can be run by a compatible container runtime on almost any modern server environment.

But in some ways, things have stagnated in the container build realm; the Dockerfile, which was nothing more than a shell script with some Docker-specific DSL and hacky inline commands to solve image layer size issues, is still used in many places as the de facto app build script.

Geerling Blog 3

How many times have you encountered an indecipherable Dockerfile like this?

We can do better. Ansible can build and manage containers using Dockerfiles, sure, but Ansible is also very good at building container images directly---and nowadays, you don't even need to install Docker! There are lighter-weight open source build tools like Buildah that integrate with an Ansible container build tool ansible-bender to build containers using more expressive and maintainable Ansible Playbooks.

There are other ways to build containers, too. But I lament the fact that many developers and sysadmins have settled on the lowest common denominator, the Dockerfile, to build their critical infrastructure components, when there are more expressive, maintainable, and universal tools like Ansible which produce the same end result.

Cluster Management

Kubernetes Clusters don't appear out of thin air. Depending on the type of clusters you're using, they require management for upgrades and integrations. Cluster management can become crippling, especially if, like most organizations, you're managing multiple clusters (multiple production clusters, staging and QA clusters, etc.).

If you're running inside a private cloud, or on bare metal servers, you will need a way to install Kubernetes and manage individual servers in the cluster. Ansible has a proven track record of being able to orchestrate multi-server applications, and Kubernetes itself is a multi-server application---which happens to manage one or thousands of other multi-server applications through containerization.

Projects like Kubespray have used Ansible for custom Kubernetes cluster builds and are compatible with dozens of different infrastructure arrangements.

Even if you use a managed Kubernetes offering, like AKS, EKS, or GKE, Ansible has modules like azure_rm_aks, aws_eks_cluster, and gcp_container_cluster, which manage clusters, along with thousands of other modules which simplify and somewhat standardize cluster management among different cloud providers.

Even if you don't need multi-cloud capabilities, Ansible offers useful abstractions like managing CloudFormation template deployments on AWS with the cloudformation module, or Terraform deployments with the terraform module.

It's extremely rare to have an application which can live entirely within Kubernetes and not need to be coordinated with any external resource (e.g. networking device, storage, external database service, etc.). If you're lucky, there may be a Kubernetes Operator to help you integrate your applications with external services, but more often there's not. Here, too, Ansible helps by managing a Kubernetes application along with external integrations, all in one playbook written in cloud-native's lingua franca, YAML.

I'll repeat what I said earlier: you should not settle for automating the inside of a Kubernetes cluster while using manual processes to build and manage your cluster---especially if you have more than one cluster!

Application Lifecycle

The final area where Ansible shows great promise is in managing applications inside of Kubernetes. Using Ansible to build operators with the Operator SDK, you can encode all your application's lifecycle management (deployment, upgrades, backups, etc.) inside of a Kubernetes operator to be placed in any Kubernetes cluster---even if you don't use Ansible to manage anything else in that cluster.

Rather than forcing developers and ops teams to learn Go or another specialized language to maintain an operator, you can build it with YAML and Ansible.

There is a lot of promise here, though there are scenarios---at least, in the current state of the Operator SDK---where you might need to drop back to Go for more advanced use cases. The power comes in the ability to rely on Ansible's thousands of modules from within your running Application operator in the cluster, and in the ease of adoption for any kind of development team.

For teams who already use Ansible, it's a no-brainer to migrate their existing Ansible knowledge, roles, modules, and playbooks into Kubernetes management playbooks and Ansible-based operators. For teams new to Ansible, its flexibility for all things related to IT automation (Networking, Windows, Linux, Security, etc.) and ease of use make it an ideal companion for cloud-native orchestration.


Rebooting Network Devices with Ansible

Rebooting Network Devices with Ansible

With the Red Hat Ansible Automation Platform release in November, we released over 50 network resource modules to help make automating network devices easier and more turn-key for network engineers.  In addition to the new resource modules, Andrius also discussed fact gathering enhancements in his blog post, which means with every new resource module, users gain increased fact coverage for network devices.  For this blog post I want to cover another cool enhancement that may have gone unnoticed. This is the ability for network devices to make use of the wait_for_connection module.  If you are a network engineer that has operational Ansible Playbooks that need to reboot devices or take them offline, this module will help you make more programmatic playbooks to handle disconnects.  By leveraging wait_for_connection network automation playbooks can look and behave more like playbooks for Linux or Windows hosts.

Comparing wait_for and wait_for_connection

There are two great modules that can wait for a condition to be met, wait_for and the wait_for_connection.  I highly recommend against using the pause module if you can get away with it, and I equate it to using a programming equivalent of a sleep within an Ansible Playbook.  Using either of these two wait_for modules is superior to random pauses within your Ansible Playbook because they are a more programmatic solution that is more adaptable to devices taking different amounts of time to complete a task.  The other problem with the pause module is that using prompts does not work within Ansible Tower. A much better solution for human interaction would be to use an Ansible Tower workflow with an approval node.

The wait_for module can wait until a path on a filesystem exists, or until a port is active again.  This works great for most reboot use cases, except for when a system is not able to be logged into immediately after the port is up.  The wait_for_connection extends the functionality of the wait_for use case a bit further. The wait_for_connection module will make sure that Ansible can log back into the device and receive the appropriate prompts before finishing completing the task. For Linux and Windows hosts it will use the ping or win_ping module, for network devices it will make sure the connection plugin that was last used can fully connect to the device.  At the time of this blog post this only works with the network_cli connection plugin.  This means that subsequent tasks can begin operating as intended as soon as wait_for_connection completes versus where wait_for just knows that port is open.

Dealing with prompts

With networking devices when we perform operational tasks such as a reboot, there is often a prompt to confirm that you want to take an action.

For example on a Juniper vSRX device:

admin@rtr3> request system reboot
Reboot the system ? [yes,no] (no)

The user has to confirm the reload to be able to proceed. Something I neglected to cover on my deep dive with cli_command blog was that cli_command module can handle prompts. The cli_command module can even handle multiple prompts! For this example the Cisco router had not saved its config, and we are performing a reload. First the Cisco router will alert me that the System configuration has been modified, and ask me if I want to save this before I lose my running-configuration:

rtr1#reload

System configuration has been modified. Save? [yes/no]:

After confirming yes or no, you will receive a second prompt:

Proceed with reload? [confirm]

We need to build a task that can handle both prompts using the cli_command module:

---
- name: reboot ios device
  cli_command:
    command: reload
    prompt:
      - Save?
      - confirm
    answer:
     - y
     - y

The above task will answer yes to both prompts, saving the config and reloading the device. The list for prompt answer and the list for answer must match and be in the same order. This means that the answer for prompt[0] must be answer[0].

If you want to see a more detailed example of handling multiple prompts, here is an example of a password reset on a Juniper vSRX device.

Using reset_connection in combination

Now that you understand how to reboot the device with cli_command we can combine that with the wait_for_connection to create a reusable Ansible Playbook. However, we need to add one more task, a meta: reset_connection to make this work programmatically.  

We need to make sure the current connection to the network device is closed so that the socket can be reestablished to the network device after the reboot takes place.  If the connection is not closed and the command timeout is longer than the time it takes to reboot, the persistent connection will attempt to reuse the closed SSH connection resulting in the failure "Socket is closed". A correct Ansible Playbook looks like this:

- reboot task (this is a snippet, full task removed for brevity)

- name: reset the connection
  meta: reset_connection

- name: Wait for the network device to reload
  wait_for_connection:
    delay: 10

Now we have an Ansible Playbook that can reconnect to network devices after a reboot is issued! For a full example please refer to this reboot.yml Ansible Playbook for Arista vEOS network devices.

Where to go next?

This blog helped outline how to create reusable Ansible Playbooks for rebooting network devices.  One of the next steps is obviously building out an Ansible Role that can reboot multiple network platforms.  I have gone ahead and created one and uploaded it to Github here.  This role will work on Juniper Junos, Cisco IOS and Arista EOS devices and can be easily modified to handle many more network operating systems.